By Rick Shultz, MBA, DBA
Years ago, I took my first ‘Bike Fitting’ course. It was called ‘Foot Pedal Interface’ offered by BikeFit. It is a very good course and I highly recommend it as a basic requirement for all bike fitters. Why? Because the Foot/Pedal interface is one of the most neglected areas of bike fitting.
Many of my clients tell me of their previous ‘bike ill-fitting’ experiences. Their top complaint is that their previous fitter did not even touch their cleats, and now they are in pain and have a hard time riding their bicycle. My belief is that other fitters really do want to do a good job for their clients, but they sometimes lack the foundational knowledge (i.e., education) to do so. I highly recommend every bike fitter take the Foot/Pedal Interface course from BikeFit.
Wedges
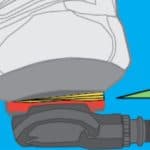
 Wedges (figure 1) play two roles, and this is where the fitter needs to be careful. Wedging has created two distinct camps. One camp says never, the other camp says always. Yes, high drama.
Valgus or Varus?
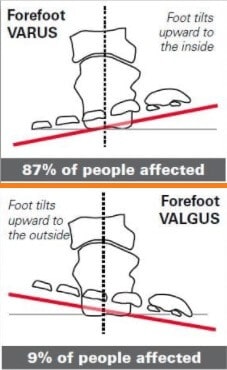
In their relaxed state, your feet will tend to be either tilt big toe up (Varus) or tilt little toe up (Valgus). And her is where the issue is. When the bicycle is sitting upright, the pedals, cleats and shoes are parallel to the ground. But, since your feet are either Valgus or Varus, they do not sit flush to your shoes. The degree of Valgus or Varus is what can cause forefoot pain in the metatarsals, or sesamoids.
Wedging Plays Two Roles
Role 1 – Wedges can ‘fill-in-the-gap’ which is essential for cyclists with extreme Valgus or Varus feet (figure 2). A solution I use is to (a) prescribe wedges (only if there is accompanying foot pain), (b) prescribe a supportive insole like Icebug and (c) long-term fix is for the cyclist to visit a physical therapist who can prescribe foot exercises that can help mitigate an extreme condition.
So, what’s going on?
Here’s a little exercise which will clearly show the issue. Imagine you have an extreme Varus right foot (little toe down). Make sure you are on a hard floor – cement or tile. Place your foot in an extreme Varus position. If you have Varus feet, this is your ‘normal’ position, in other words, the relaxed state your body wants to always return to. Simulate pedaling pressure of the foot by moving the ball of the big toe (1st Metatarsal) down. Your foot will remain in this ‘pushing’ position until about 6 o’clock when you start to transition to the upstroke.
With reduced pressure, your foot will want to return to a Varus position inside the shoe until about 12 o’clock where you transition to pushing again. When you start pushing, you will again flatten out the foot against the bottom of the shoe. To simulate normal pedaling cadence, leave your right foot on the floor and rock the foot from flat to Varus. Faster and faster, 1-1/2 times per second – which is a cadence of 90 RPM. Now, do this for 10,800 times (a typical 2-hour ride). What you are noticing is that you are grinding the 5th metatarsal against the hard carbon of the inside of the shoe. Your 5th metatarsal will start to hurt after a short period of time.
A fix for this is to use 1-2 wedges that, when placed correctly between the sole of the shoe and the cleat, will rotate the shoe into a Varus position as well. Now, in your ‘relaxed’ state, all metatarsals should be in contact with the bottom of the shoe instead of just the 5th metatarsal. I hope this makes sense.
Also, if you are using those floppy insoles that come with most cycling shoes, throw them out and get a good insole that will support your arches better.
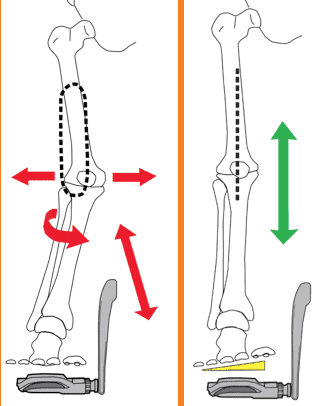 Role 2 – Wedges can also be used to align-the-knee (figure 3). Here’s a little experiment you can do to see how wedges impact knee alignment. While seated, start with your feet flat on the floor, make sure your thighs are straight out in front of you and your knees are at 90°. Take your right foot and create a Varus condition. In other words, raise the ball of your big toe. What happened to your right knee? It rotated outward. Now, create a Valgus condition. What happened to your knee now? It dove inward.
The theory here is that if cyclists’ knees go outward on the way up, use wedges to create an artificial Valgus condition which rotates the knee inward. Even though your knees are now going straight up and down, this is not a natural position for you.
A lot of fitters use this second role to align the knees. I completely disagree with this role and use a completely different approach which is discussed below. This is the controversy.
Artificial Knee Alignment Horror Stories
I recently had two clients visit me after going to another local bike shop for a bike fit. Both complained of newly created knee and hip pain. “So, what’s going on,” I asked? Since both had gone to the same local bike shop, both told me the same story. They said, “The bike fitter had noticed that my knees were going outwards at the top of the pedal stroke, so he placed wedges under my shoes and sold me custom insoles which had wedges built into the forefoot as well as the heel cups.” “Even though my knees are now straight, they now really hurt!”
What’s the Problem?
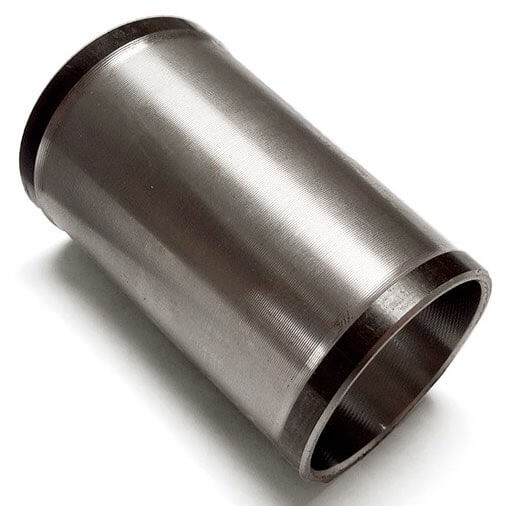 The culprit is pictured to the right (figure 4). A 68mm Bottom Bracket shell for a BB30 road bike. But, they also make 70mm, 79mm, 86.5mm, etc. You ‘gotta’ love the bicycle bottom bracket standard, especially since there are so many of them! What these BB shells have in common is that they are all too narrow for many Americans.
Having a width listed in millimeters (mm), you can probably guess that these are all European specifications. At one point in time, the Europeans were smaller, thinner, lighter and narrower than us Americans. Although, a recent trip to France showed me that they are catching up with us!
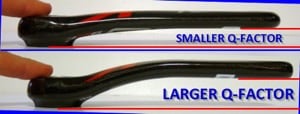
What’s happening is that your hips are at a constant width and, when clipped into the pedals mounted to a crank which is 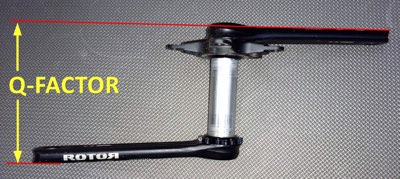 mounted through a narrow bottom bracket. Your hips are wider than your feet so, when you pedal, your knees will follow your hips on the way up and will follow your feet on the way down. The narrower your feet, the more knee movement you can expect. The width of the outside of the crankarms is called Q-factor.
Anyway, there are two ways to straighten out the knees…the right way and the wrong way. In my experience, the wrong way is to use wedges (figure 3) … just ask my two recent clients.
 The correct way is to place the feet under the hips. This is accomplished by widening the pedal stance, or Q-Factor. There are several ways to accomplish this.
Pedals
Several manufacturers make pedals with different axle lengths. Shimano has both a standard width as well as a +4mm (0.1575”) width in their Dura-Ace and Ultegra pedals. Speedplay has gone one better with their Zero Stainless Pedals. The Zero’s are offered in 5 different axle lengths of 50mm (1.9685”), 56mm (2.2047”), 59mm (2.3228”), 65mm (2.5591”) and the stock 53mm (2.0866”).
Pedal Washers and Extenders
There are also 1.2mm (0.0472”) pedal washers. Make sure to only use a maximum of 2 per pedal. BIKEFIT offers a 20mm (0.7874”) pedal extender. So, theoretically, you could take a Speedplay stock Zero Stainless pedal and add 34.4mm (1.3543”) to the pedal stance (per side) by replacing the stock 53mm (2.0866”) axle with a 65mm (2.5591”) which adds 12mm (0.4724”), add 20mm (0.7874”) BIKEFIT pedal extender plus 2.4mm (0.0945”) worth of pedal washers.
Cranksets with Wider Q-Factor
Another option is to purchase a crankset that has a built in wider Q-factor. There are cranksets with wider Q-factors and cranksets with narrower Q-factor.
 As I’ve explained before, the body always wants to return to its natural relaxed state. Fitting cleats to a relaxed foot will put the foot in a natural position for pedaling. If the cleats are ill-fit, the cyclist will be subconsciously trying to move the foot back to where it wants to be which will rob the cyclist of power and more importantly increase the risk of injury.
Once cleats are set correctly, it’s time to look at the Q-factor. If the knees are going out at the top (which 98% of my clients do prior to a bike fit), simply widening the stance in small increments will move the feet outwards so that the knees can travel straight up and straight down.
Next – Question of the Week
Coach Rick, I own two recumbent tandems that I would like to get fitted for us. Is there some certification I should look for from a shop certifying they can fit a recumbent tandem? Unfortunately I’m in the Boston area so would not be able to employ your services but I do want to get the best I can. Thanks – Greg
I would look at anyone who is Certified by Bikefit Systems or The Cycle Point. I only fitted a tandem once and it was basically 2 fits. First I fitted the captain and then the stoker. Each rider had adjustments independent from each other.
Coach Rick, how would I go about measuring how long a pedal axle I might need since there are at least 5 different lengths? Thanks – David
Hi David,
In most cases, if your knees are going out at the top, your feet are clipped in narrower than your “hips” its necessary to investigate longer pedal axles. Speedplay has different pedal axles to help with this.
Anybody know where to get pedal washers that have the correct size holes . The last pedal washers I ordered had too big of a hole where the pedal spindle went through and would not work. Thanks, Jack
bikefit.com
Another pedal that comes in multiple axle lengths is Keywin.
re David L. I bought my Keywin pedal from Bikeeffect in Santa Monica and as I remember. the shop had a Keywin fitting pedal that could be adjusted at home by adding spacers and the when you found a comfortable position, you added up the spacers to determine the pedal size to be purchased.
I think I have the opposite problem then the others…my right knee lightly brushes the top bar unless I deliberately move my knee to avoid it. I am 73 yrs old and bike about 80-100 mi a week. Should I be getting something that moves the pedal out a little? Thanks
I’m in the same position. How tall are you and what’s your background?
I’m 5’6″ and primarily a runner. Narrow stance is good form in running.
I’d love to find some shorter pedal axles, I much prefer the Q-factor on my road bike than MTB.
What does one do if their hips are significantly narrower than the pedals? The modern bicycle cannot accommodate any narrower q-factor, so what is the solution to eliminate the feeling of “pedaling on a horse” felt by riders with very narrow hips?
One thing I’ve considered is asking a machinist to turn down and thread the shoulder of the pedal axle, allowing more of it to be bolted into the crack.
This narrows the Q-factor without fouling the chainstays, but be careful your foot won’t strike the crank arm.
Interesting idea, DiminutiveRunner. For me I am not sure it would help, because my cleat angle is set so that my heel is as close to the crankarm without rubbing it. So for me, the limiter to a narrower stance is not really the pedal width, but instead the width of the crankarms near where the heel passes, at the spindle end of the crankarm.
Hello,
Good article!
From what I understand, the goal for the best fit is to place the feet under the hips, but… what happens if you are a “genu varum” or “verus Knee”? this is my personal situation. I have a 300mm hips distance, and I’m riding MTB bycicle since more than 30 years (now I’m 52), without any knee problems, but… few weeks ago I bought a new bike and I ‘m suffering pain in the left knee. But not with the old bike. The only difference I found is that old bike has 275mm “stance width” (distance between center feets), and the new one 300mm (just my hips distance!). In theory the new bike is correctly fitted according with my hip distance…. maybe my “genu varum” condition requires a different fittings, and this is “why” my old bike doesn’t cause me any pain, despite of “shorter stance width”?
Many thanks!