DIY Rear Derailleur Adjustment

A couple of Tech Talks ago, we covered super cleaning a double crankset by removing the chainrings. It’s an excellent bike maintenance project because it doesn’t require special tools and it results in a like-new looking crank. It’s also something even beginning mechanics can tackle to hone their basic skills.
This week’s topic, do-it-yourself rear derailleur adjustment, is another skill that even newbs can master. And once you’ve got it down, you’ll be able to keep your bikes shifting perfectly, plus fix your riding pals’ machines, too – making you a hero out on the road!
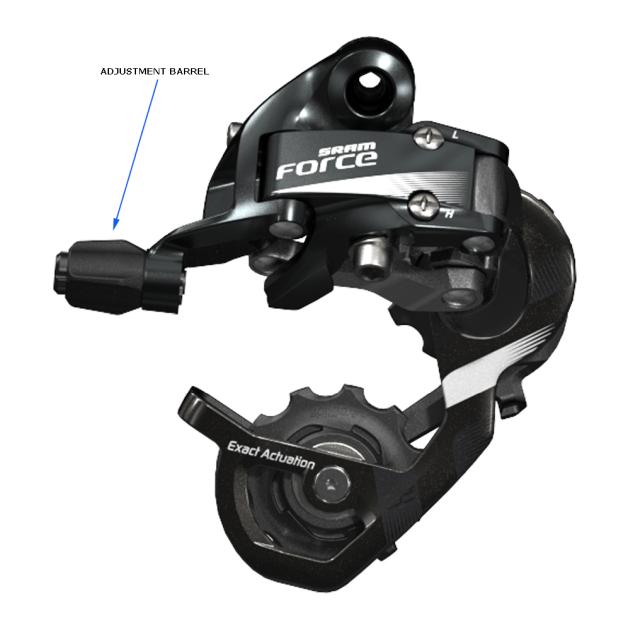
One of the things that makes this adjustment so easy is that no tools are required. It’s done manually, by turning a small adjustment barrel found on the back of cable-operated rear derailleurs (see photo).
Note that today’s tip is not for adjusting electric shifters – although those, too, are usually adjusted by hand. If you want to learn that skill, it’s not much more difficult, but it varies with each brand and model of electric shifter. You’ll want to read the correct manual to learn how. The beauty of cable-operated rear derailleurs is that this DIY adjustment works for all of them.
Disclaimers: Turning the adjustment barrel to cure shifting ills only works on a drivetrain that is out of adjustment but otherwise in good working condition. If you have a worn-out chain, chainring or cassette cogs, replace them first. And for bent or loose parts, fix them first.
Reasons bicycles need this fine-tuning
The rear derailleur adjustment barrel comes in so handy for fixing common shifting issues because shifting is one of the most frequent things we do when riding. And over the weeks and months, all this shifting stretches the shift cables and compresses the shift housing (what the cables run inside).
When this happens, the cable tension loosens, which reduces how far each click of the shift lever moves the rear derailleur. For it to shift perfectly, it must align perfectly beneath each cassette cog with each lever click.
Even minor chain, cassette cog and chainring wear affects the shifting precision, too.
And, on some bikes, pilot error is a contributing factor. Because, while this adjustment is definitely DIY, it’s easy to get confused and get it wildly wrong if you don’t follow the rules (keep reading).
Elevate the rear wheel to make the adjustment
Whether on the road or at home, before you start adjusting, find a way to hold the rear wheel off the ground so that you can shift with one hand and pedal the bike with your other hand to check and adjust the shifting.
A repair stand is ideal for this. Or, on the road, if you can find a tree with a low branch, rest the tip of the saddle on the branch to support the bike. If you have a rear vehicle rack, you might be able to put the bike on it and pedal and adjust it there, too. Or have a helper hold the bike up while you work.
Finding the adjusting barrel
You can see the adjustment barrel in the photo above. If there’s any doubt where it is on your rear derailleur, find it by following the cable path on the back of the bike to where the cable and housing enter the rear derailleur.
The adjustment barrel is the knurled plastic piece that looks designed to be turned by hand. The housing disappears into the barrel, and you should be able to see the bare shift cable coming out on the other side.
Adjusting barrel rules to remember
The most common shifting glitch to use the adjusting barrel for is hesitation, when the chain seems like it just doesn’t want to move all the way to the gear you’re selecting. And most of the time, it’s hesitating when trying to shift into easier gears.
So, for example, you’re climbing, and the hill steepens. But when you click your lever to shift one gear lower (easier), instead of shifting, you hear “clickity, clickity, click” – and nothing happens.
When a derailleur hesitates to shift to easier gears like this, you turn the adjusting barrel toward the largest cog (turn it counterclockwise – when viewed standing behind the bike).
The rule for this is easy to remember: If hesitating when shifting toward the largest cog, turn the barrel toward the largest cog.
The other type of hesitation happens when shifting to harder gears. And in this case, you follow the opposite rule, which is just as easy to remember: If the derailleur hesitates when shifting toward the smallest cog, turn the adjusting barrel toward the smallest cog (turn it clockwise – when viewed standing behind the bike).
How far to turn the adjuster
Now that you know which way to turn the adjuster, it’s important not to turn it too far. Start with 1/2 turns and keep track of how many half turns you’ve made. That way you can go back to the starting point if, for example, you were turning it clockwise when you meant to turn it counterclockwise.
Small adjustments can make a large difference, too. As you get the shifting better and better, you may find that even turns of 1/32 of a rotation improve the shifting.
Adjusting to perfection
Tuning the shifting to perfection with the adjustment barrel takes careful observation, patience, and trial and error. But it’s not difficult if you take your time and keep track of what you’re doing. This is not an adjustment to make while distracted or multi-tasking.
Start by getting the derailleur to shift from the smallest cog to the next smallest cog when the lever is clicked once. Then check each shift all the way up the cassette. The goal is to get the chain to smoothly and quietly run on each cog with each shift of the lever. Do this, shifting up the cassette, and keep fine-tuning until you’re satisfied.
Then, do the same thing shifting back down the cassette, making sure that the chain shifts to each cog and runs on it nicely with each click. If not, make small turns of the barrel to fix any issues. Typically, as the shifting gets better and better, smaller and smaller turns are required.
When you’re satisfied that the rear derailleur is shifting perfectly up and down the cassette, if you have more than one chainring, shift onto the other chainring and test and fine tune the shifting up and down the cassette on that ring, too.
As a final check, hit the road and run through the gears, checking your work. Following these rules, and with a little practice, you can get very skilled at fixing common shifting issues. Have fun mastering your new skill.

Many times, you can do this adjustment without even testing the shifting. A quick eyeball check of the rear derailleur should show you that the idler pulleys are directly lined up with the cassette cogs. If they are not and your shifting is acting as described above, give the barrel adjuster a twist so that the upper pulley is centered on the cog. That usually fixes the shifting, or at least gets it very close.
The ‘remember to shift toward or away’ from cogs never works for me. I use a functional guide to remember: the cable stretch (as Jim explained) means the cable/derailleur needs to be lengthened, and turning the barrel adjuster counterclockwise moves it – and the derailleur – further from the mount, effectively tightening the connection. I do like the guidance to make small adjustments as the fit gets close.
I used the method of lining up derailleur pulleys with the cogs for years and this is not bad. About 6 months ago a friend told me showed me a better method. Shift to one of the middle cogs and look how the chain sits on the cog. If it is not centered, then adjust the barrel adjuster to move the derailleur in the direction required to center the chain. Pedal a few revolutions and check again. Continue until you have the chain centered on the cog. This is much more reliable with aging eyes than trying to align the pulley with the cogs!
What’s missing is that the limit upper and lower limit screws need to be set or at least checked to make sure that they’re neither restricting the shifting unnecessarily or allowing the derailleur to travel too far in either direction. I’ve seen bikes come from dealers with the screws not properly set, allowing the rider to shift the chain into the spokes.
Yet another way to think of this adjustment: By turning the barrel counterclockwise, you are backing it out (righty-tighty, lefty-loosey). By backing it out, you are effectively increasing the length of the cable housing, which means more tension on the shift cable to occupy the space of the housing. More tension means the derailleur moves inward toward the larger cogs. (With no tension, the derailleur moves to the smallest cog position.)
I teach bike repair classes at the local bike non-profit, and different students will respond to the several approaches described in comments above, but the method Jim Langley describes gets the best response. As a mechanical engineer, I appreciate the ‘lengthen or shorten the cable housing’ mentioned, but haven’t found that students grasp that concept until they’ve spent more time working on bikes.
It’s amazing how often the limit screws are out of adjustment, because someone thinks they are they method to correct indexing errors.
I have a strange situation in that the high gears and low both shift perfectly, spot-on the cogs yet 3rd and 4th are both quite noisy (clattery if that’s a word). Any hope for adjustability on the inner cogs?