How to Set Up Your Road Bike Brake and Shift Levers Correctly

 By Jim Langley
Whether you’ve got regular old levers that don’t even shift, or the latest models with every bell and whistle, it’s important to set them up right. If you don’t, you can lose braking power and make your bike less safe, you can put pressure on your wrists and hands leading to numbness and pain, and I (and Coach Fred) have even seen neck and shoulder injuries related to lever issues.
If you’re riding a relatively new bike set up by a shop, the chances are good that they got your levers right. However, levers and handlebars can get knocked out of position or move, so it’s good to know how to get them back where they belong.
This isn’t so easy. The problem is that there are two levers and they’re almost infinitely adjustable up, down and around the handlebar, which can also move, complicating things further. Making matters more difficult, well-meaning riding buddies may give you bad advice based on adjustment myths or the current trend in the pro peloton. To help you avoid these pitfalls, here are some handy lever do’s and don’ts.
Tip: You can usually reposition levers a little without having to remove the handlebar tape. If you’re moving them a lot or setting up new levers you may need to re-wrap.
Do start with the handlebars
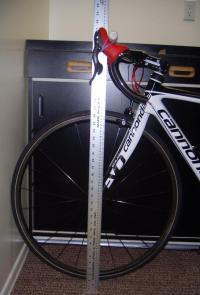
You can’t position your levers correctly until your handlebars are set right. For most road riders and most handlebar designs, a good starting position is to angle the bottom, straight sections of the bars down about 10 degrees off level. This puts them where you’ll be able to hold them with no strain on your wrists and hands. Equally important, it positions the bar hooks (where the levers are) in the right range for correct lever placement.
Tip: If you have carbon handlebars, fully loosen the stem before rotating the handlebars because if you just force the bars into position the stem could cut into them, leading to failure.
 Don’t mount the levers too high
I mentioned myths and trends, and a common one today to avoid is mounting the levers so high that they cause problems. It’s an easy mistake to make because you want to be able to easily and quickly reach the levers, and you may have been told it’s right to put them high. But there’s a limit to how high they can go. Too high and the levers will be too close and angled up too much, and you’ll have to rotate your wrists to hold onto the hoods, which leads to pain, even injury. And, if you ride in the drops, you might not even be able to reach your levers to brake or shift effectively.
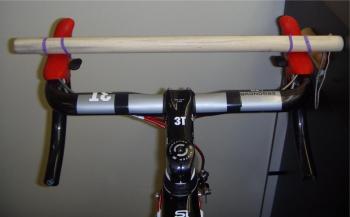
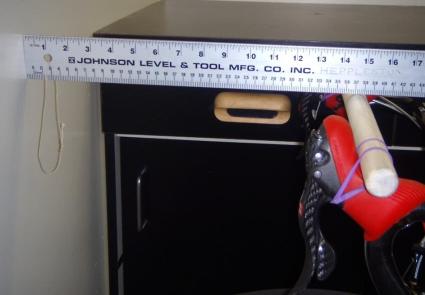
A good way to get them right is to rest a ruler on the bottom of the handlebar drops (the same bottom, straight portions of the handlebars you used to properly angle the bars). Start by aligning the tips of the bottom of the lever handles with the ruler to get them in the exact same position on each side of the bars. If you prefer higher levers, you can move them up within a range of about 2cm, depending on the design/shape of the handlebars. But, never move them so far that they rotate your wrists or you can’t reach them when you’re riding in the drops or apply enough braking pressure when you’re riding on the hoods.
Tips: Once you find it, mark your ideal lever position by putting a line above and below the lever clamp behind the handlebar. That way, if they move again you’ll be able to easily reposition them.
Do align the levers
Now that the levers are at the right height, make sure they’re aligned correctly with the handlebars, too. Use the brake hoods as the reference point and make them straight in relation to the handlebar hooks. In other words, the lever hoods should be straight, not angled in or out. Otherwise, they will force you to angle your wrists in or out, and you don’t want that.
Tip: This adjustment can be tricky to see. Look at the hoods to get it right, not the handles/blades of the levers, because the latter can be angled and throw you off.
Don’t overtighten
Modern levers are super-expensive, and they’re one of the first things that hit the ground if you drop your bike or crash. So, it’s a good idea to tighten them just enough so that they can’t move when you’re riding, braking and shifting — but loose enough that they will move if you dump your bike.
If you have carbon handlebars, follow the torque recommendations for your handlebars (not the specs for the levers) because it’s surprisingly easy to overtighten the levers and ruin a super pricey bar.
 Do check/adjust the lever reach
Many of today’s levers let you adjust the reach so that all hand sizes can shift and brake with them efficiently, comfortably and safely. But even with older levers there are ways to accommodate smaller hands and fingers. The important thing is to check your levers after you’ve set them up correctly on the handlebars to make sure that they work for you.
With modern levers that feature reach adjustment, follow the instructions if you need to improve the reach. Just Google the maker’s tech specs for whichever levers you’re using.
For levers without built-in adjustments or shims, one simple trick is slightly loosening the cable adjustment so that the levers travel further before applying the brakes. This helps smaller hands apply enough power. To hold the lever closer to the bar, glue a shim between it and the lever body. Just be sure to ensure the brake still applies sufficient braking power to stop you.
Do get help if you need it
If you’re having a hard time braking and shifting, or suffering hand pain on rides, and your levers look okay to you, find a local bike shop that specializes in fitting bicycles and have them take a look at your levers. They can quickly spot any minor issues that might be wrong with your levers or bars.
And, whether you have old or new levers, they’ll know how to dial them in to work best for you, which will be well worth the price. Also, note that even older levers can usually be improved, so don’t worry that you’ll have to buy expensive new levers.


very informative this guide me very much as a new rider please keep share something about Hybrid Bikes and their accessories. I got new Hybrid Bike and collect info about its riding and maintenance.
The problem I see is that road levers are designed for racers who have their bars very low so their forearms are much more vertical than a sport rider whose forearms are more horizontal to the ground. This is because the sport rider has their bars much higher than a racer.. Thus, the sport rider needs the hoods to turned up more than the racer, which means the sport rider cannot easily reach the brakes when holding the drops.
This is the same as almost all lightweight bikes having a low stack height for racers. Only endurance bikes have a higher stack height to allow higher bar placement, and endurance bikes are few and tend to be heavy unless you spend $12K.