More on Centering Rim Brakes (Sidepull Brakes)

Jim’s Tech Talk
By Jim Langley
Last week, we gave Larry tips for fixing his rim brakes. They were often moving out of position and needing centering to avoid them rubbing the rim on one side. Here’s the whole story: Fix for Larry’s Off-Center Rim Brakes – Sidepull Brakes.
This is a common problem for lots of roadies with rim brakes. So it was nice to see some helpful additional tips posted in our comments by “Akta1,” “Kerry Irons” and “Joan.” They raised more issues about rim brakes and keeping them centered that are worth going over.
To prevent any confusion, we’re talking about rim and not disc brakes. For disc brake tips, please search to find Tech Talks about them.
Start with a Quick Wheel(s) Check
Because rim brakes grip the rims to slow and stop you, don’t ever start working on a brake until you check the wheel it grips. If a wheel is loose in the frame, out of true, or mounted incorrectly, you actually need to fix the wheel problem, not your brake. Once the wheel’s A-OK, you’ll probably find that your brake works as good as new.
For example, on a wheel with a quick release, it’s not uncommon for someone to have the quick release come apart. This could happen when fixing a flat roadside or when mounting a bike on a roof rack that requires wheel removal.
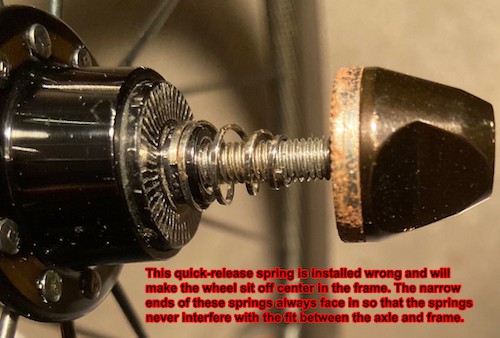
Then, if the quick release parts are reassembled wrong, one little spring might be put on upside-down . And this seemingly harmless mistake can leave the wheel crooked in the frame and make the brake appear off center.
The correct solution is not to change the brake adjustment but to fix the quick release spring. The narrow ends always face in, toward the hub. Put on the other way they end up between the axle and the frame preventing the wheel from being completely in the fork/frame.
Likewise, if a wheel has a wobble, you don’t want to open the brake so it doesn’t rub. You want to fix the wheel. Otherwise, you could make your brakes unsafe.
There’s a lot to know about wheels and their issues. But, even a rookie can check that the wheels are tight and eyeball their alignment in the frame to see if they’re wobbly or sitting crooked (they should be centered). If so, have the issue fixed. If the wheel(s) checks out, you can move on to dealing with the brake.
Your Comments and Questions and My Replies
The first comment was from “Akta1,” who said,
“Radical Solution: I use a hammer and screwdriver. Place the tip of the screwdriver on the brake spring and lightly tap the screwdriver to center the brake. The spring is HARDENED steel and will not be damaged!”
To this,
Kerry Irons added,
“Old school technique that I first saw used by the legendary Gene Portuesi in the very early ’70s. He had a “special punch” in his shop with a groove cut in the tip so it wouldn’t slip off the brake spring when he whacked it with the mallet (not a hammer).”
My thoughts: Thanks for bringing this classic technique up. I never had the privilege to meet him, Kerry, but it’s nice to see the name Gene Portuesi again, the cyclist behind one of the first mail-order bike catalogs, Cyclopedia. That catalog, Palo Alto Bicycles’ and a few more introduced millions of people to the joys of road riding back in the huge bike boom of the early 1970s.
There’s an online scan of the catalog here: http://www.fixedgeargallery.com/resources/cyclopedia/. It’s fun to go back in time and think about how far our sport has come since 1974 – and how much it has stayed the same!
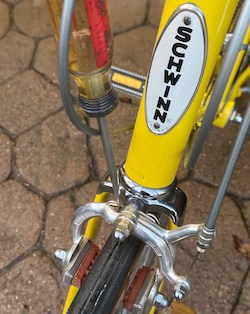
Here’s a photo I took to show the key element of the screwdriver and hammer technique. Note that I set it up on a genuine and new old stock 1973 Schwinn Varsity. The technique was taught to me by Bruce Anderson at Andy’s Bike Shop in Keene, NH in 1973 and the bike model in the photo was red hot back then.
The type of sidepull brake that this hack works on is one with a centering spring that activates both arms. You can see that the spring on the brake in the photo runs from side to side. On this type of spring when you tap on one side by hitting the screwdriver, it moves the brake back because the spring is fixed to the center bolt of the brake. The spring provides the leverage to move the bolt, rotating it in the frame and centering the brake.
Don’t Hit the Spring Too Hard
While it’s true what Akta says that most of these springs are made of hardened steel, it is possible to bend them if you hit them too hard. Or, if the brake is very tightly mounted, it might take a major blow instead of a tap to get the brake to move. And if you hit anything hard enough you can damage it.
So follow the rule that if tapping doesn’t have the intended result of moving the brake, put down the hammer. Then loosen the brake fixing bolt a little and try again. But, please keep reading to the end for some safety tips pertaining to loose bicycle parts.
My Langley 5th Hand Spring Retensioning Tools
Fortunately, if you do manage to bend a brake spring with the hammer and screwdriver technique you can fix it. To do so, carefully release the spring’s end from the little stop it rests against (easy to see by looking behind the brake arm). Then bend the spring upward to increase and fix the spring tension on that side.
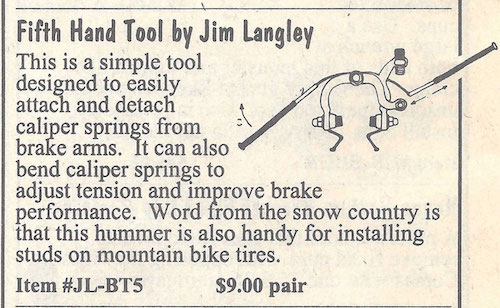
I invented, made and sold a tool for this in the 1980’s called the Langley 5th Hand. Here’s the little ad for them showing how they worked. (Sorry, I sold out of these tools a long time ago and no longer make them.)
Using Wrenches to Center Brakes
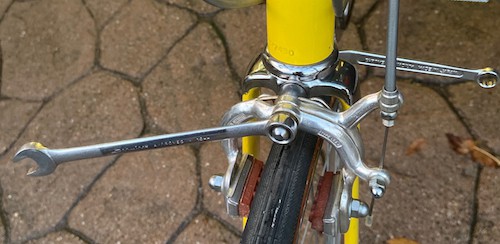
A softer, kinder way to center this type of sidepull brakes is to use two wrenches. One goes on the front nut and the other goes on the fixing nut on the back of the fork or frame. By holding both wrenches, you can usually move the brake back to center because they allow turning the brake centerbolt.
This moves the spring, too, ensuring the brake stays centered. When using two wrenches like this use care not to loosen either nut. The idea is to move the brake back to center, not to loosen anything.
Other Centering Techniques
Centering “Flats” on the Brake Centerbolt
Some sidepull brakes have a built-in centering device on the center bolts. If so, you’ll see it between the brake and frame on the bolt. It will have two flats on it to receive a thin wrench. To center brakes that have this feature, you simply use a wrench that fits onto the flats to move the brake left or right to center the brake. The wrench centering technique is shown in the Park Tool video below.
Tip: If you don’t want to buy the special thin brake centering wrenches available, you might have a bicycle hub cone wrench that will fit. They’re thin and may fit your brake. It’s also possible to make your own thin brake centering wrench by grinding down a regular wrench to fit. You would need a grinder and some time because you’ll remove a lot of metal.
Tapping on the Brake Not the Spring
While the hammer and screwdriver technique still works fine, it was a hack for brakes with the single springs like in the photo. Modern sidepull brakes often have two springs, one for each arm. There’s no spring accessible to tap on and even if you could, it probably would not center the brake.
But, with a dual spring brake like these, you can use the hammer gently to tap on the brake to nudge it over and back to center. Or, to be completely safe, you can strike it with the heel of your hand to move it. That’s how I do it. And, if it moves too easily, I’ll use the technique of holding on the brake, loosening the fixing nut and then tightening it firmly.
Brakes with Centering Screws
Some brakes have built-in screws that you turn to center the brake. This makes it easy and fast and allows very fine adjustments, too. But, it’s not always obvious how to use the screw and sometimes there’s more than one. Please continue reading to the end for my reply to Joan who asked about her centering screw.
Leaving the Brake a Tiny Bit Loose?
Kerry Irons made a second point in his comment. He wrote,
“My take is that the brake nut should still be loose enough so that the brake can be moved with “very firm” hand pressure. I have no idea what torque this requires but it means that a simple knock won’t move the brake but a serious hit (like in a crash or when the bike otherwise gets hit hard) will move the brake rather than damaging it or the frame.”
My thoughts: Thanks for raising the idea of leaving the brake just loose enough so that it will move and not get damaged in a crash – or get damaged less – Kerry. It makes sense especially for the front brake which on some designs can slam into the frame in a crash from the bars and fork swinging hard to the side.
If this happens on the side of the brake where the cable is routed, the top of the brake will hit the frame and can get badly bent and possibly dent the frame, too – if not that, it can scratch/gouge the paint. If the brake can move, it’s less likely to get damaged or damage the frame. Because it might move out of the way.
However, brakes often include devices designed to keep them from moving, such as serrated washers made to bite into the frame locking the brake in place so it cannot move. Which makes sense from a liability standpoint. Ideally the brake provides every bit of its stopping power when you need it.
Any looseness in the brake could create more looseness and possibly at some point develop into a dangerous situation. For example, if a front brake loosens to the point that it can move even slightly in the frame, when it’s applied forcefully the looseness can cause the brake to lock the front wheel which could cause a fatal fall. At the shop we were trained to always tighten brakes completely to the frame for this reason.
But, I have definitely heard of race mechanics and racers leaving components a tad loose for crash damage prevention and also easier resetting the components after crashes. But, like you said, it’s tricky to determine what torque gives you the ideal situation where you still have optimum braking and reliability plus a part that moves. And, if you want to be 100% sure a component doesn’t loosen more, the best approach is to tighten it fully. Otherwise there’s always some risk.
The most common thing racers leave slightly loose is brake/shift levers on the handlebars – since they touch down first in crashes. Racers want to be able to get back in the race ASAP and just put parts back into place with their hands fast.
But, even here, it’s asking for trouble. One of the best masters racers in the country had his slightly loose brake lever suddenly slip. It was the lever for his front brake. When the lever slipped, it dropped lower on the handlebar. This had the effect of slamming on his front brake resulting in a crash and broken clavicle.
So, I recommend being very careful if you choose to use this hack.
The Last Word Goes to “Joan” Who Wrote
“I have been having this exact problem both front and back, tightened the fixing screw – but did NOT know to squeeze the brakes at the same time. I also have tried the centering screw (Shimano sidepulls) but that doesn’t keep the brake centered.”
Thanks for bringing up the centering screws on rim brakes, Joan. If using that screw on your brakes did not work (it should), it could be that you’re turning the wrong screws. There are different models of Shimano brakes and some have two screws and it’s not so easy knowing which screw centers the brake.
One way to figure it out is to find the brake model number. This is printed somewhere but you have to look closely all around the brake to find it. It’s often on the back of the brake so you might need to remove the brake. There’s no need to do anything with the cable so you won’t lose your adjustment.
Once you find the number, search for it online. Here’s an example: I Googled “Shimano 6800 brakes.” In the results page, I want to find the official Shimano manual for these brakes. So I look for their name “Shimano” in the list of links in the search results.
And this brings me to this page: https://bike.shimano.com/en-EU/product/component/ultegra-6800/BR-6800.html. Then, you will see links to the Users’ and Dealers’ manual right there. Click on the one you want and they’ll open and you can learn which screw is for centering. I usually open the Dealers’ because it’s more complete.
Let’s finish with a nice Park Tool video that goes over sidepull brake centering with a variety of brakes and techniques (not all).
Ride total: 9,487

These may have been mentioned, but might add the following…
After replacing a wheel in the drop outs, I always stand over the bike, lean on the saddle or bars (depending if back or front) and open (then close) the QR…often, the wheel is not fully seated and this will make sure it is seated.
I have also found that brakes will not function properly if there is play in the wheel hub so I always check for this and adjust the hub/axel bolts if/as necessary.
Finally, there is a neat tool (Park OBW 3) which allows one to adjust the caliper springs (without hammer and screw driver) and also allows one to adjust the nut in front of the fork and behind the spring (in lieu of the thin wrench).
Thanks for the tips, Walt! Here’s a link for anyone wanting to see Park”s Offset Brake Wrench (OBW tool):
https://www.parktool.com/product/offset-brake-wrench-obw-3
Thank you,
Jim
For brakes with those flats where you can put a thin wrench to center them, no need for special tools or grinding down a wrench. Cone wrenches are a perfect fit. Of course many “modern” mechanics might not have cone wrenchs in their tool kit, but if you have brakes with the flats on them, a cone wrench is a worthy purchase.
Thanks, Kerry. Here’s an example of a cone wrench where readers can see a photo: https://www.parktool.com/product/double-ended-cone-wrench-dcw-1?category=Hub%20%26%20Axle
Appreciate it,
Jim
What’s rec for situation where upgrade to Durace brakes results in bolt (secures front brake to fork) is too long. Ie, bottoms out before brake is tight. I assume a shorter bolt would fix the problem. IF that’s the case where do I find a shorter appropriate bolt. At least this is my Dx. Perhaps you have a different Dx and fix.
BTW: Incredibly impressive ride total!
Bolts for securing brake calipers in a frame/fork come in different lengths to solve that problem. Can usually find at your local bike shop or they can order them. Can also usually find them on ebay or Amazon (you will need to calculate needed length if order on line).
In last comment, instead of “bolt” I should have said “nut.”
Bike brakes have a direct effect on the efficiency of your ride, so you must regularly adjust the bike brakes to attain optimum performance. If it is too slow for your needs, you have to adjust the brake system slowly until you reach the right speed that you desire. If it is too fast, you have to adjust the bike brakes rubbing. It means that the brake rubs your wheel which can abruptly stop the bicycle.