

I’ve been working on quite a few disc brake-equipped road bikes in our Praxis workshop lately. One of the problems that keeps coming up is a rubbing or dragging brake.
The type of rubbing I’m seeing can be missed when riding because it’s slight. But if you lift the wheel that’s rubbing off the ground and give it a spin, you’ll realize straight away that the rotor (the metal disc attached to the wheel) is slightly rubbing, because the wheel will stop spinning much more quickly than the other wheel (unless it’s rubbing, too).
I’m not talking about the type of rubbing caused by a bent rotor. That creates a major rub that’s easy to see because the rotor wobbles when the wheel is spinning. A bent rotor will also often make enough noise that you can clearly hear it. To fix rubbing caused by a bent rotor requires straightening the rotor – or replacing it if it is too badly bent to be straightened. A great tool for straightening rotors is Park’s Rotor Truing Fork: http://amzn.to/2xPZxpQ.
The type of rubbing I’m explaining how to fix here happens on straight rotors. It’s highly annoying because, while it’s only slightly dragging, it’s constantly slowing you down and wasting your energy. You can try squeezing and releasing the brake lever repeatedly, removing the wheel and reinserting it, gently flexing the rotor to try to push the rubbing pad away – but the brake will usually still rub as soon as you brake again.
Fortunately, there’s a fix for this problem that almost anyone can do. All you need is the right wrench to remove the brake caliper from the frame and an ordinary business card. Don’t worry. You do NOT need to disconnect the brake hose/cable from the brake caliper or change any brake adjustments.
Tip: When working on disc brakes keep all oils (even from your hands), greases, lubes, etc. away from the brake pads and rotors. Lubes can contaminate and ruin the braking. If you make this mistake, to fix it, you’ll probably need to replace the brake pads and super clean the rotors.
To fix the rubbing, follow these 5 easy steps.
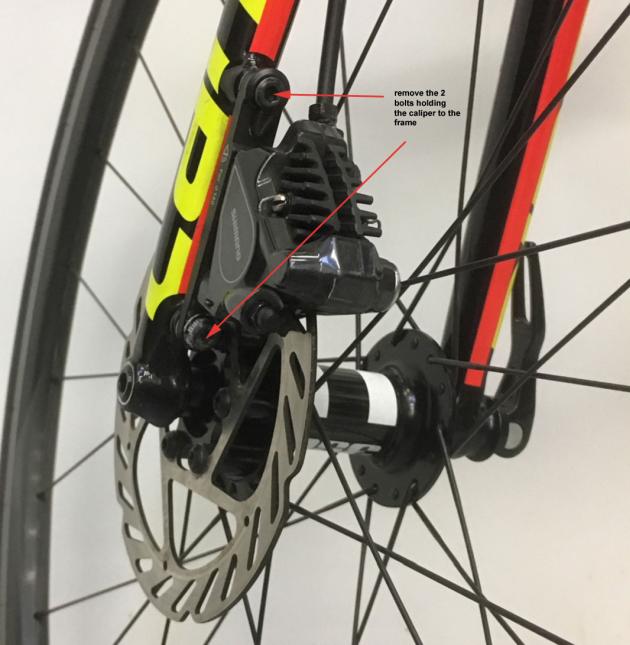
- Remove the rubbing caliper from the frame by loosening and removing the two bolts holding the caliper in place (turn the bolts counterclockwise). Before taking the bolts all the way out, be sure to note (take a photo) which one goes where and the order of any parts between the bolt head and the brake caliper. There may be washers or locking washers and one bolt may be different than the other. Be 100% sure you know exactly how the bolts and any parts go back on so you can get it right when you reinstall the caliper.
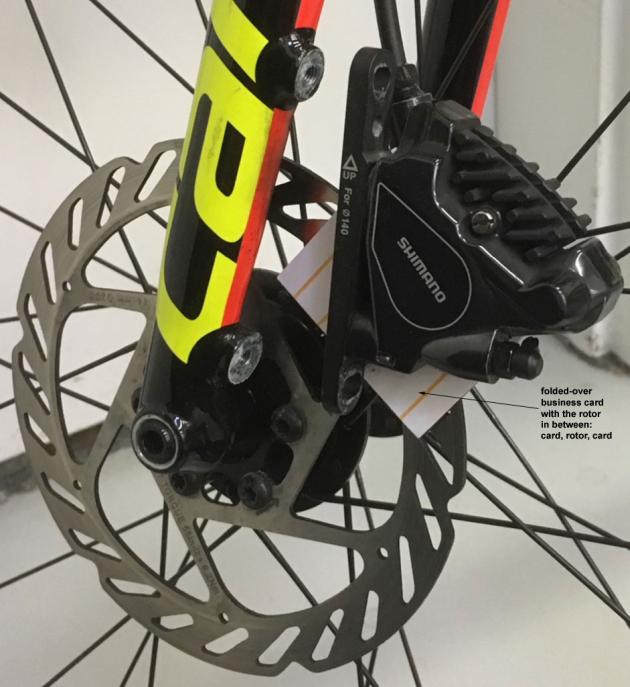
- Now, hold the removed caliper in your hand. It’s still attached to the brake hose/cable, but there’s room to work on it. Next, fold an ordinary business card in half and slip it inside the caliper as shown in the photo. Then wiggle and push the caliper back over the rotor so that the business card is in between the rotor on both sides and the brake pads, too (they’re tucked inside the brake caliper).
- While keeping the caliper on the rotor, turn the wheel so that the caliper lines up to the bolt holes in the frame. Then, put the bolts back through the caliper, using care to put the bolts in the right place and any washers or tension devices in the right place, too. Refer to your photo. Screw the bolts clockwise until the caliper is loosely mounted back on the frame with the business card still in place inside the caliper.
- Now, squeeze the brake lever and keep it squeezed while tightening both brake caliper bolts fully. If you’re working on the rear brake, you might not be able to reach the bolts while holding the brake on. So, ask a friend to help, or wrap something around the brake lever that keeps it firmly squeezed, like a toe strap or strong elastic band. (Tip: Considering buying a Bike Brake for each of your bikes – click to read our review from a few years ago. They’re great little rubber band-like devices that you can keep on your handlebar just for instances like this, and use to park your bike almost anywhere just by leaning it against something.)
- Now that the caliper is back on the frame and tight, release the brake lever and squeeze it a couple of times as if braking. Now, turn the wheel while holding onto the edge of the business card and the card will rotate with the rotor and come out. Once the card is out, you should find that your brake works nicely again with no more annoying rubbing!
Jim Langley is RBR’s Technical Editor. A pro mechanic & cycling writer for more than 40 years, he’s the author of Your Home Bicycle Workshop in the RBR eBookstore. Tune in to Jim’s popular YouTube channel for wheel building & bike repair how-to’s. Jim’s also known for his cycling streak that ended in February 2022 with a total of 10,269 consecutive daily rides (28 years, 1 month and 11 days of never missing a ride). Click to read Jim’s full bio.
This is the right way to do it. Beware of mechanics that will just spray brake cleaner in between the pads and rotors and say ‘fixed’. Since you will more than likely pay a couple of dollars for a mechanic to look at your brakes, make them do it right. I highly recommend to print out Jim’s article and take it with you!
I often find disc brake squeeling is related to a slight bend in the rotor. My mechanic uses a plier-like tool to make micro-adjustments in the disc which fixes the noise. I haven’t been brave enough to do this yet. How about an instructional on this?
Thanks!
If I was a mechanic and you brought an article in telling me how to do my job, I’d most likely throw you out! If your mechanic doesn’t know how to perform this simple task you either need to find a new mechanic or learn to do it your self. Do not take instructions to a mechanic!
I don’t know if this is true of all disc brake systems, but with most be careful you don’t squeeze the brake lever while the wheel is out. This can drive the brake pistons out too far and then you’ll have to carefully push them back in. Special tools are made for brake pistons but if you search online you’ll find you can use a large screwdriver or something similar if you are very careful. Rule of thumb though, if the rotor is out of the brake, don’t squeeze the lever.
Jim, a frustrating problem I have is on our road recumbent tandem I get no rub on the stand or trainer but when riding I get a rotor rub. Sometimes a quick squeeze of the brake handle makes it go away most of the time it doesn’t. Yet when I get this rub I can immediately get off the bike lift the wheel off the ground, spin it, no rub. Ideas? Thanks! – Greg
Did you solve this, I have this exact problem, hydraulic brakes.
I would repack or replace your hub bearings and make sure the rotor bolts are properly tightened. If the hub bearings on one side have a tiny bit of play the alignment could seem fine until you put load on them.
[quote=Dave Minden]I often find disc brake squeeling is related to a slight bend in the rotor. My mechanic uses a plier-like tool to make micro-adjustments in the disc which fixes the noise. I haven’t been brave enough to do this yet. How about an instructional on this?
Thanks![/quote]
Thanks for the suggestion, Dave! I’ll write a Tech Talk about truing rotors sometime soon as a follow-up. Thank you.
That’s good advise, Jeff, thanks.
I generally find that the solution is to slacken the bolts to the piston, squeeze and hold the brake on and re-tighten the bolts. Job done without any dis-assembly!
If you have mechanical disc brakes, Greg, it might be that something is changing when your weight is on the bike that’s acting to apply the brake. This can happen with all cable brakes. A common example is with rear brake cables on road bikes. When the brake adjustment is too tight and you turn the handlebars to the side, it tightens/applies the rear brake. The solution is to put a little more slack in the cable so there’s more leeway to counteract the tendency of the bike to apply the brake.
If you’re lucky that’ll work, Henry. But on a lot of disc brake bikes that won’t be enough to do the trick because the frame braze ons that the caliper is screwed into aren’t perfectly aligned with the rotor. So the business card trick is a nice one to keep up your sleeve for when you run into this. The reason it works is because it forces the spacing between the pads and rotor instead of relying on the frame’s braze ons to hold the brake in the right place. But I’m glad your bike is so cooperative.
Why not loosen the caliper nuts without removing them, remove the wheel, put the folded card over the disc and reinstall the wheel with the card? Then you don’t have to worry about pieces and parts getting out of place.
[quote=Will Haltiwanger]Why not loosen the caliper nuts without removing them, remove the wheel, put the folded card over the disc and reinstall the wheel with the card? Then you don’t have to worry about pieces and parts getting out of place.[/quote] That’s another way to do it that can work, Will. Thanks. The only thing is that it can be tricky on some bikes to get the rotor back into the brake caliper when the business card is on it – and to keep the business card in the right place on the rotor so that the card ends up exactly between all 3 things (rotor and both pads). You can do it if you’re patient and careful but if you’re not, you could get the card in the wrong place or even knock a pad loose. In comparison, when you push the caliper over the disc you can see what you’re doing, the card will stay were you put it inside the caliper and it’s less likely you will damage anything. But, your approach will work fine and can be a quicker, better way to do it, as long as you work carefully. Thanks! Jim
Works great. Thanks for the info.
I had a similar problem when switching wheels on my bike. I have two sets of wheels with different tires for road and off-road. The hub width between the two sets of wheels was slightly different- just enough to cause rotor rubbing. I used to routinely adjust the brakes as described in the article. It didn’t take long, and I could do it trailside. I finally tired of that and bought a set of rotor shims. This allowed me to make the rotor spacing on both wheelsets identical.
I have a problem on my hydraulic brakes that make a light ‘rattling’ noise constantly. However, if I gently pull on brake lever (without causing the pads to grip the rotor) the noise goes away. Any thoughts on how to solve this?
Hi Adam,
If it’s a constant noise while riding from one brake, I would look for a dragging pad on one side. Sometimes dirt gets on the pad and prevents that pad (sometimes both) from fully returning when you release the brake lever. If you clean the sides of the pad (all around it), it will often fix the issue and if the pad no longer sticks, it won’t be rubbing and making the noise. I believe this video from Park Tool shows how to do this: https://www.youtube.com/watch?v=vQXFFgRButo
Hope this helps,
Jim
That did the trick! Many thanks.
In regards to the Bike Brake, you don’t need to buy anything, a simple small wide rubber band will do the same thing, so will an old school pedal strap, I use a piece of velcro strap. Most people have stuff laying around in junk drawers that is adequate for holding the brake lever.
The velcro strap I use does double duty on my touring bike, it holds the brake lever when I’m parked, and when I’m riding it secures the frame pump as a precaution.
Has anyone else found that while tightening a caliper body bolt, as it tightens, the bolt head rotation drags the caliper body sideways, repositioning it away from where you want it? The only solution I’ve found – with varying success, is to very gradually, and frequently alternate tighten the two bolts. Any other suggestions? Thanks.
Hi Don,
When you’re tightening the bolts you should be holding the brake lever fully on. That makes the brake’s pads grab the rotor holding the brake caliper in place so it cannot move as you tighten the bolts. As long as you hold on the brake like this, the caliper should not move when you tighten its bolts. But, it’s still best to tighten as you are doing – a little on each bolt back and forth until both are up to torque (usually 5-6nm).
Maybe something else is going on, like if the brakes are on post mounts and the concave/convex washers are upside down, that would rock the brake when you tighten the bolts even if you held the brake on as hard as you could. Or if a washer was missing…
Hope these ideas help you figure it out,
Jim
I have found on some of the bikes I have assembled the the mounting face for the caliper is not square to the the rotation of the wheel. No matter what you do that slight drag can’t be resolved. Park Tool makes a facing tool that allows you for reface the mounting surface and correct the problem. I’ve had great success with it.
Thanks, Chris, that’s a great tool, though designed as a pro shop tool at a cost of $465.95 . But, if you were having disc brake issues, you could find a bike shop that has the tool and have them face your disc mounts, which would be much, much less expensive and likely fix you up.
Here’s Park Tool’s video showing how the tool is used: https://www.youtube.com/watch?v=zBsqYnYj_sE&feature=emb_logo
Good tip, Chris, thanks!
Jim
That is a pretty sophisticated tool. No wonder it costs 500 beans!
There is a tool that is multi-purpose that can help with this problem and a couple of other problems that can occur on disc brakes. It is from Hayes and you can find it online for about $20. If you ever make the mistake of squeezing the brake lever when the rotor is not present, this tool can create separation of the cylinders safely again. The instructions come with it and it allows you to make adjustments w/o removing the wheel. Business cards can vary in thickness. This tools always gives the correct clearance. Another problem that I have found is cylinders that do not move symmetrically when you apply the brakes, or a cylinder that is stuck and only one cylinder moves when pressure is applied. This causes the rotor to warp when the brakes are applied. Ever had a really noisy brake, check for this. It also complicates getting a correct and consistent adjustment. A misaligned can also occur if you tighten the brake mounts too quickly on one side. Once I start getting tension on one bolt, I move to the opposing bolt and bring it to the same tension. Then make micro-adjustments as you go to full torque. This minimizes the opportunity for the brake caliper move move away from square or shift as you fully tighten it.
Thanks, Big Ring Bob – FYI, I wrote about the Hayes tool in another Tech Talk. Here’s a link: https://www.roadbikerider.com/a-cool-tool-for-fixing-rubbing-disc-brakes/
And here’s a link to the tool on Amazon: https://amzn.to/2YxZRcE
Thanks again!
Jim
You can do this with the metal slide from an old 3 1/2″ floppy disc.
I think you meant without removing the caliper. I’ve been using the Hayes tool for years with pretty good success, And, yes, without removing the caliper.
The last time I tried this on my Cannondale Synapse with Hydro SRAM Red brakes, it seemed like there was no play in the mounting that allowed for side to side adjustment of the caliper against the frame mounts (and therefore allowing centering over the disk). So no matter how hard I squeezed the brakes, they only wanted to seat in one orientation. There was a slight rub and I could not get rid of it (I did find a way with a thin washer, but that’s a kludge I don’t want). I’m curious if any other cyclists/mechanics have come across this and know a solution?
I’m going to revisit this as I’m about to change tires and I’m probably going to have to play with the brakes again.
Hi Corey,
I would check the calipers for a stuck piston – one that’s dirty and not fully retracting. I posted a link above to a Park Tool video showing how to clean these and get them working again.
Good luck,
Jim
Would this advice only apply to dual piston brakes ?
My Avid BB-7 cable brakes are single piston , instructions call for asymmetrical spacing of each piston from rotor.
The BB7 is a completely different beast. First, there are inboard and outboard pad adjusters which most brake systems don’t have (at least that I’m aware of) and second, they’re adjusted asymmetrically, as you noted. These features call for a very different method of adjustment. Poke around online and you’ll find plenty of decent instructions on how to adjust them.
Are some brands of brake more prone to this? The reason I ask is that in my experience I have seen this a lot with my Sram equipped bikes, but never with Shimano.
It can happen on any disc brake, Ian. But, I would agree that disc brakes vary in quality and performance across brands.
Jim
Thanks, Jim. Another incredibly helpful and timely article. Look forward to them weekly.
Thanks for the kind words, Aaron! Appreciate it!
Jim
If you have an old 3 1/2 inch floppy around the metal slide is easily adapted to slide over the disk and provide a space on both sides. A free effective tool.
That’s a good tip, Bill, thanks for sharing!
Jim
I have adjusted this way and no rubs when on the bike stand. But when I get on the bike it rubs. Must be due to a slight torque on the frame when sitting on it that deflects the brake slightly. So I have someone sit on the bike when I’m tightening these bolts up. It’s my mountain bike, and no sound when on dirt but it still rubs when on pavement. No articles seem to address this.
Interesting, David. If your MTB has suspension, could that be allowing movement somehow?
Jim
After hours of faffing about with my Shimano Ultegra front disc brake, I was almost ready to replace the caliper. Nothing I did fixed the rubbing. A quick google and I found this article. I gave it a 10% chance of working, but it looked like a 5 minute job, so what the heck. 3 minutes later and perfect brake! No rubbing at all.
Thank you! You have saved me a fair bit of cash and effort
The business card worked perfectly. Thank you.
Can’t wait to try this with my Shimano Ultegra front brake rub problem. It was never right when I purchased from Mike’s bikes in Folsom,CA. I will let you know shortly if I can get it working rub free! ??
This was driving me crazy for the longest time. Thank you for this. Took 5 minutes, and it’s been smooooth sailing ever since!
Thanks for this, but I would love to know why this works. I’ve watched many how-to vids on brake adjustment and none of them remove the caliper or use this business card trick. Most just have you loosen the caliper bolts, apply the brake to recenter, and then use a visual adjustment if that isn’t sufficient. Why does your method work and why is it better?
My front wheel brake rotor appears to be “true” to the naked eye but there is one spot that rubs with each rotation You can see the light gap between the brake pad and the rotor close up each time. It’s a very slight rub but it annoys me when I have the bike up on the stand. I’ve taken some spills but never noticed anything obvious in the way of any damage or even excessively dirty around the front brake . . . they were relatively “soft” landings. I’d like to be able to fix this myself and not have to run to the dealer if it happens again. My front brake is a SRAM G2 RSC, 4-piston caliper, hydraulic disc, 200mm. Ideas?
This totally worked for me thanks!