
Jim’s Tech Talk
By Jim Langley
Once set up well, road bike disc brakes usually just work. But, as with rim brakes, some discs can occasionally develop a rub. The usual cause is that a brake pad, or more than one, inside the brake caliper rubs on the rotor (the metal discs attached to the wheels). If you’re lucky, the rub is so minor that you don’t even notice it.
But, if you do – and especially if you can feel it or hear it when you’re riding or even walking the bike, it can drive you nuts.
Disc brakes can rub for several different reasons. A while back I gave some tips for diagnosing and fixing rubs. You can read those here.
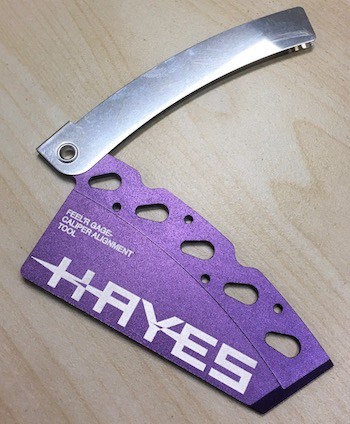
Today, I’m sharing a tool that I think everyone who enjoys working on their own disc brake-equipped road rocket will appreciate having. It’s the Hayes Brake Pad & Rotor Alignment Tool $17.95: https://amzn.to/2pvaRbU.
This folding stainless-steel and aluminum tool is small and light so that you can even take it along on rides if you want. The aluminum body of the tool works as a brake pad spreader (once the wheel is removed), a braking power tester and a pad gap feeler gauge.

Feel ‘R Gauge for Fixing Rubbing
The best function of the tool and the reason I am recommending buying one, is its Feel ‘R Gauge Caliper Alignment Tool. It’s comprised of two side-by-side and connected stainless steel feeler gauges – the shiny piece you can see on the tool.
They’re unfolded from the tool like opening a pocket knife and then slid in between the rotor and the brake pads to act as thin shims to help center the brake caliper to stop rubbing.
These stainless gauges are so thin and flimsy (each is .25mm thick), you must handle them with care. You gently wiggle and push them into the brake, over the rotor and between it and the pads on both sides. Don’t jam/force them in or you will bend and ruin then.
I do it by holding them against the rotor and turning the rotor with the tool on it watching carefully that the feeler gauges get started right and slide into place between the brake pads and rotor.
It’s not difficult. It just requires watching what you’re doing. Also, you absolutely must keep it clean of any lube, grease or grime that could get on the rotor or pads and ruin your braking.
Now, Center the Caliper
Once the Feel ‘R Gauge is in place, all that’s needed to center the caliper is to loosen its mounting bolts (look close – only loosen the mounting bolts attaching the caliper to the frame/fork).
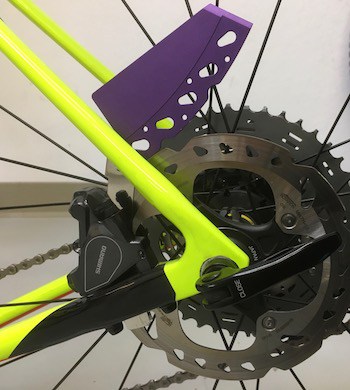
With the caliper bolts loose and the Hayes stainless feeler gauges in place (photo), hold on the brake you’re working on by squeezing the lever and keeping it squeezed. This will center the caliper over the rotor.
To finish the adjustment, keep holding the brake on and then tighten the bolts fixing the caliper to the frame again. Be sure to torque them, too (usually 6 – 8 Newton Meters). When you release the brake and remove the Hayes tool, the rotor rub should be gone.
I like Hayes’ rub-fixer enough that I bought several to have them in my different tool boxes and in my shop, too. I think if you’ve experienced an annoying disc rub you’ll appreciate having one, too.
Jim Langley is RBR’s Technical Editor. A pro mechanic & cycling writer for more than 40 years, he’s the author of Your Home Bicycle Workshop in the RBR eBookstore. Tune in to Jim’s popular YouTube channel for wheel building & bike repair how-to’s. Jim’s also known for his cycling streak that ended in February 2022 with a total of 10,269 consecutive daily rides (28 years, 1 month and 11 days of never missing a ride). Click to read Jim’s full bio.
Save the money. Loosen the caliper mounting bolts, squeeze the lever ensuring the pads are tight against the rotor then as you keep tension on the brake lever slowly tighten the caliper mounting bolts. If you tighten the bolts too quickly it may cause the caliper to move, so as the bolt snugs go slowly. Been doing this for decades with nary a squeal, Unless of course your rotor is bent.
This! I have also been doing this for years.
Save your money.
Cheers
Exactly! This is a solution to a problem that already has a free and easy solution!
Looks like a useful tool but a folded business card works, too.
The metal slide cover on an old 3.5 floppy disc does the same.
Also, I have cut strips from a thin plastic card (thinner than a credit card). Seems to work well.
Thanks for the feedback and tips, guys. In our previous article on disc brake rubbing, which is linked to early in this latest story, the business card trick is shown.
Centering the caliper without a shim tool like the one from Hayes or a business card will work if you’re lucky, Ken – which you obviously have been (congrats!). But, it doesn’t always work with all rubs. That’s where a shim tool like this comes in handy. The Hayes tool is easier to slip into place than a business card and easier to remove, too, but the card will work nicely, too.
Using a metal slide cover off an old 3.5 floppy is a clever idea and I’m even old enough to have a few of those lying around still 😉 Thanks Bobby!
Thanks for the added tips!
Jim Langley
Usually when a rub is persistent I’ll shine a light through the caliper and line it up manually. If it continues I’ll just replace the rotor. I think someone many years ago made varying size shims to mount behind the rotor to help with machining irregularities. I’ve not wrenched at shop in years so I may be a bit out of touch with the latest techniques and parts available. Thanks for the reply and best to you.
I’m interested in this tool, anything to speed up caliper alignment is a great addition. But I don’t understand why you need it if you are pulling the brake lever while tightening the bolts. Now….having said that…I have had trouble when I do the “pull the brake lever, tighten the bolts” procedure. I’m guessing this tool helps but….why? how? Thanks 🙂
Keep in mind with comments above that there is a difference between mechanical disc brakes and hydraulic disc brakes. Road Bike’s with hydraulic Disc Brakes have very little clearance so a tool like this is critical to getting it right. Yes,I’ve used the light method, credit card method, folded paper method and eyeball method. There are also other tricks once the caliper is loosened which are critical to getting the clearances on disc brakes. I’m going with this tool as it fits all my needs and who knows when I’m 50 miles from the nearest town I don’t want to hunt around for a piece of paper thin enough to get back on the road.
Does it work with both mechanical and hydro brakes?
Yes, Frank it can work on both so long as a minor adjustment can fix the rubbing. If major adjustment is needed, you’ll need to manually move the caliper to create clearance for the dragging pad. Loosening one bolt at a time and slightly moving the caliper and then repeating on the other bolt, you can usually center even constant rubbing. Note that the rotor needs to be true too.
Hope this helps,
Jim
Another reason for bake pad/rotor rub is the piston (or pistons) not fully retracting when the brake lever is released. It usually indicates dirt or gunk on the piston. Cleaning the piston and in some cases, lubing it with the proper lube is the usual fix.
I align my disc brakes in this manner and on the stand there is no rubbing but as soon as I sit on it, I hear rubbing. I assuming this is because there is a little flexing in the frame. Is there any way to deal with this? I’ve tried adjusting them with someone sitting on the bike and that didn’t really work either.
How often do you have to align the pads in a mechanical disk brake system? I haven’t done it to my TRP Spyre C dual piston brakes since I got the bike in 2020, the bike has just over 2,000 miles on it, but they’re not rubbing whatsoever. Is it only when you replace the pads you have to align the pads?