Dealing with a “Loose” Wheel, Part 2

Last week in Part 1, we learned about Pennsylvania RBR reader Randy’s rear Shimano wheel, which was rubbing the brake pads on each pedal stroke because the spokes had loosened. This week, I’ll explain how anyone with some basic mechanical aptitude can go about fixing a loose wheel like Randy’s.
Can you true and tension?
What do I mean by “basic mechanical aptitude?” Essentially, that you’ve diagnosed and fixed enough things on your bicycle or your car or around your home that you have developed the ability to analyze and understand how something works. And also that you have the confidence that if you try something new and things aren’t going according to plan, that you can reason it out using your mechanical judgment learned from fixing other things.
Now, if you’re not sure about your mechanical aptitude – or if you know you’re a complete novice – you could still learn to work on wheels and more on your bicycle by reading books and videos. For example, my comprehensive article on wheel building is here: http://jimlangley.net/wrench/wheelbuildfull.html
You might, however, want to take a basic bicycle repair class first to get hands-on experience and build up your confidence. Because, when you see your own wheel start to turn into a pretzel-shaped mess because you turned too many spoke nipples the wrong way, you might have a panic attack thinking you ruined your wheel.
To get experience, some bicycle shops offer courses and sometimes cities have bike repair classes through their recreation programs. REI and other outdoor retailers have such classses. If there’s a nearby community college, they can have bike classes, too. Another approach is to round up a few friends who want to learn and ask your favorite local shop if they’d hold a class. I had that happen at two of the shops I worked at and was happy to make a little extra money with after-hours private classes. I even taught wheel building classes after a while.
Why do wheels go loose?
So, you’ve decided to tackle your loose wheel. Before starting, it helps to know that it’s not unusual for perfectly good wheels to loosen their spokes over many years and miles of use. It’s caused by the way the wheels flex from a rider’s weight rolling down the road. Gradually, on wheels with this tendency, the spokes all loosen evenly. And when they’re uniformly loose like this, the wheel(s) can make a bike feel sluggish and handle vaguely.
Checking for loose spokes
If you think this has happened to your wheels, you can check for it by gently squeezing pairs of spokes in your hands around the wheels. When properly tensioned, bicycle spokes are uniformly tight. Enough so that it’ll hurt the hands a little to squeeze them. If they move easily when squeezed, they’re probably too loose. If you’re not sure, if you have a friend who rides similar wheels as yours, squeeze their spokes for a comparison.
Another way to check is to pluck the spokes and listen to the tone they make. Properly tensioned spokes make a high-pitched tone, not a dead one.
The tools and setup for fixing wheels
To retension a loose wheel, you’ll need to pick up the correct size and type of spoke wrench. It’s called a “spoke” wrench but it needs to fit your spoke nipples, which can vary in size and type on different wheels. If you’re not sure, measure the thickness of the nipple at the flats and you’ll know the correct size spoke wrench to purchase.
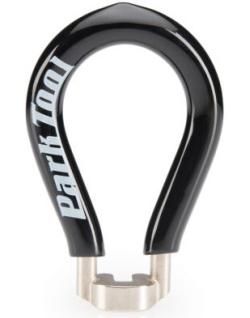 I like Park Tool’s loop-shaped spoke wrenches, which are color-coded to size and have a comfortable vinyl coating. The Black size shown is the most common size:.127 inch. Park’s Red fits .136 inch; Blue .156 inch; and Green .13 inch.
Ways to hold the wheel for truing and tensioning
If you have a truing stand (also called a “truing jig”), a special dedicated apparatus for working on wheels, use it, because the little pointers on the stand make it easier to see side-to-side wobbles and out-of-round hops and dips. If you don’t have a stand, that’s okay. You can use your bicycle frame as a truing stand.
Tip: Basic truing stands are available for as little as $50. Better ones are in the hundreds (like Park’s Profession model in the photo) to as much as you want 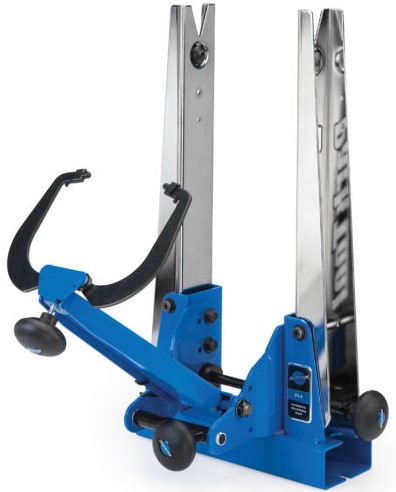 to spend, depending on the features. If you’re handy, you can make your own basic and portable stand, too – which is what pro team race mechanics often do. Here are instructions on Wheel Fanatyk.
It’s easiest to use your frame to work on your wheel if you remove the tire and tube. You’ll also need to elevate your bicycle so that you can spin your wheel as you work.
If you have rim brakes, use their pads as the pointers that show you how true and round your wheel is. As the wheel spins, watch the gap between one pad and the rim to judge how true and round the wheel is.
Tip: Resting the thumb of your dominant hand against the brake pad allows seeing and feeling the wheel imperfections as you true and tension.
Now that you’re ready to start doing the tighten-up, next week in part 3, I’ll explain the process of re-tensioning loose wheels and keeping them true and round as you do it, too.
can also be loose cones (the wheel bearings).. i commented on this last week, still do not see it in the article pt1 pr pt2
Thanks, Larry. Loose hub bearings in a wheel is a different problem than a wheel with loose spokes and it’s a different feeling to the rider, too. A loose-spoke wheel feels soft, vague even unstable. Loose hub bearings need to be pretty loose for most riders to feel anything at all. And, when the bearings get loose enough to feel it, what you usually feel is a clunk or rattle – and sometimes only when moving the bike, not when riding it. Now, if you were to let a loose hub get super loose and the cones loosened so far that the bearing fell out – something drastic like that – then yes, you are right that loose bearings can make the wheel very loose – but it’s still a different looseness than spoke detensioning. Hope that helps explain.