Beginner’s Guide to Clipless Pedals, Part 3
 Jim’s Tech Talk
By Jim Langley
Thanks to the excellent comments, suggestions and a question that arrived after Part 2 of this series, we’re going to wrap up our beginner’s guide to clipless pedals this week with a Part 3. You can read Parts 1 and 2, here and here.
This final installment should fill in any gaps in what we’ve already covered. That way you’ll come away with a working knowledge of all the basic things cyclists should know about clipless pedals. We’ll also answer a couple of reader questions and share two walkable pedals recommended by you helpful clipless users.
Do Clipless Pedals “Release?”
Let’s start with a question from Joel Garfield who says, “In the video (from Performance) that you shared in Part 2 – the instructor says (at about 2:20) that the pedals are designed to release “.. if something bad happens, like a crash …” (paraphrasing here) — I have never heard that.”
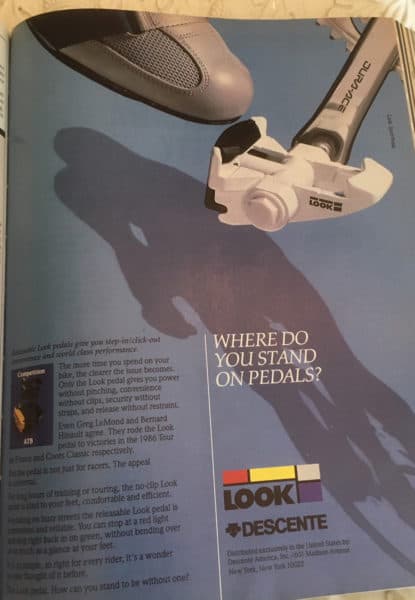
That’s an excellent question, Joel. You haven’t heard about it because clipless pedal makers don’t seem to talk about it much anymore; why, I don’t know – maybe because it’s assumed everyone knows the pedals release. But, back when Look introduced their first system, the release feature of clipless pedals was part of their marketing and sales pitch. Please see the text in the 1986 ad for Look pedals above.
Remember, that up until clipless pedals arrived on the scene, we rode with toe clips and straps that when tightened actually locked your feet to the pedals. With toe clips and cleated cycling shoes – or even sneakers with ribbed soles, before you could get out of the pedals you had to reach down and loosen your toe straps, i.e. the pedals did NOT release on their own.
With the revolutionary at the time new clipless pedals, the only thing you needed to do to get out of the pedal was to twist your heel outward and the sprung jaws in the pedal (or in the cleats for some Speedplay models), would open and release.
Back when Looks first hit the scene, 5-time Tour de France champ Bernard Hinault told how the pedals had let him get a foot out preventing what would surely have been a bad crash had he been using toe clips. Also, Look pedals borrowed technology from skiing, where bindings were designed for safely getting out of the skis to save breaking legs in crashes.
Having explained that, maybe you read into what the Performance guy said as the pedals actually having a built-in releasing mechanism – like an open/close button or switch? But that’s not the case. The release is a forced release that only happens when you move your foot the right way to spread the jaws so the pedal lets go of your foot and lets you take it off the pedal.
The interesting thing is that if someone has never tried toe clips and straps they understand and can get out of clipless pedals almost right away. Because the natural action is to move your foot to the side to step off the pedal and get your foot down to stop. Toe clips and straps teach you to pull up and back to get out of your pedals, a motion that doesn’t work at all with clipless.
What If You Can’t Get Out Of Your Clipless Pedals?
As just explained, clipless pedals should release when you twist your heels away from the crankarms (they will also release if you twist the foot the other way but the crankarm, frame and chain can get in the way).
If clipless pedals don’t release, the most likely issues are loose, worn out or damaged cleats. A common problem with new setups is that the cleat bolts aren’t quite tight enough. In that case, instead of spreading the pedal jaws and letting you get out of the pedals, the cleat is actually turning on the sole of the shoe.
If loose cleat bolts let the cleat move on the shoe like this, you may need to take your foot out of the shoe leaving the shoe attached to the pedal. Then, with luck, you can get the right tool through the pedal to tighten the cleat bolts. Or, you might need to wiggle something between the cleat and pedal jaws to open them and release the shoe. Then it’s easy to tighten the bolts.
When cleats are tightly fastened to shoes and you start having trouble getting your feet out, it usually means the cleats need replacing. What happens is the edges of the cleats that engage the jaws become smaller/thinner. In that event, they are no long large enough to sufficiently spread the pedal jaws and when you swing your feet to exit the pedals, the pedals resist letting go.
In this scenario, you can almost always get out. But if you keep using the cleats, it can get so difficult to get out that your setup isn’t really safe anymore. I recommend replacing cleats at the first sign of bad release. They’re not expensive. I usually keep a spare pair on hand just in case I notice issues before an important ride. Also, with a spare pair on hand you can compare the new ones to the ones on your shoes to tell how worn they are.
How Do I stop Clicking, Squeaking And Creaking From Clipless Pedals?
Clipless pedals and cleats can make annoying noises. It can take some Sherlock Holmesing to determine what’s causing it and shut it up for good. Keep in mind that it’s a system, so you need to check the cleats, the cleat bolts and the pedals. It’s even possible for parts on some shoes to make noises (to make sure it’s not the shoes, try a different pair and see if the noise persists).
Worn cleats are more likely to make noises than new ones. So if you know yours are old, try new ones. You can inspect cleats for wear, too. Walking is what does the damage. If you see gouges or missing pieces or the edges that the pedal holds onto are quite thin, it’s probably new cleat time. You can also get a knocking sound and feeling from worn cleats that comes from them moving back and forth during pedaling. That’s an energy-waster, so definitely replace the cleats.
If newer nylon cleats make noise, try a dry lubricant like wax or spray ArmorAll on the cleats. Just realize they will feel more slippery.
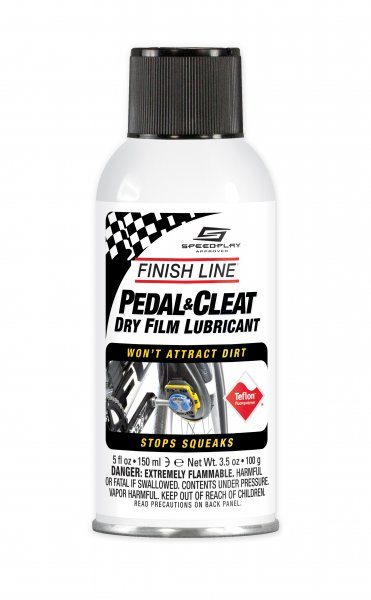
Don’t assume that metal cleats don’t have issues. They also wear and can make noise. Usually, a little lube will silence them. But, don’t forget you lubed your cleats or else you might walk into the house in your greasy shoes and trash the carpets. Finish Line offers a dry lube for clipless pedals. You can find it on Amazon here.
To slow down cleat wear indefinitely, buy some rubber cleat covers to carry on rides. You can then slip them over the cleats before walking in your shoes to protect the cleats.
Do Clipless Pedals Require Maintenance?
Some of the steps mentioned under pedal noises are a type of maintenance to keep the clipless system working well. As long as they aren’t beaten up by a crash or accident, clipless pedals themselves usually work for many years without issues if you simply keep them clean of dirt and grime build-up.
Some Shimano SPD style (walkable) pedals have Phillips screws on the bodies that can loosen and start to back out. If you see gaps between the heads and body, just tighten the screws again.
With enough years and weather you can wear out parts on the pedals, like the jaws that hold the cleat. At that point, it’s time for new pedals. The bearings inside the pedals should last longer than it takes to wear out the pedals. And, if the bearings loosen slightly side to side, it’s an easy job to add some grease to the bearings to remove that slight bit of play.
More Clipless Pedal Recommendations
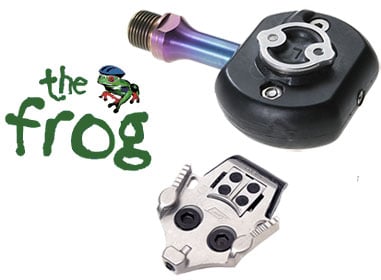
It’s always helpful to know what other roadies choose for their bikes so I want to share Jack Lockwood’s email. He says, “ I use Speedplay Frogs (photo). They’re walkable, shed dirt, and nobody talks about them…not even Jim. I can’t imagine a better pedal.”
Sorry, Jack. I actually used and loved Frogs back when I was mountain biking more. I should have remembered that they make for a nice walkable road system, too. Besides the benefits you mentioned they have Speedplay’s free float, too, which is easy on the knees.
![]()
And, we also received a nod for another Shimano model from “Tom in MN.” He explained, “If you want a double-sided pedal like the Shimano M520 recommended in Part 1 of this series, I suggest you take a look at the M8020. It’s the same idea, but with a much bigger platform that makes it much less of a problem to pedal for a bit, say in traffic, when you have missed the cleat. They are Shimano’s Deore XT, fairly high-end line, so not much heavier and easy to find online at half of list price, about $60.”
Thanks roadies!
And so concludes our guide to clipless pedals, which we hope has helped if you’re just starting out with them. Please share any feedback below and if there are questions, I’m happy to help, too.
Ride total: 9,038
” maybe because it’s assumed everyone knows the pedals release” – most likely, they want protect themselves from lawsuits in case pedals marketed with the “release feature” will not release in the specific crash.
I use Look clipless pedals and at stops I clip out my right foot 99.9% of the time. Hence, being frugal, I usually replace the left cleat half as often (or less) than the right, as the left cleat stays pristine.
To Richard’s comment above, I also clip-out on the right side and thus wear the right cleat faster. When I notice the right cleat wearing I switch the left to the right & vice-versa. This extends the pair, when they both wear out I replace the set. Forgot to mention Look red cleats.
Similarly, I replace the right SPD-L cleat more often than I replace the left one. When the cleats develop loose bits of plastic that interfere with clicking in, I trim them with a small pair of diagonal cutters.
A comment on cleat maintenance and protection: I typically spray a paper towel with a small amount of lubricant, grease. WD40, or the like, and wipe the front and back of the cleats. This cleans out dirt, lubricates a little, and causes me to check the cleats prior to the ride. Caution, as noted in article, in that it can create a slipping tendency when the foot meets the road to stop.
Also, I have rubber cleat protectors in all my saddle bags, Invaluable, and courteous to store owners, during rest stops.