Beginner’s Guide to Clipless Pedals, Part 2
 Jim’s Tech Talk
By Jim Langley
In Part 1 of this beginner’s guide, we covered the basics of clipless pedals and how they came to be. Catch up here.
Afterwards in our comments section, helpful reader Steve Kearney pointed out that, “You haven’t mentioned the fundamental reason for purpose-built riding shoes. That is the solid sole that doesn’t compress each time you apply force to the pedal. New riders may not realize that every other shoe is built for comfort with padding of some kind to absorb shock.”
Thanks, Steve, that’s an excellent place to commence with part 2. You are absolutely correct. All cycling-specific shoes have a stiffener inside between the footbed and sole (or built into the sole) so that you pedal more efficiently. Since a soft squishy sole (think cushioned running shoe or sneaker) that you have to compress isn’t between you and the pedal.
Also, the stiffener helps prevent you feeling the pedals, which can become painful in some cases. There’s even a cycling condition called “hot foot,” which is more likely to occur with soft shoes. You want to avoid it because it feels like your feet are resting on hot coals and can even cause cyclists to abandon rides.
So, if you choose to ride in regular sneakers or street shoes it’s best to pick a pedal model like platform types that are less likely to hurt your feet. But, understand that you will lose some efficiency and comfort while pedaling through the flexibility in the soles. This might not matter if you’re not riding too strenuously or too far.
If you decide to go with walkable cycling shoes, they are designed to flex a bit more for comfort and traction than stiffer-soled performance-oriented road shoes. But, they too have stiffeners inside for efficient pedaling, comfort and prevention from “hot foot.”
Tip: If you ever experience “hot foot,” pedal to a convenience store. Buy a bag of ice and stick your feet into the cubes for as long as it takes to stop the agony. You will then be able to continue riding. Preventing hot foot in the first case is more difficult, but proper fitting cycling shoes and shoe cleats are the place to start, along with never over tightening shoes – and especially on hot days.
Clipless Pedal Types
We touched on some of the different clipless pedals for road riding in part 1. Let’s look at a few popular types and what they offer. This should help you decide which is right for your cycling. If you’re still not sure ask your riding friends what they recommend and/or at your favorite bike shop for advice.
![]()
Since we were talking about riding in sneakers, Shimano’s M324 pedals are a good place to start. You can see that one side is for riding in regular shoes while the other side is clipless. This is a great choice if you want to try clipless pedals but aren’t sure you’ll lock your feet into the pedals at all times.
As long as you’re wearing walkable shoes with the SPD cleats installed on the soles (cleats are included with the clipless pedals), you can choose to ride either on the flat side of the pedals or click and lock your feet into the SPD clipless side. You could also ride with one foot clicked in and the other free on the flat side.
When you master getting in and out of the clipless pedals you can use that side of the pedals for most of your riding. Yet, if you forget or don’t want to put on cycling shoes, you can still ride in regular shoes.
Note that you can ride on all clipless pedals in regular shoes, but because they are small and unusually shaped, it’s risky since your feet can slip off.
Tip: If you’re new to clipless pedals, for safety’s sake do not hit the road until you practice getting in and out of the pedals many times. A great way to do this is to put on your clipless shoes and go out onto a lawn and stand over your bike. Now, you are nice and balanced and will have a soft landing if you happen to fall over, which shouldn’t happen if you do what I say. The goal is to train your muscle memory so your feet and ankles know how to get in/out of the pedals.
To do this, click into and out of the right pedal at least 25 times. Then do the same with the left. When you can do it without looking, you can go for a ride. But remember that if you think you can’t get out when riding, DO NOT STOP until you find something to hold onto, like a parking meter or car. Hold onto that and then you will be able to get out. If you stop with nothing to hold onto you might fall over or even break an ankle (I’ve seen it happen).
Tip: Many clipless pedals have adjustable entry/release tension. If you’re new to clipless it’s a great feature. I recommend that beginners loosen the tension so that they can easily get out of the pedals. Usually from the factory they are set to a medium tension, which is too tight for newbies in my experience.
![]()
One of my favorite walkable clipless pedals (also excellent for mountain biking) is Shimano’s M520 SPD pedals. This type of pedal has jaws on both sides so you don’t have to look down to find the correct side to click into (as you do with the next pair of pedals I discuss). Also, because these are dual-sided, you can also set the tension release different on either side of the pedal to be able to have “easy” and “hard (more secure)” in/out sides.
Notice that these are small pedals. In other words, the platform that you stand on is smaller than wider pedals. This is another reason that for optimum comfort you choose walkable cycling shoes which have stiffeners and wider soles to disperse the pressure across your feet. If you want wider platforms, there are models of SPD style clipless pedals with them.
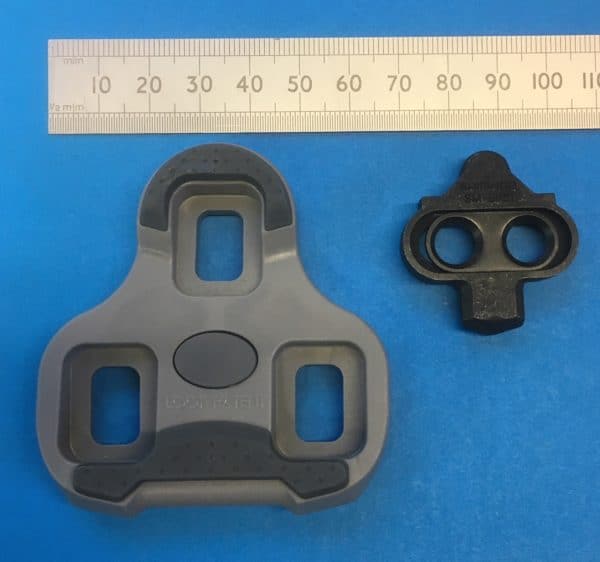
One thing to understand is that Shimano’s SPD pedals created the standard SPD cleat (photo). It’s a tiny cleat that attaches to shoes that have a recessed hole to receive it. And it attaches with only two bolts. This recessed, small cleat is what makes it possible to walk on the shoes because the cleats don’t protrude outside the sole and hit the ground.
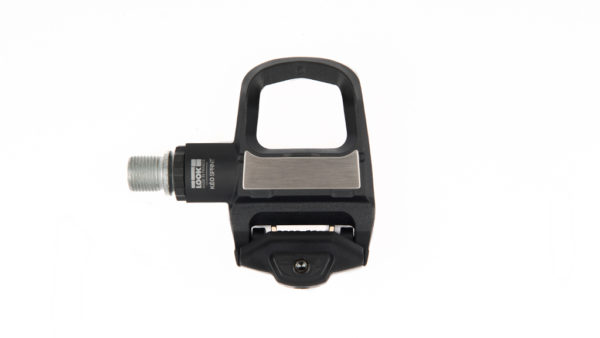
Look was the first company to popularize clipless road pedals way back in 1984, and their Keo pedals today are so popular they make many different models. I have Keos on three of my bikes and love the easy entry and exit.
Keos are an example of what’s become known at a Look-compatible pedal because it mates with Look-compatible cleats you mount to your shoes. Note that you click into the pedals on only one side, so you must “find” the pedal with your foot before you can step down and click into them. This takes a little practice.
Look cleats mount to shoes with three bolts and the cleats are designed to protrude from the soles, they are not recessed at all. This allows the shoes to be lighter, stiffer and more efficient. The cleats are larger than the walkable recessed SPD cleats, too (photo above), so there’s more contact between pedal and shoe.
If you start off and by mistake push on the bottom of the Look pedals, because the cleats are made of a hard plastic, your foot can slip right off the pedal. That can be dangerous so you learn quickly to be careful when getting on.
Tip: You can walk in road-specific cycling shoes with the protruding cleats, but the soles barely flex, so it can be awkward, uncomfortable and bad for the shoes if you bend them to the point you damage them (it’s also possible to slip and fall on slick surfaces like tile and wood floors). You can also ruin protruding cleats by walking on them a lot.
To prevent these things some roadies carry rolled-up flip flops and take off their cycling shoes. Others use rubber cleat covers to protect the cleats and provide traction and just walk carefully to not flex the shoes much. You can purchase cleat covers for all types of cleats.
One of the chief advantages of clipless pedals over the old standard toe-clip and strap pedals (if you’re not sure what that is see Part 1 for photos), is that they provide some knee protection. They do this by not locking the feet in fixed positions. The sprung jaws have some “float” built into the cleats to let the feet swivel at the heel left and right to some degree so that it’s less likely to suffer knee pain when riding.
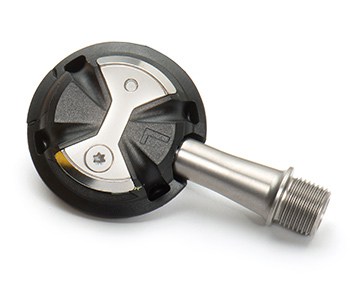
When it comes to this “float” feature, Speedplay pedals are unparallelled. It’s thanks to an ingenious design where the cleat is the mechanism that holds the pedal instead of the other way around. Plus, Speedplay pedals are round, the perfect shape for the feet to float.
Speedplay uses a four hole pattern for these cleats and there are even dedicated Speedplay-compatible 4-bolt shoes that recess the cleats for perhaps the closest pedal to sole profile ever and maximum pedaling efficiency. Read my review here. Speedplay pedals are also dual-sided so there’s no need to look down to get in.
These are nice features, but what brings most roadies to Speedplay pedals is their free and luxurious float. If you have ever suffered knee pain or injuries, these pedals may be perfect for you because your feet can float much further and more freely than on most other road clipless pedals.
Since the Speedplay cleat has working parts inside, it’s even more important to protect them when walking. For mine, I use and highly recommend the Keep on Covers – rubber covers that you put on and leave on the Speedplay cleats unlike other cleat covers, you don’t need to take these off in order to ride.
Tip: Whenever you change your pedal and shoe system, it’s recommended to fit the cleats carefully to avoid knee and leg injuries. I provide some basic helpful guidelines for positioning cleats here. But professional bicycle fitters are the best experts for this job if you experience any discomfort on the bike. Once your cleats are properly fitted be sure to mark their position on the shoes by tracing lines around them with an indelible marker. That way, when they wear out, you’ll be able to put the new cleats in the exact right place.
This beginner’s guide to clipless road pedals is an overview of a huge and expanding market and we haven’t even looked much at the many shoes out there. Still, I hope these newby clipless tips are helpful. And if there are question or comments please share them below. Perhaps there will be a Part 3 to the story, so stay tuned.
Ride total: 9,031

Hi Jim,
As these articles are aimed at new cyclists your readers may want to know what SPD stands for. I didn’t see Shimano Pedaling Dynamics spelled out anywhere is either of these two very informative articles. Thanks!
Thanks for explaining Bill – appreciate it!
1) I think they should be called SPS – Shimano Pedaling System, but, if you are British, its Shimano Pedalling System 🙂
2) Jim, If these are ‘Clipless Pedals” how do you ‘clip’ in and out? What are you ‘clipping’ into if these are clipless?
3) In all seriousness, most cyclists, including those who think they already know it all need to practice clipping in and out. How often do you see cyclists looking down at their feet when taking off after a stop light? How many times do you see Cat 5 and even Cat 4’s look down while they try and clip in – when they look back up, the pack is already half-way through the first turn.
Good points, Coach! On point 2, I tried to be careful writing the stories to always use “CLICK-in” not “clip-in.” Saying “clip-in” is a leftover from when we did clip into our pedals’ toe clips. Like you say, with clipless pedals there is no clipping in, you click in or you could say step in. But, while it’s confusing, using incorrect wording is probably so ingrained in cyclists it may be impossible for people to stop saying it. We can all try though 😉
in the video (from Performance) – the instructor says (at about 2:20) that the pedals are designed to release “.. if something bad happens, like a crash …” (paraphrasing here) — I have never heard that.
If you want a double sided pedal like the M520 above, I suggest you take a look at the M8020. It’s the same idea, but with a much bigger platform that makes it much less of a problem to pedal for a bit, say in traffic, when you have missed the cleat. They are Deore XT fairly high end line, so not much heavier and easy to find online at half of list price, about $60.
About that “clipless” denotation…There is a clip but there is no STRAP! So they should be referred to as “strapless” pedals. “Click.”..really?? I’m still clipping into my Time 2-sided MT. pedals on all 5 of my bikes….Mike
Great piece but the video left out an important tip: It suggests you should decide which side is more comfortable to unclip and always clip out on that side. I’ve been taught to clip out on the side away from traffic, usually the right foot, so that if you lean a bit too far you’ll fall out of the way of vehicles.