
A Few More Tube Tips

Jim’s Tech Talk
By Jim Langley
Thanks for sending in your great questions and comments about last week’s column, which was titled A Simple Hack to Prevent Punctures at the Base of Presta Valves. Flat tires being such a common issue, it’s always an important and popular topic.
Today, I’ll answer two great questions that others might have too and I’ll share some thoughts on a helpful comment.
Question 1
A reader named Michalis asked “I had this problem on an MTB, I don’t know if it applies here… it was repetitive punctures at the base of the valve. I tried every trick on the internet… The culprit was that the tyre was slipping on the rim when braking and pulling the inner tube with it and the valve against the rim hole. I had to go tubeless to solve it. Maybe a different/more tight tyre would do?”
My Answer
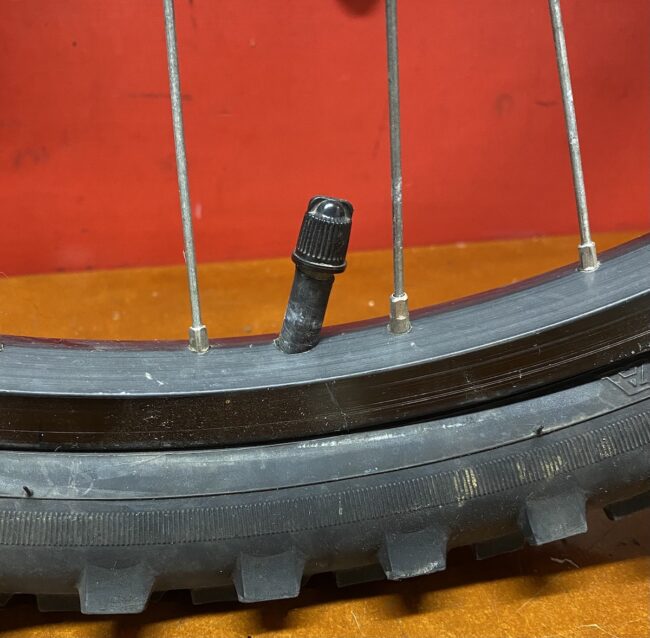
Thanks for asking Michalis. This is a very common issue and the telltale sign that it’s happening is that the valve becomes crooked in the rim (photo). I saw this constantly when I was a shop mechanic. (Please note that the photo is of a Schrader valve because that’s what I had available with a crooked valve. Presta valves can become crooked too.)
The thing that causes this common problem is that there isn’t enough air in the tire. And the reason that happens is because tires lose air naturally over time. If you don’t regularly top them off to the proper pressure, they will eventually go flat. And if you ride on them when they’re too soft, the tire can definitely move and pull the valve with it, which can lead to punctures at the valve.
If you spot a crooked valve soon enough, you can let any remaining air out of the tire, wiggle the tire on the rim to free it, and pull on the tire to move it on the rim until the valve straightens. If that isn’t possible, it’s best to remove the tire and tube and reinstall it. After that be sure to keep the tires fully inflated to prevent it happening again. It’s a good practice to check your tire pressure before every ride. So long as it’s got enough pressure, the tire won’t move on the rim and the valve will remain straight and safe.
Question 2
This one is from my friend Phil in Texas. He asked, “I bought some Continental TPU tubes. I noticed when installing them that they have smooth valves, which have removable cores, but only have a few threads at the top to accept the plastic valve cap, but that’s it (I don’t use valve caps).
There are no threads on the valve and no valve nut so I cannot put on a valve nut which I have used to snug up my other tubes to the rim. It appears that the Conti TPU tube has two “bars” at the bottom of the valve which go inside the rim and which apparently are intended to snug up the rim and the tube. Does this work?”
My Answer
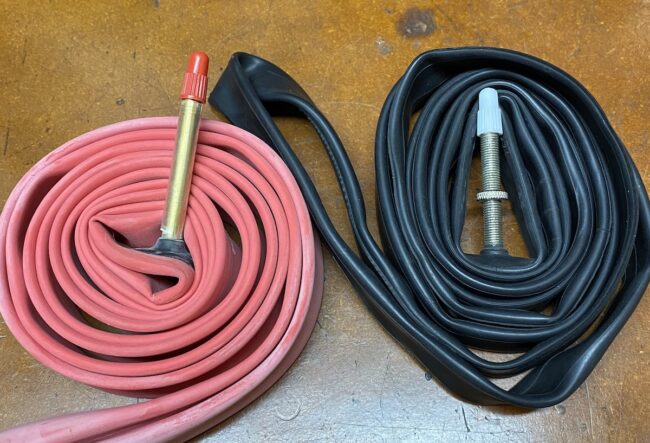
The thing that’s different – or you could say new – about TPU tubes is the plastic valve, Phil. That’s one of the things that allows them to be the lightest tubes available.
Smooth valves like on these TPU tubes have been around since way back, probably the 1960s or before even. They were always metal valves before TPU. But they were smooth.
As far as I know, the reason there’s the choice of threaded or smooth is because cyclists have different preferences. Some people favor smooth valves because they like that there are no threads on the valve to chew up/damage the rubber grommet in their pump head. The threads can make it more difficult to put some pump heads on and to take them off the valve, too. So they see smooth valves as an advantage.
But, others like that the threads keep the pump head on the valve and don’t let it come off when you’re inflating as the pressure builds. And they like being able to thread on the valve nut so that the valve won’t go up inside the tire when you need to inflate the tire and it’s really soft. The valve nut keeps the valve sticking out far enough to make it easy to get the pump head on.
I don’t think any company yet is making threaded TPU valves, even Rene Herse who has all-metal valves on their TPU tubes (not plastic) is using smooth valves.
Sorry for the long answer but I wanted to make sure you understood there’s nothing new here really. Smooth valve tubes work just as well as threaded valve tubes… unless you’re a rider who really wants to have the valve nut on a valve. Which is fine too.
I have not used Continental TPU tubes. I looked at an online photo here: https://www.continental-tires.com/products/bicycle/tpu-tubes/. It looks to me like the tube tapers slightly at its base. Maybe the idea is for it to fit more tightly in the rim hole when in place. But, I don’t know of any design to try to keep smooth valves in the rim apart from the natural tendency of the valve to go where it belongs once the tire is inflated. Nothing more than proper inflation is needed to keep the valve where it belongs.
Question 3
This one is from a reader who signed off as “SLittle.”
His question is, “Should we do this on all tubes, or only after a tube has abraded at the rim valve hole? Why not use a small file, such as a chain saw file to deburr the hole?”
My Answer
Usually, rims are made smooth inside, including at the valve hole. So you would typically only need to make the reinforcement for the valve in the event there’s an issue with the valve hole. And it would be fine to deburr or smooth the hole with tools or emery cloth, etc. I would still make and install the valve reinforcement until I was sure that whatever sharp edge was causing the issue wasn’t still there.
Heed Walt’s Advice
Last but not least, I want to share reader “Walt’s” tip for using valve nuts.
Walt says, “I have found that many people with Presta valves do not understand the use of the valve stem nut. They often tighten it down so much that it can pull the valve stem out of the tube. It only needs to contact the rim without any pressure as it only serves to prevent the valve stem from being pushed into the tube when inserting the pump chuck to air up the tire.”
My Reply
I’ve seen this time and again too Walt. Some valve nuts are actual nuts (hexagonal) and I’ve found them tightened up against the rim with a wrench, which surely made sense to the installer because it’s a nut after all.
The problem is that as Walt points out, it can puncture, possibly even ruin the tube. And, if that doesn’t happen, you better carry the tools to get the valve nut off or you won’t be able to replace the tube if you get a flat.
Another mistake is to snug up the valve nut before you fully install the tire. That often results in the tube getting pulled too deep into the rim, which blocks the tire beads from seating correctly in the rim since the base of the valve is in the way. That can result in a tire blowing off the rim, you definitely don’t want that to happen.
Thanks for the great tube talk! Feel free to comment with any other tips that come to mind.
Jim Langley is RBR’s Technical Editor. A pro mechanic & cycling writer for more than 40 years, he’s the author of Your Home Bicycle Workshop in the RBR eBookstore. Tune in to Jim’s popular YouTube channel for wheel building & bike repair how-to’s. Jim’s also known for his cycling streak that ended in February 2022 with a total of 10,269 consecutive daily rides (28 years, 1 month and 11 days of never missing a ride). Click to read Jim’s full bio.

FWIW & IMHO, I greatly prefer a threaded stem + nut: more than a few times I’ve had flats when conditions were less than optimal, in fact entirely lousy = rain, cold, exhausted, etc. Being able to secure the tube lightly to the rim just enough to get the pump on and started, and then gradually tightening while pumping means I DON’T having to be hyper-careful to avoid wiggling the stem in the rim under the force of pumping and maybe cutting the tube at the valve against the rim (been there / done that.) It would be nice to think I’m always able to execute the fix perfectly, but real-world conditions are rarely perfect, and those threads are sometimes just enough help to get me back in rolling mode.
RideNow does have TPU tubes in a version with a metal and threaded valve. It’s the main reason I use RideNow TPU tubes. These are a bit more expensive, of course, than their plastic valve versions, but I find it worth it. I will add that these have removable valve cores. The only problem with that is, that they sometimes remove a little too easily! I have a pump that screws onto the valve stem and when I unscrew the pump head after inflating it, I have sometimes had the valve core come out as well. I have fixed this problem by making sure to hand tighten the valve cores before using them and/or by adding just one drop of thread locker onto the valve core and re-installing it.
“If you spot a crooked valve soon enough, you can let any remaining air out of the tire, wiggle the tire on the rim to free it, and pull on the tire to move it on the rim until the valve straightens.”
I’ve seen this problem, mainly on my kids’ bikes. My solution was to let the remaining air out and walk the bike backwards until the valve stem straightened out. 🙂
Thanks Steve, I’m glad your kids’ bikes were so easy to fix!
Some TPU tubes have a plastic cover on the stem leaving very little thread available so pump heads that screw on (Lesyne) cannot engage properly. I have returned a few for this reason.
When I use tubeless tires I always carry small pliers to unscrew stubborn tubeless valves in case an inner tube needs to be installed