
Tech Q & A: Bert’s Daughter’s E-bike Chain Drop Problem

Jim’s Tech Talk
By Jim Langley
Unfortunately, last week’s article 7 Basic Chain Drop Solutions for 1X Drivetrains, which provided multiple solutions for fixing bikes with chains that fall off on single-chainring drivetrains, didn’t help a reader named Bert.
Here’s his follow-up question with my reply based on the information he provided about his daughter’s e-bike. I’m hoping that Bert will see this article and send in more details about his brand, model and type of e-bike – or maybe share the solution he figured out. In the meantime, I offered some possible solutions for Bert based on some popular e-bikes I’ve seen.
Bert’s Comment
“I need suggestions on our chain drop problem. My daughter bought a single-ring e-bike and has been having occasional chain dumps. I don’t believe she has any of the problems noted in points 1-6 in your article. I’ve been looking for a chain retention device such as the Shark Tooth I have on my tandem. Unfortunately, the seat tube flares, increasing in diameter near the bottom bracket. This would make it difficult to attach a chain retention device that employs a band or clamp to attach it to the frame. Any suggestions? I’ve also advised her to work on her shifting finesse, focusing on one gear at a time to avoid excess slack during the shift.”
My Reply
“Hi Bert,
It would help to know what brand and model of e-bike she has. If she bought a budget model online, it could have come with a loose bottom bracket or a bent chainring, these are common issues I’ve seen on the budget e-bikes I see that have been bought online or in department/warehouse stores. Also, while it’s always good to teach shifting with finesse, a properly working drivetrain should be able to handle even irregular shifting without dropping the chain.
Checking for bottom bracket looseness
To check a bicycle for a loose bottom bracket (AKA “BB”), you can push and pull sideways on the crankarms to feel for play in the BB. If it moves sideways when you push and pull on the crankarms, the bottom bracket is loose, and that might be the problem. The chain comes off because the chainring is wobbling and not running straight all the time, as it’s supposed to.
To fix it, you would adjust the BB to remove the play and ensure that the bottom bracket bearings are adjusted correctly and running smoothly. How this is done depends on the type of crankset and bottom bracket on the bike. An excellent resource for identifying what type of bottom bracket you have and learning how to adjust it is available on Park Tool’s awesome bike repair website here https://www.parktool.com/en-us/blog/repair-help?query=&area%5B%5D=47
Checking for chainring wobble, i.e. a bent chainring
Once you know that the bearings are properly adjusted and there’s no play, you can lift the chain off the chainring and turn the ring as you look at it for wobbles. It should run true in order for the chain to stay on.
Unfortunately, chainrings can come from the factory out of true; can get bent from things like a pant leg getting caught in the drivetrain (which can cause a crash); and get struck by something, such as when a bike falls over on its side. So, bends and wobbles are common issues.
To sight for wobbles, you need a reference point and good lighting and the bike needs to be held still. The chain is lifted off the chainring for this. Ideally the chain won’t be rubbing the chainring as you turn the crank. If it is, you can simply tie it to the frame to keep it out of the way.
If there’s a chainguard on the bike, it can make sighting the chainring difficult. You can usually find a way to lift the chainguard up above the chainring so that you can see the wobble – or remove the chainguard altogether. BUT BEFORE YOU DO THAT take a photo so that you have a record of exactly how it goes back on.
Making an Indicator
To see how true the chainring is, it’s helpful to have a reference point close to the chainring. A zip tie is handy for this. It can be wrapped around the seat tube (or on some bikes, the down tube might work better), and tightened just enough to stay in place.
Then, the end of the tie can be cut so that it provides an indicator next to the chainring. Place it so that it’s next to the teeth since they’re what’s holding the chain on.
If the chainring wobbles, the zip tie can be rotated on the frame to effectively make the indicator longer or shorter so that there’s clearance between the end of the zip tie and the ring.
If you can’t use a zip tie, you could use tape to temporarily stick an indicator to the frame wherever it works so that you can turn the crank and sight for wobbles.
When you do it, the thing to understand is that a chainring should be almost perfectly true. It shouldn’t wobble side to side as you spin the crank. If your chainring is straight, you’ll be able to move the tip of the indicator within tenths of a mm from your ring and it will spin without touching the zip tie.
Ways to Fix a Bent Wobbling Chainring
If the ring has a wobble, you might be able to fix it but it’s a little tricky to do it. First, make sure that the chainring itself is tight on the crankarm. If not, that might be the cause of the wobble. To check, hold onto one crankarm to keep it in place, and while gripping the ring with your other hand try pushing and pulling on it to ensure it’s firmly connected.
If the chainring moves on its own, that is probably why the chain is dropping and you’ll need to tighten the ring on the crankarm. That’s good news because tightening is a lot easier than straightening a bent chainring.
Straightening a Bent, Wobbly Ring
Chainring truing takes patience and practice. You can do it with a rubber mallet (gently striking the ring) or a lever (gently prying or pushing the ring). What you’re doing is bending the chainring back where it was before it got bent. Steel is easier to bend than aluminum. With both you want to go easy with the force. Start gently to learn how much force it takes to get out the wobble(s). Don’t overdo it, or you’ll make it worse. And watch out for the teeth because you don’t want to bend any of them, you only want to straighten the ring.
Start with the largest wobble. You have to observe the chainring as it’s turning to get an idea which way wobbles need to be bent to get the chainring true again. Most of the chainring is still true/straight. As you turn it and look at it, you should be able to see the centerline, which lets you know which way to force the ring to get the wobble back in line.
As I mentioned, this job can take time and can be frustrating. So, instead of trying to fix it, you might choose to replace a bent chainring. Used chainrings make nice yard art!
Chain Keepers
Since you mentioned that you’re considering adding a shark fin type chain keeper, I thought I’d recommend Trek’s. I have one on my Trek SL 5 gravel bike and it’s worked really well. Here’s a link to it in their catalog. I don’t know if it comes in the right size to fit your frame but it might (since it’s made of nylon – like zip ties – maybe you could modify it to fit):
Lastly, because you mentioned that the seat tube “flares” at the BB, your daughter’s bike might have the motor in the BB. In that case, there might be a proprietary chain keeper made especially for the bike (the photo shows an example), which if so, would mean that there should be a place to mount it on the bike. You would just need to research what chain keeper belongs there, then buy and install it.
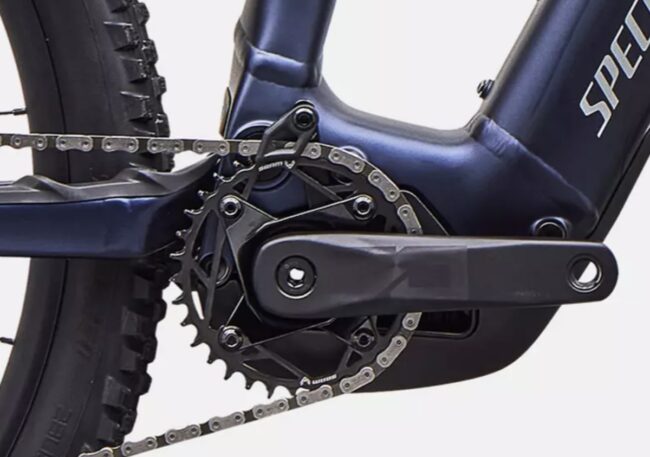
There could be other issues causing the chain drops for your daughter but these tips are where I would start Bert. I hope they’re helpful.
Jim Langley is RBR’s Technical Editor. A pro mechanic & cycling writer for more than 40 years, he’s the author of Your Home Bicycle Workshop in the RBR eBookstore. Tune in to Jim’s popular YouTube channel for wheel building & bike repair how-to’s. Jim’s also known for his cycling streak that ended in February 2022 with a total of 10,269 consecutive daily rides (28 years, 1 month and 11 days of never missing a ride). Click to read Jim’s full bio.
all of that is good advice
but
i had a cheap ebike for a while [it broke]
one of its issues was this – chain dropping
it was a 6 speed freewheel
the chain was unusually long – it was floppy and a sort of ‘wave’ of slack, back and forth, would go through it, and throw the chain off the chain ring
it did not have any fixable or observable problems other than everything about it was cheap
ultimately i discovered that if you pedal over any kind of bump, that was usually when the chain came off.
so try not doing that
it is a pain but so is chain coming off
i could not ever really fix it
it was a terrible bike and a terrible ebike
i tried a [home made] chain keeper and that also did not help
Thanks a lot for sharing your tips Larry!
Jim