

Back in RBR Newsletter Issue No. 784, I shared a nifty trick for How to Fix Disc Brake Rubbing. That article explained how to center the brake over the rotor to stop a minor, common and annoying rub because it causes the brake to drag, wasting your energy.
What that piece didn’t cover is how to straighten a bent disc brake rotor, which is another common cause of brake rub. We’re going over that in this article.
Causes
Rotors are the round, thin metal plates that attach to the wheel hubs. When you’re braking, the brake pads inside the brake calipers squeeze the rotors, providing excellent all-conditions slowing and stopping power.
If you’re lucky, your rotors will remain almost perfectly straight and you’ll never have to worry about them until they’re worn out, which can take a long time. But, if you’re unlucky, many things can bend the rotors.
For example, you could have a stick come up, get stuck in and bend the rotor. Or, on a long descent, you might hold your brakes on too long and heat a rotor enough that it warps. Another one is having someone at a rest stop mistakenly lean their bike against yours without realizing that their pedal is going to slam into your rotor when they let go.
Fortunately, these types of bends are usually fixable. What’s required is straightening the rotor. It’s a good skill to have because it’ll save money and let you keep riding instead of having to shop for new parts.
Tip: You can always replace bent rotors with new ones if you can’t or don’t want to try straightening them. They aren’t overly expensive. Just be sure to do your homework and get the same type you had.
Caution: When working on rotors and disc brakes, keep any and all lubricants away from the rotors and brake pads, because they can compromise the pad material and rotor, ruining the braking. If that happens, you may need new pads and rotors to restore the braking fully.
Inspecting rotors
Before assuming a rotor is bent, check that there aren’t other problems causing it to only appear bent. Rotors are held on with lockrings or bolts. If these loosen, a rotor can wobble and look warped when all that’s needed is tightening the rotor bolts or lockring.
You might also have a wheel that’s not fully tightened in the frame. Check the quick release or through-axles to make sure. Or, a wheel might be off-center in the frame or fork, which can make the rotor look too close to the brake, causing you to think it’s bent. In that case, all that’s needed is loosening and centering the wheel.
Another glitch that can make a rotor wobble when it’s not bent is loose wheel bearings. To check for this, grip the wheel near the fork or frame stays (rear wheel) and push and pull gently sideways.
If the wheel bearings are correctly adjusted, the wheel will not move side to side when you do this test. But, with loose bearings, a wheel will move, and sometimes a lot. The cure is to remove the wheel and adjust the bearings to eliminate any play.
When inspecting rotors, if yours has a compound bend, or is bent so badly that it almost has a crease or fold in it, it is probably beyond repair. The bends that are fixable can be significant, but only smooth bends, not actual damage to the rotor. So, if you see twisted or folded or crunched rotors, you should replace them because they’re likely beyond straightening.
Straightening
Once you’ve determined that you for sure have a bent rotor and not a seriously damaged one, you can try to straighten it – or you can say “true it.” It’s a trial-and-error process that takes practice to master. It’s not difficult, but it can be frustrating and require patience and a good eye.
You can true rotors while the wheel is on the bike. For a tool, I use and highly recommend Park Tool’s DT-2 Rotor Truing Fork (about $20). You can see in the photo how this tool has two ends that slip  over the rotor for excellent and precise leverage.
Park’s tool is heavy and fits perfectly so as not to damage the rotor even when you pry on it pretty hard. That’s usually what it takes to get a wobble out. If you’re new at it, you’ll get a feel for how you have to bend the rotor well beyond where you thought it would go straight to get it to improve, because the metal wants to rebound more than it seems it would.
You can slip the top of the tool over the top of the rotor to pull out or push in to remove a side-to-side wobble. You can also use the end with the short horizontal slot to remove a twist in the rotor by slipping that notch over the twist and pulling or pushing the tool as you hold it 90 degrees to the rotor. Another use of the horizontal slot is to slip it through the rotor and onto one of its “legs” to straighten lower bends.
Don’t rush it, and pay attention to the changes you’re making, and you can get good at straightening rotors. If it helps, you can mark the bent area of the rotor so you can keep track of your progress. Just be sure not to use anything that’ll compromise the braking surfaces.
Sighting the wobbles
One of the challenges of straightening rotors is seeing/finding the wobbles. With the wheels on the bike, you can sometimes sight through the brake and watch the rotor come through. If so, you’ll be able to see the rotor move left and right in relation to the brake pads, and be able to stop the wheel at that point. You then rotate the wheel to bring the wobble outside the brake so you can straighten just the right spot.
If you’re having trouble seeing the wobble through the brake, try putting a piece of white paper in your line of vision behind the brake caliper – or have a friend hold one up. Another trick that can work is holding a flashlight just so, to light the inside of the brake so that you can spot the bends.
Reading further, you’ll learn about the only tools I’m aware of specifically designed to make rotor truing much easier and super accurate. They’re great tools. But if they’re beyond your budget or needs, you could maybe copy how they work and rig up a pointer on your fork or frame.
Something as simple as a pencil for the pointer and a rubber band to hold it in place might do the trick in a pinch. If you come up with something that works well, please share it in the Comments section.
The gold standard in rotor truing tools
If you’re straightening rotors on a regular basis, you can save yourself a lot of time and do an even better job truing them with one or two more cool tools from Park, their DT-3 Rotor Truing Gauge (about $40) and DT-3I.2 Dial Indicator for DT-3 (about $40). See the photo.
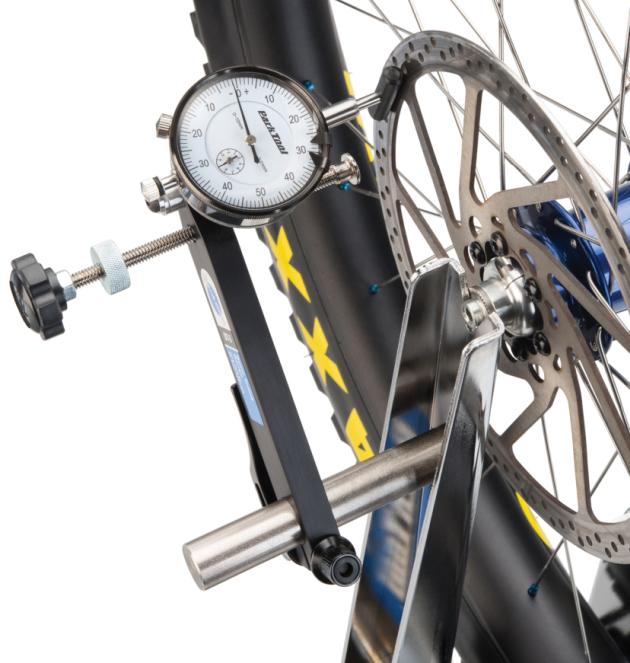
Note that in order to use the DT-3 and DT-3I.2 Truing Gauges, the wheel with the bent rotor is removed from the bicycle and placed in either Park’s TS-4, TS-2.2, or TS-2 Professional Wheel Truing Stand ($252 – $372), which are all pre-drilled for the gauge to bolt onto.
If you have another brand of truing stand, it might be possible to drill it to accept Park’s gauges.
With the wheel held securely in a truing stand with one or both of Park’s gauges attached (the photo shows both), there’s no need to try to sight through the brake caliper. Instead, you locate the wobble with the gauge’s indicator and straighten each wobble with the Park Truing Fork.
It still takes time and patience to find and true wobbles, but because the indicator shows you exactly how true the rotor is becoming, the trial and error is greatly reduced. It’s super satisfying when you end up with nice true rotor and a disc brake that works perfectly again.
Here’s an excellent video on rotor truing with Park Tool tech whiz Calvin Jones:
Great article. Since my wobbles are sometimes apparent on week long tours and I might not be near a LBS, I do carry a small vise grip. Have to admit I haven’t yet tried it, and the leverage might not be sufficient to the task, but you’ve demystified the process enough for me to try.
TSA damaged the rotor on my tandem on a trip to Canada. I wish I had known how to do this then. By the time I figured out what was wrong, the pads were damaged as well. It made for some scary down hills with only my rear brake on a tandem.
Hello Dave. Instead of using a small vise-grip–which can leave bite nicks/burs in the rotor–the use of a small adjustable wrench would be advisable.
Given the choice, I’ll us the Park tools shown above to true rotors. However, for minor or impromptu rotor truing jobs, you have all the truing tools you need with you all the time, your thumbs. Sight through the brake caliper to find the spots that are rubbing, then turn the wheel to get them out in the open. Cover the rotor with a clean cloth, cardboard, or even just paper, to keep skin oil off the rotor, then press or pull on it as necessary with your thumbs. Spin the wheel again to check your results and repeat as necessary. You’ll quickly develop a feel for how much to push to make the small adjustments that are necessary.
I use this method out on the trail all the time (mostly for people I ride with). Note it probably will not work on rotors that are kinked from an accident, but most rotor truing is about removing minor warping, which is easy to do by hand.