Setting Up Your Levers

This is the time of year when most roadies get in their training rides for their big goal events of 2016 (one of mine is L’Eroica http://www.eroicacalifornia.com/). As you increase mileage and intensity, you bump the risk of overuse injuries.
These are frequently caused by bicycle fit issues. Sometimes they’re harder to find than the classic seat that’s slipped down and is now too low. Or the cleat that loosened and moved and is now making your knee hurt.
Tip: For these common issues, there’s a preventive measure: simply mark your components so that you can tell when they’ve moved and also so you can easily and quickly move them backto the right position.
Coach Fred diagnoses a pain in the neck
For example, a few years back Coach Fred and I were helping riders at a PacTour Desert Camp. These weeklong events are super fun and perfect for building fitness. You also get to enjoy the awesome desert roads in Arizona. That week, we were along for the ride and to provide technical support during the day and in evening seminars.
A few days into the week, with about 250 miles in the bank, we spoke with a guy who was hoping we could help him solve his increasingly painful neck – which only hurt on one side. Without hesitation, Coach Fred walked over to his bike, took a long look at his brake lever hoods and showed him that the brake lever on the side that his neck hurt was in a different position than the other lever. Simply aligning the levers made all the difference.
I was reminded of that incident from an article sent in by reader Peter Heppleston from Edmonton, Canada, who says that “in the Great White North the long winter months give me way too much time to tinker with my position on the bike.”
Peter offers an easy and clever way to check your lever alignment. Here’s his step-by-step instructions, with photos.
Measuring and aligning your shifters
Most riders spend most of their time on the bike with their hands on the shifters (hoods), so the position of the shifters on the handlebars is very important for long-term comfort, safety and performance. Once you’ve found the correct position for you, here is a simple method of measuring the position of the shifters on the handlebars.
Knowing this, if you have to remove the shifters for maintenance or to install new handlebars, then you can easily re-install the shifters back in the same position. Or, if you want to make some adjustments to the position of the shifters, you will be able to easily keep track of both the old and the new position, in case you find you have to go back to the original position, or make further adjustments.
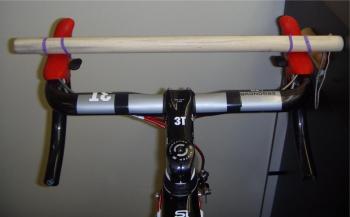
Take a length of 1-inch or 1/1/4-inch-diameter dowelling – about 20 inches/500 mm should be long enough – and attach it to the shifters with strong elastic bands as shown. The large diameter will pop into the same position on the levers each time, cradled in more or less the same position as your hands on the hoods.
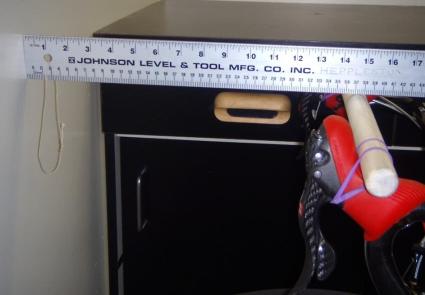
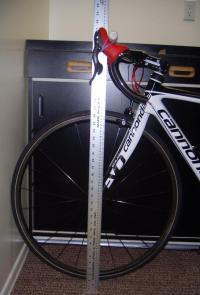
To pin down the location of the levers, lean the bike up against something with the front wheel up against a wall, rest a metal straightedge horizontally on top of the dowel and measure to the wall. Then place the rule on the floor and resting vertically on the front of the dowel, and measure from the floor to the dowel. See photos.
If you use the simple bike-up-against-the-wall method to measure saddle setback and handlebar reach, or if you use a FitStik or some other similar device, then it’s easy to add shifter reach and height to your fit data.
With all the measurements written down, it’s always easy to check them and reset any component that needs it.
Tip: You can also use the dowel to visually check that both shifters are at the same height – the dowel and the bare handlebar should be parallel.
Thanks, Peter!
If you’ve got tips for checking your levers, bicycle fit or anything else helpful, be sure to send them in or post a comment below this article.