
Observations on Cleaning Parts With an Ultrasonic Cleaner

Jim’s Tech Talk
By Jim Langley
I wrote a few articles about hot waxing chains this year including one on Event Gear Simplyfast hot wax and another on the Silca Hot Waxing System, which includes a wax melting machine (with Simplyfast I used a crockpot.) Both these articles include my videos showing how to use the products to hot wax a chain.
Clean Parts Required
In order to get wax to work well, the chain needs to be really clean before application, otherwise the wax wears off too quickly. It’s also a good idea to clean the cassette, chainrings and even the derailleur pulleys, since any grit and grime on these will also compromise the hot wax job. So while applying these hot waxes I’ve been cleaning all of these bike parts.
This is nothing new for me. As a professional mechanic for 50 years in 8 different shops, I’ve tuned up and overhauled probably thousands of bikes. All that time, I’ve used the solvent tanks at the shops where I worked. While in my home shops I’ve used a variety of smaller commercially available or homemade cleaning tanks. One interesting one that I reviewed here 12 years ago was the Glove Bucket, remember that? (It worked well, but as far as I can tell, it’s no longer available.)
A Miserable Job
It would be great if you could just toss greasy bike parts into one of these tanks and the grit, grime and gunk would magically disappear, but that never happens. Even if the tank is filled with nasty stuff like gasoline (extremely dangerous – don’t do it), it will definitely loosen some of the nastiness but not all of it.
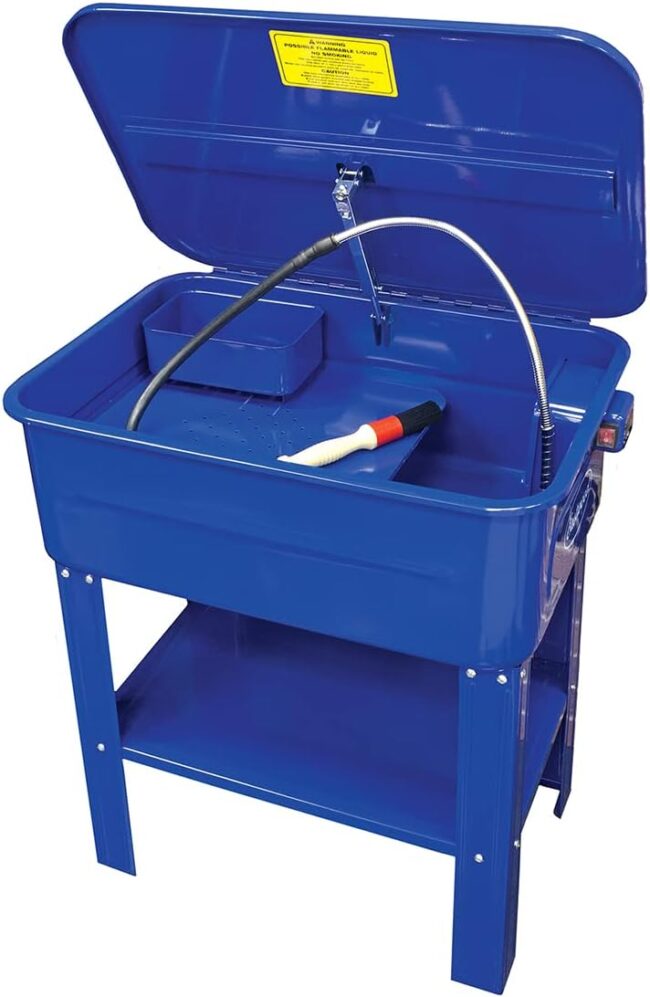
Which is why professional solvent tanks usually include a pump that shoots water through a hose into the tank. At the end of the hose is a built-in brush so that you can work at the parts with the solvent spraying on them and brushing them until they’re clean. You can see the basic setup in the photo.
Even with the solvent squirting out of the hose and scrubbing with the brush, you usually still have to take other measures to dislodge the worst deposits, such as scraping or picking or brushing more with a brass brush, which is more tenacious than the plastic one on the end of the hose.
The cleaning turns into a big hassle, and the more of a perfectionist you are, the bigger the hassle becomes. Worse, the whole time you’re leaning over the tank breathing any fumes and likely getting splashed by the solvent. Wear gloves, goggles and an apron for safety and protection.
Most shops today would use something safe for solvent so as not to put anyone at risk. But the rub is that, the safe solvents don’t have anywhere near the cutting power of the toxic ones, which means more scrubbing and scraping is required.
Enter Ultrasonic Cleaners
I’ve known about ultrasonic parts cleaners for years. They harness the power of high frequency sound waves created by transducers in the bottom of the box, which create microscopic scrubbing bubbles with significant cleaning power. There are ultrasonic cleaners that include heaters for the cleaning solution too, because that helps loosen grime and gunk even more.
Some of you commented on my hot waxing articles that you use an ultrasonic cleaner and love it. But what piqued my interest enough to try one was a video Josh Poertner at Silca posted pointing out which one he recommends along with what solvents and cleaners he uses on parts. It was one of his excellent Marginal Gains shows.
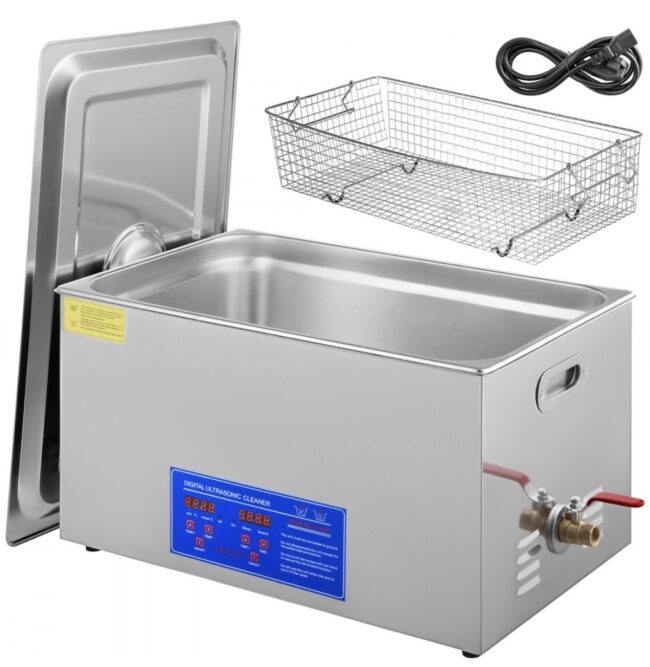
Josh’s presentation convinced me to get one and give it a try. I got one from Vevor, their 22 Liter (5.8 gallon) Industrial Digital Ultrasonic Cleaner. And I also purchased the solvents Josh recommended using. Vevor makes much smaller cleaners that will work for chains and other little components. I wanted the larger one so that I could clean an entire drivetrain if needed including the crank and chainrings since that’s one of the most time consuming items to clean.
The Vevor cleaner has 480 watts for ultrasonic power, 600 watts for heating the solution (distilled water). It’s constructed of stainless steel, has a perfectly fitting lid, reinforced recessed carrying handles on the sides, 4 rubber feet on the bottom, a large removable parts basket inside and there’s a drain and hose on the outside for emptying when the time comes. Digital controls on the front make it easy to set the solvent temperature and run time.
Overall Vevor’s cleaner feels heavy-duty and appears well made (it weighs 21 pounds without any liquid inside). The cleaner and the basket’s dimensions are: Length x Width x Height in inches: ultrasonic cleaner’s outside dimensions: 21 x 13 x 10.75; basket’s inside dimensions: 18.5 x 10.5 x 3.5
How Does It Work?
So far I’ve cleaned two chains, a crankset, a bottom bracket bearing cup, a freewheel and a cassette. For a solvent I used mineral spirits (also known as paint thinner). I chose that because it’s inexpensive (about $10 per gallon) and it cuts through grime well. That’s not what Josh uses in his video but I used a different cleaning method involving putting the parts inside containers with the solvent – similar to sous vide bags for cooking. That’s a tip from Steve’s Small Engine Saloon videos.
The result of my first ultrasonic cleaning experience made me wish I had bought one a long time ago. It makes cleaning even the filthiest parts much, much easier. You do have to wait a while (I gave the chains 40 minutes). And, when the parts come out, you have to rinse and dry them. But, that’s it. There’s no brushing or scraping or picking at parts to clean them. The ultrasonic cleaner does all that work for you while you wait. Best, apart from any wear and tear on the parts, they end up looking almost like they did when new.
And, for hot waxing chains, you get the best results because the chain is ultra clean.
Watch the Video to Learn More about the Cleaner and its Use
I made a video showing more details about the Vevor ultrasonic cleaner I used and how it works cleaning those parts I mentioned. In the description below the video there’s a discount code that Vevor gave me to share with you. That’s why I haven’t mentioned the price. And also because I’m writing this during the post Thanksgiving sales and the prices keep changing. Note too, that Vevor makes smaller units that go down to about $60 if cleaning chains is what you’re most interested in.
One important note about the video. Ultrasonic cleaners make a buzzing noise when they’re cleaning. This buzzing somehow interfered with my microphone so what you hear in the video is nothing like the noise the cleaner makes. You’ll definitely hear the cleaner and know it’s running but I didn’t find it annoying, and you won’t have any trouble hearing music over the sound it makes.
After watching the video if you have any questions, please comment below and I’ll reply. And if you use an ultrasonic cleaner please share what you use and any tips you have on cleaning with it. Or if you’re happy cleaning parts without a fancy electronic device, feel free to weigh in with your advice too.
Jim Langley is RBR’s Technical Editor. A pro mechanic & cycling writer for more than 40 years, he’s the author of Your Home Bicycle Workshop in the RBR eBookstore. Tune in to Jim’s popular YouTube channel for wheel building & bike repair how-to’s. Jim’s also known for his cycling streak that ended in February 2022 with a total of 10,269 consecutive daily rides (28 years, 1 month and 11 days of never missing a ride). Click to read Jim’s full bio.
Links mentioned do not appear at end of video.
Grease can also be removed w Dawn detergent diluted with water. In the cleaner. I have a small one for chains that works well. Was originally for cleaning glasses.
Thanks for pointing that out John. The links are in the description to the video which you can only access if you’re watching it on YouTube. To make them easy to find, I have now put them below. Thanks again!
Article on cleaning aluminum safely with an UC:
https://crest-ultrasonics.com/using-an-ultrasonic-cleaner-for-aluminum-parts/
Video showing the science behind how UCs work:
https://www.youtube.com/watch?v=M8F_jLhEJIQ&t=0s
Josh at Silca’s Marginal Gains video on UCs and cleaning solvents to use with it:https://www.youtube.com/watch?v=ka0DLKBrhB4&t=0s
Ultimate UC use tips by Steve at Steve’s Small Engine Saloon:
https://www.youtube.com/watch?v=BTN7-C72eHA&t=0s
re all the ultrasonic cleaning
the alternative is never clean, just let them wear out a bit early and replace
Yes, that’s a really good point Larry. Some riders do choose to simply lube when needed, hardly ever really clean things (just wipe major messes off), and just ride the parts until worn out. Then they just replace everything. That’s definitely one option.
Jim
For 60 years and hundreds of thousands of miles I’ve just wiped parts clean with a rag and maybe a tiny dab of solvent when something was really sticky (like tar spun up from the road). The “home-brew” chain lube concept has worked well and I get good mileage on my chains – just as good or better than those reporting the miracles of waxing. Ultrasonic baths have been around for a long, long time and recommended for cleaning bike parts, but they have never really caught on. They work just fine but it’s not clear that they really add anything to the equation. Call me a skeptic.
Thanks for sharing this Kerry, appreciate it.
Jim
In my ultrasonic cleaner I use Simple Green directly in the tank. It is a little more environmentally friendly and I don’t have any trouble cleaning the tank. I always clean new chains in the ultra sonic cleaner to remove the heavy factory oil before installing.
Thanks for tell us how you do it Mike.
Appreciate it,
Jim
Regular Simple Green isn’t actually recommended for metals; it’s apparently too caustic. However, they also make their HD formula which specifically states that it’s safe for metals:
https://www.homedepot.com/p/Simple-Green-Pro-HD-Heavy-Duty-Cleaner-1-Gallon-2110000413421/100550784
I put small parts and solvents in glass jars, then put the jars in the cleaner filled with water. keeps things a little tidier and saves on solvent. I also tend to clean parts more often since it’s easier too.
Great article Jim. Good to have you aboard the UC train. Irrespective of chain waxing, it’s the best way to clean all your parts. FWIW, I use Silca’s Super Secret drip wax lube. I highly recommend it.
Like Mike above, I use Simple Green, but I put parts in zip-loc bags with SG then into the basket. NBD, but it keeps the tub very clean. Also, remember to empty the UC container and shake-it. Also keep the drain valve open when empty to avoid rust.
Just last week, I cleaned my chain and cassette. I couldn’t get the chain perfectly clean after 3 attempts, then the light bulb turned on: I was using a nickel-plated KMC chain and the black links were flaking off appearing as dirt/grease on the wipe. Be advised. It probably doesn’t affect functionality, but it sure is not helping. All stainless next time.
The effort to mount and maintain tubeless tires is worth it to me. Same for a UC to use the drip wax. Both have riding payback, if not economical return, IMO. To each his/her own indeed.
Jim, I envy the size of your 22L UC. Mine is 6L. How much did 20L of distilled water cost?
Thanks for the tips Seth. I didn’t buy the distilled water at the cheapest source because we just happened to be by an Ace Hardware. I bet I could have saved on it at a large grocery chain like Safeway. But at Ace it was about $3 a gallon, so in total, about $18 for 6 gallons (a little over the 22L). I bet I could find it cheaper other places.
One thing to consider about Simple Green as a cleaner. In their own documentation they actually say it can corrode aluminum parts. I stopped using it once I read that – that was years ago not long after it came on the scene.
Thanks a lot,
Jim
Hi Jim: I really enjoyed your ultrasonic cleaning article. Being a “hot waxer” I’d like to share my procedure for cleaning and waxing my chains. Well, I have three chains I keep in rotation, and every 500 miles I change it out for a clean chain. When cleaning the chains, I use a smaller ultrasonic cleaner than you have pictured, since I only clean chains, the upper and lower head tube bearings (once a year) and the free hub. I use the cleaner basket and put two chains in and put the basket in the paint thinner. I clean them for 15 minutes, and during that time swish the chains around to ensure all crevices of the chain are exposed and cleaned. I then remove the chains and rinse them in water, wipe them somewhat dry, then put them in a jug of alcohol and shake it good for a bit. This is to remove any remaining water. They are hung to dry, which only takes a few minutes. Then I measure the chains using a Park Tool or Pedro’s 12 speed chain checker. The paraffin wax is heated up in a pan out in the garage on a hot plate. I use a candy thermometer, and when the heated wax gets to 300 degrees F, I put the basket with the chains in another ultrasonic cleaner and pour the molten wax over the chains. The ultrasonic is turned on for 15 minutes. During that time I move the chains around to, again, ensure all crevices are exposed to the liquid wax. After the 15 minutes I turn off the ultrasonic and let the wax cool for about 45 minutes. I feel this is VERY important as I don’t want to remove the chains from the hot wax and have the wax drip off from the chain pins and rollers. So I wait until it’s almost ready to solidify then carefully remove the basket with chains, let it cool, then take the chains out, straighten them, then hang them up.
A couple of things:
The flash point of the wax is about 400 F so need to pay attention to this. I get it that hot so the surface tension of the wax is even lower and will penetrate the tight spots of the rollers, pins and plates.
I measure the chains only when they’re clean to avoid any debris or wax from filling a void and giving a false reading, which would show the chain to have less wear.
I don’t clean the cogs of the chainring or the cassette in a cleaner since I wash my bike and I clean it then.
My bike has 14,800 miles (I use mainTrack, an app I downloaded to my phone to track the various bike components) on this set of chains and the drive train. And the chains show hardly any wear but the cogs on the chainring and the cogs on cassette sprockets seven through 11 show definite “shark fins” so I’m in the process of replacing those parts along with new chains.
I’ve tried taking apart a link or two to verify there’s wax penetrating in the rollers or pins, but no luck doing that.
I keep the master link to each chain with that chain with the use of a paper clip. And yes, I reuse the master links, never had any problems.
So that’s how I maintain my chains, and please, if you or any of your readers have any constructive criticism on how to make it better, please tell me.
Thanks very much for sharing all your tips Lloyd, that’s very nice of you.
Appreciate it!
Jim
Thanks Jim; sorry I was off the subject by a 1000%.
From information I read on the Silva site the regular Simple Green can cause weakening of the chain by hydrogen embrittlement. Use the aerospace formation, Simple Green Extreme, instead. Highly recommended, works great.
Thanks for sharing this tip David!
Jim
I started using an ultrasonic cleaner about 15 years ago for my chain and cassette. I tried several cleaners mentioned above simple green (both the regular and the lighter version), dove soap etc. and finally ended using mineral spirits for the past several years. After removing from the ultrasonic I hose/rinse the chain with water then hang it and use my air compressor to blow out the water from the chain. I do the same with the cassette. The chain is wiped weekly with gear or cleaning wipes to remove any gunk off the chain, pully wheels and chainrings then a light coating of Boeshield T-9 is applied (I ride about 200-250 miles/week). This greatly reduces the number of times that I have had to use the ultrasonic.
Used mineral spirits are considered as hazardous waste and you should follow appropriate disposal protocols. This is not a trivial issue.