By John Marsh, Editor & Publisher


|
HOT!
|
NOT!
|
|
Updated Version of Fly 6 Tail Light Camera Improves on Original
[NOTE: This review was updated after the release of version 2 of the Fly6 in late November 2014. The original model hit the market earlier in 2014, and I first reviewed it in August. I was one of 20 testers worldwide who provided feedback on the new model. Among the upgrades or changes to the new model are a few that have been previously reported (and addressed some of the shortcomings noted in my original review): shorter size of the unit, brighter light, longer run time, and an upgraded camera and lens. See the Upgrades section below for a rundown of the improvements. I have updated all the product specs in the review to reflect the new version, but I have largely left the original review intact because it captures the essence of the Fly6 in terms of its value to cyclists, how it operates, etc.]
Getting shot with a pellet gun on a ride only weeks before was still fresh in my mind when I first found out about the Fly6 combination tail light and HD camera.
Though I suspected it was a shot fired from a car behind me that bloodied my hip that day, I had no evidence. If only I had had the Fly6 then!
Because that’s exactly what the Fly6 was designed for: to keep a full-time watch over the vulnerable area behind you (your “6,” in military-speak) – and record it in case something goes wrong and you need a visual record of the event. The makers call it “incident protection technology.”
I call it brilliant.
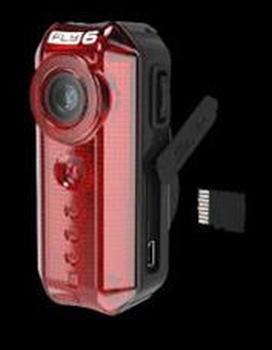
In a unit about the size of an average tail light (88mm long, but a bit heavier at 113g, or 4 ounces), you get a fully functional flasher AND high-definition 720p video camera with audio.
It’s USB rechargeable with decent battery life (up to 6 hours on one charge) considering it’s both a tail light and a camera that runs full-time from the moment you turn it on. Even though the new version improved run time from approximately 5 to 6 hours, that still may not be enough to cover one very long day on the bike.
Easy, But Not Ideal, Set-Up
The Fly6 isn’t quite plug-n-play, but it’s close. When you receive it, you plug it into your computer with the USB cable (supplied) until fully charged. Then you turn on the unit while it’s still plugged into the computer and access a file containing the date and time to set up and save those so that all video contains an exact “time stamp.”
The Fly6 attaches to your seat post (with supplied mounting bracket, rubber straps, and spacers to fit both traditional and aero seat posts). The seat post-only mounting is both to ensure the proper recording angle and stability for the camera.
I admit that I was a bit flummoxed at first when I saw that the seat post was the only mounting option, since like the vast majority of our readers, according to a recent poll, I prefer a seat bag to carry my tubes and tools. However, after looking closely at my bike, I realized I could mount the unit at the junction of the seat post and frame, and it would work fine.
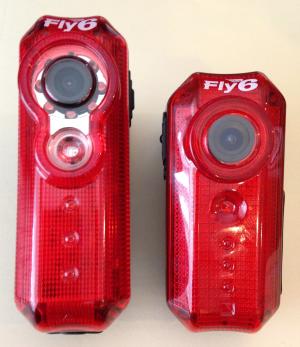 The original Fly 6, at 110mm long, resulted in my seat bag showing up at the very top of the frame in the video captured by the unit. It was just a fraction of the overall viewing area and did not in any way block the important rear view. But the shorter size (88mm long) of the updated Fly 6 addresses this issue to a degree, and its overall size is comparable to most typical tail lights. (See the photo of the original, left, and updated units.)
You still may see a bit of your seat bag in the very top of the frame depending on the type of bag, how much seat post you have exposed, etc. In fact, because I have a different saddle and seat bag from when I tested the original, and the seat bag hangs lower, it still shows up just a bit in the video. Again, it’s not at all an issue.
Set It And Forget It Functionality
The best aspect of the Fly6 is how easy it is to use. Here it is: Turn it on. Ride.
The power button turns on both the flashing light and the camera, so you literally need only to set it and forget it while you ride. You hear a series of beeps when you turn on the unit that correspond to remaining battery life, and you can see small bezel lights that rotate around the camera to indicate it is operating.
The camera records in a continuous 2-hour loop. The recording is stored in the unit on an 8GB class 10 microSD card (supplied) and downloads automatically to your computer when you plug in the unit after a ride. The 2 hours’ worth of video is split into 10-minute files to keep the size manageable (about 650MB). The original Fly 6 split the video into 15-minute files of about 800MB. The small files are a bit more manageable.
The loop recording feature cannot be turned off. However, if you want to record more than 2 hours, you can purchase a larger microSD card (up to 32GB, which will allow up to 8 hours of recording).
Perhaps the coolest feature of the Fly6 is the “incident protection” function. When your bike tips past 30 degrees and stays that way for more than 5 seconds (for instance, in the event of a crash), the unit automatically triggers a program that stops the recording one hour after the incident. Thus, you have on your standard 8GB microSD card the hour leading up to, and after, the incident. (The degree of tilt was changed from 45 degrees in the original unit, and from 3 seconds.)
If you lay your bike down at a rest stop, or there’s another innocuous reason for the post-30-degree tilt, you can simply turn off, and turn back on the unit to start the 2-hour loop anew.
On-The-Road Results: Clear, Wide-Angle Video
The proof of the Fly6 is in the video captured at a resolution of 1280 x 720, at 30 frames per second, in the AVI file format. The camera records a 100-degree field of view, so you can see cars, other riders, and objects until they are nearly even with you on the road.
Playback can be done on any Mac or PC using a common video viewing software, like Windows Media Player. Cycliq, the renamed company behind the Fly 6, recommends using VLC Media Player.
The video is clear and sharp, and the updated version of the Fly 6 employs a better camera and sharper lens to improve upon the quality rendered by the original. You can very clearly view passing cars, any fellow riders you happen to be in front of, and watch the scenery roll by in a view you’ve never seen before.
While it’s fun to have a view of riding buddies (which means you’re out front!) or record group rides and such from an interesting angle, the key, of course, to the safety aspect afforded by the Fly 6 is vehicle identification. The clarity of the video allows you to capture and read license plate numbers, pick out the make and model of a car, etc. All of this would be necessary in the case of any harassment – or worse – in a hostile interaction with a vehicle. And that’s the true purpose of the device.
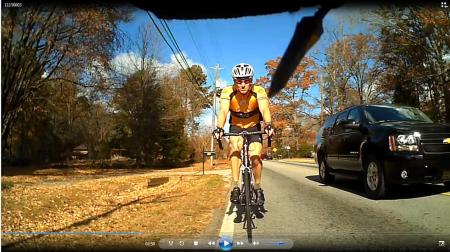
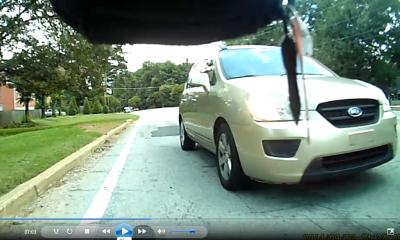 (The top photo is of me and a riding buddy getting passed, safely, by an SUV. The photo below that one shows me getting buzzed. Georgia is among those states that does not require a front license plate. Note the clear visibility of the front area of the minivan where the plate would be in front-plate states.)
“Fly6 is a safety camera, not an action camera,” the makers state. “It is designed to record what happens behind you during your ride so you can enjoy the ride ahead. There have been a number of motorists caught being aggressive to actually hit-and-run incidents caught on Fly6. The police get involved and serve justice where previously these motorists would get away.”
Their hope is that as more drivers expect riders to have such cameras on board, the drivers will increasingly police themselves.
An Added Bonus
I’ve used a flashing tail light full-time on all rides for over two years now, and I’ve always “felt” that drivers give me a bit more space because of that. The Fly6 has provided me video evidence that supports what until now has been that purely anecdotal feeling.
One of the most welcome upgrades to the new Fly6 is a doubling of the light’s output from 15 to 30 lumens. (It is bright enough to hurt if you take anything more than a quick look directly at the light.) It features 3 individual LEDs below the main flasher, as well as those bezel lights that rotate in a circle around the camera at the top of the light. All told, it’s quite a “cacophony” of lights, and it does seem to catch the attention of drivers.
(So even if you don’t feel the need for the video-tail light combo, you still may consider another full-time rear flasher as a safety tool.)
Upgrades in the New Model
Here’s a rundown of the improvements from the original model to the new Fly 6:
- smaller form factor (88mm long vs. 110mm)
- brighter flasher (30 lumens vs. 15)
- longer run time (6 hours vs. 5)
- better camera and sharper lens
- steady on (not flashing) mode to comply with European regulations
Other (firmware, etc.) changes include:
- 2-hour recording split into 10-minute video files (vs. 15-minute) for smaller file size
- incident capture initiated when bike tips past 30 degrees for more than 5 seconds (vs. 45 degrees for 3 seconds)
- micro USB port and microSD card slot moved to side of unit (from bottom of unit)
Final Analysis
The Fly6 is not a panacea. It’s not meant to replace a mirror. Nor will it prevent harassment, or worse. But it works as promised, is easy to use with its set-it-and-forget-it functionality, and is another useful safety tool for road riders. And the improvements in this newly updated version – chief among them a brighter flasher, shorter length, better camera and lens, and longer run time – make it an even better product.
Just like a helmet, the true benefit comes to fore only in the case of an incident or accident, but that’s exactly why – and when – you want to have it. And the full-time flasher may well serve to provide an extra safety buffer around you as you ride – an added benefit.
I’ve now been using a Fly6 on every single ride for about six months. It is one of my favorite products to come along in quite some time, and I anticipate using it well into the future. To me, it’s an indispensable, common-sense safety tool.
December 2014
John Marsh is the editor and publisher of RBR Newsletter and RoadBikeRider.com. A rider of “less than podium” talent, he sees himself as RBR’s Ringmaster, guiding the real talent (RBR’s great coaches, contributors and authors) in bringing our readers consistently useful, informative, entertaining info that helps make them better road cyclists. That’s what we’re all about here—always have been, always will be. Click to read John’s full bio.
It is disappointing to see that with the Version 2 model, they have not addressed the issue of the mechanism for mounting the light. I had the misfortune of having a light come loose and being destroyed during a ride (my bad, I modified it to improve it and did not fully understand the dynamics of the mounting straps). To their credit, they offered me a reduced cost replacement and acknowledged others had the same issue. There was discussion about integrating a quarter-turn mount like the Garmin Varia and current model Garmin Edge units and the Fly12.. Hopefully Version 3 will address this issue and you will see one back on my bike in the future.
I have a 58cm frame as I am tall. I have absolutely no issue mounting the Fly6 on my seat post. It sits well below my medium sized tool bag and works perfectly. I love the Fly6 version 2.