
Jim’s Tech Talk
By Jim Langley
Rubbing hydraulic discs can drive you crazy. Sometimes, it’s just a slight chirp or brushing sound only heard when walking your bike. Or it could be bad enough that you actually feel a brake dragging making it harder to pedal! Either way, it’s annoying and something to fix ASAP.
Standard adjustment
For this, I’ve twice offered tips for making fine adjustments to stop rubbing. The standard recommended adjustment by the brake makers is to loosen the bolts holding the caliper to the frame then to squeeze the brake lever and hold on the brake while you tighten the bolts back down.
If you’re lucky, this will allow the caliper to center over the rotor again and voila – no more rubbing. (Be sure to torque the bolts.) If you’re unlucky, though, you might improve the rubbing but not get rid of it completely.
The business card and Hayes tool workarounds
For these situations, there are workarounds and tools that basically add shims between the brake pads and rotor so that the standard adjustment works even better. In this Tech Talk I explain the “business card” method. And in this one, I show a super cool tool from Hayes that does the trick.
When the standard adjustments don’t work
Unfortunately, sometimes the standard and “shim” adjustments don’t fix the rubbing. Here’s what to do when that happens.
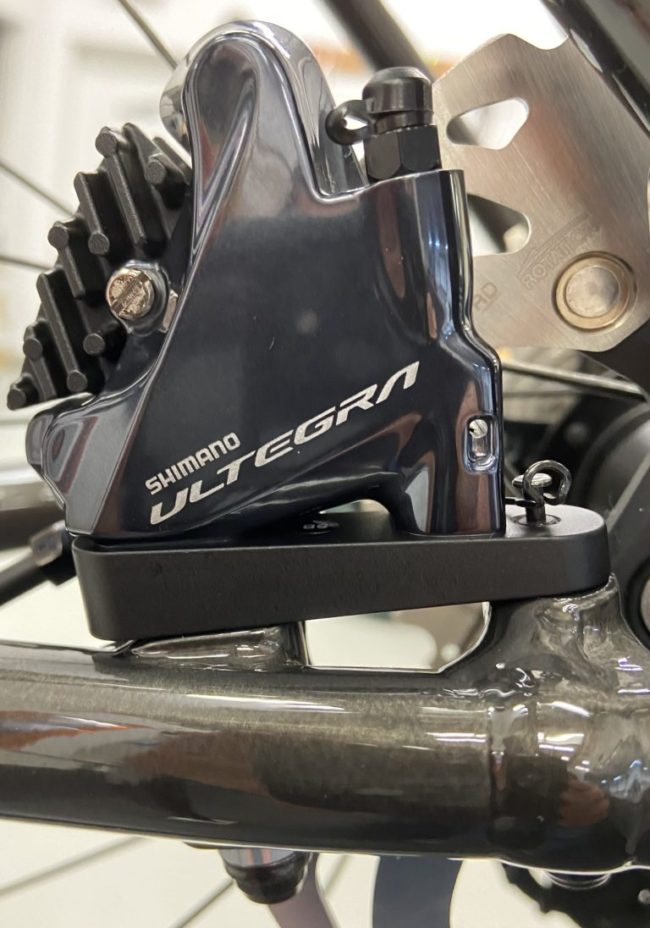
The first step is loosening the caliper just as you would for the standard adjustment. When you do this, be sure to only loosen the bolts that hold the caliper to the frame. I mention that because on some brakes there may be secondary bolts holding the caliper to an adapter. Look carefully and loosen the correct bolts.
When the caliper is loose, grab it and wiggle it around a bit to make sure it is loose (not just the bolts) and can move. This ensures it’s not hung up on anything like the hose. If the hose is pulling the caliper out of position, pulling on the hose gently should create the slight amount of slack needed to let the caliper move freely.
Setup
To do the fine-tuning to stop rubbing, you need to be able to spin the wheel you’re working on and look down through the brake caliper to sight the gaps between the pads and rotor. For this, you want the bike stable so it doesn’t shake around. A repair stand works nicely for this. But you could also do it for example, by putting a board across two tall chairs and resting the seat or bars on it, depending on which brake is rubbing.
You’ll also need a large piece of white poster board or something that acts like it. I have used the tops of coolers at bike events. This white object is going to provide a background so that you can actually see the gaps. They’re often invisible without this white backer. If you can’t clearly see them you can’t make the adjustment.
The adjustment
With the brake bolts loose, the bike suspended and the white backer below the brake you’re working on, you’re ready to get to work. You’ll need your allen wrench for the brake bolts you loosened.
The first step is to make the standard adjustment, holding on the brake lever while tightening the bolts. BUT, only slightly tighten the bolts. Now spin the wheel and look for the rubbing. You should be able to see it clearly now with the white background.
Take your time and watch the rub and determine which direction the brake needs to move to provide clearance and stop the rub. It might not be obvious. And that’s okay because this is basically a trial and error process. So take your best guess and push on the caliper in the direction you think it needs to go.
If pushing on it by hand won’t move it, loosen the bolts a tad more. Or, if the bolts weren’t overly tight and it didn’t move easily, you can tap on the caliper with something firm like a rubber hammer to bump it and move it a tad. Through experimenting like this with slight changes to the caliper position, you will find a spot where there’s no rubbing.
Keep in mind that there are two bolts, which means you can move the brake throughout a range of angles. You can also tighten one bolt a little more than the other to hold one end in one place while you move the other end where you want it.
When you’re satisfied the rubbing is fixed, go back and forth snugging each bolt a little at a time until both are tight. This gradual tightening prevents the caliper changing positions during tightening. Then apply the brake a few times to make sure the rubbing is really gone. If it is, hold on the brake as before and finish the job tightening the bolts with a torque wrench.
It takes a little finesse and back and forth to get the feel for this adjustment and fix brake rubbing. But, it’s not really much different than what we cyclists have done forever when centering sidepull rim brakes. And, it’s super satisfying when you stop the rubbing – and knowing you’ve mastered the skill and can do it anytime it’s needed.
What if the rotor is warped
Working on a rubbing brake you may spot a wobble in the rotor. Minor wobbles shouldn’t prevent you being able to stop rubbing. But, a large one can.
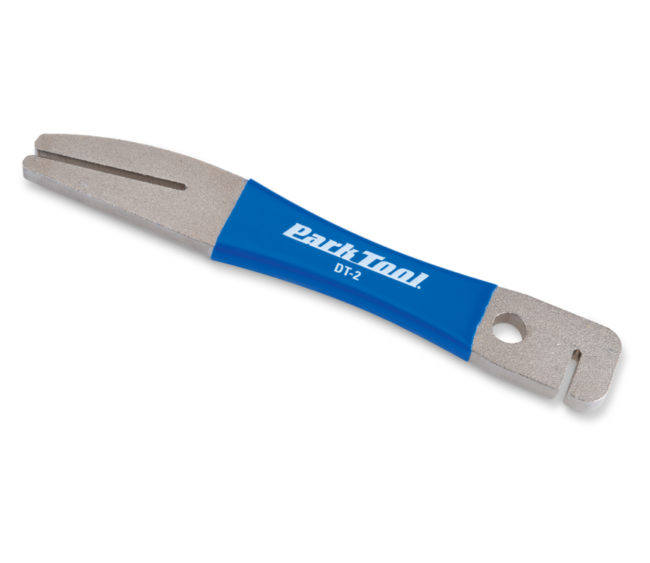
For fixing wobbly rotors, I like to use Park Tool’s DT-2 Rotor Truing Fork: https://amzn.to/3osxo2Q. It has a long “nose” that lets you hold onto a wide portion of the rotor and a narrower end to fit inside the arms of rotors.
Straightening rotors takes a little practice and getting them perfect can be nearly impossible. But, you can remove enough of wobbles to stop rubbing if you keep at it for a while. The tricky thing is that rotors spring back when you try to bend them straight. So, you have to push or pull more than you expect in order for them to actually take a set.
Don’t get frustrated and force it too much or you can warp the rotor worse and make more work for yourself. I find that the best way to find the wobble(s) and fix them is working on the worst ones first.
I slowly turn the wheel by hand and watch the gap between the rotor and brake pads. When that wobble is in between the pads, I move the wheel to bring the wobble out where I can go to work on it. I use the Park tool to straighten the rotor at that spot as best I can moving the wheel to bring the rotor back between the pads to check my progress. Then I continue the process on any other wobbles until I have the rotor as straight as I can get it.
Here’s an outstanding Park Tool video showing these adjustments.
Ride total: 9,800
Jim Langley is RBR’s Technical Editor. A pro mechanic & cycling writer for more than 40 years, he’s the author of Your Home Bicycle Workshop in the RBR eBookstore. Tune in to Jim’s popular YouTube channel for wheel building & bike repair how-to’s. Jim’s also known for his cycling streak that ended in February 2022 with a total of 10,269 consecutive daily rides (28 years, 1 month and 11 days of never missing a ride). Click to read Jim’s full bio.
Worked great ?. Thanks for the help.
You’re welcome, Charlie!
A buddy showed me a trick that really helps see the gaps. He put a small work light/flashlight on the floor and shined it upwards through the calipers. That really helps to easily see the disc rotating, clearances and any rubbing. If you don’t have the park tool for straightening the disc I’ve used needle nose pliers and open end wrenches for slight bends, too. On the road, I’ve also seen folks place the disc between the longer hex wrenches on a universal tool to slightly bend the disc to stop the squealing.
Been using a nearly closed adjustable (Cresent) wrenchs to true rotor. A thin old cotton Tshirt inside the wrench jaws prevents scratches and keeps the rotor smooth.
I had a particularly difficult alignment problem that I tried to address exactly as stated above. Still couldn’t solve the problem (rotor was straight and true). Turned out, the cylinder on one side was not moving when the brakes were applied. The piston on one side was stuck. I discovered this by observing the cylinders when the pads were completely out of the caliper and the wheel was off. There was asymmetry in the movement of the pistons. You must be VERY careful when doing this because you can pop the piston out of the cylinder. Once I found this problem, I removed the piston from the cylinder and discovered that it had failed and small pieces were floating around behind the piston. This prevented consistent operation of the pistons in the cylinders. The home position of the pistons was not constant. The manufacturer replaced the whole assembly under warranty although the components were more than three years old. I am deliberately leaving the name of the manufacturer out because over the years they have always gone out of the way to take care of me. Just know if you run into the problem, ask nicely you could possibly get free replacements..
This comment is about hand numbness, often a problem especially as we age. I have found that even the slightest–and I mean SLIGHTEST looseness in the headset bearing adjustment can cause/aggravate hand numbness. Obviously the bearings adjustment shouldn’t be cinched down tight, but as snug as possible with no drag can make a real difference, even if no looseness was detectable previously
The ultimate solution to difficult rubbing disc brakes- SELL THE BIKE!
Don’t laugh. I know several very experienced road riders who have done this…..including a few who bought used so they could go back to rim brakes. Interestingly I know no MTBers who gave up on discs. Maybe because the relative benefit over rim brakes is greater, and perhaps MTB discs/calipers are more forgiving to set up (?).
We have one bike in the family with hydraulic disc brakes and the maintenance required on them makes me not want them ever again. Constantly rubbing. Another bike has mechanical discs that work just fine and require no maintenance.
I have done this numerous times. It works great on the stand but when I sit on the bike it rubs. Apparently there is a bit of flex in the frame. The only way I can figure to fix it is to have someone sit on the bike while I make this adjustment.
I unknowingly had a piston freeze up. Eventually my brtakes started to rub so I moved the caliper to sell the rub. After a few iterations I realized the only easy to adjust to stop pad rub resulted in the rotor contacting the caliper body. This was very frustrating until I figured out that one piston was seized. I freed the piston and was able to get rub free brakes again. Now when I change pads I do a better job of cleaning and lubricating the brake pistons.
Subsequently I had a piston seize on my MTB.
When I got a new MTB I had the shop swap the 4 piston stock brakes for a set of two piston brakes. I wouldn’t want to be on the trail with 1 of 4 pistons seized.
After reading this I will stick to rim brakes. Never had a problem with them, can travel without worry and oh yea, if I want to stop faster I’ll get bigger tires.
Agreed. I’m a flat-lander road rider perfectly happy with rim brakes (AL rims & cleaning pads/rims periodically). The big makers only offering their higher end (Ultegra/DA/Force/Red) roadies with discs has pushed me AWAY from buying a new bike 🙁
While a frozen piston will surely cause problems, more often it is a lazy one that can produce an off-centered caliper. Syborg’s cleaning and lubrication of the piston seals is the solution.
I might suggest seeing that the caliper is centered on the rotor with the pistons fully open without the pads in place (sighting the gap between the rotor and the caliper gap) should be a preliminary step before installing the pads.
I use a small flashlight to see the gap insteadof a white sheet. Also, tightening each bolt a little at a time does not always keep the caliper from shifting. Sometimes applying another set of washers under the bolts helps with that. As far as warped rotors go, I find using my fingers and a clean oil-free paper towel is much more effective in taking the warp out especially if it is a longer section. The tool pulls too much in a narrow spot and can make the warp worse. These are my opinions from years of dealing with disc brakes