
Jim’s Tech Talk
By Jim Langley
Just when we thought we’d covered every aspect of derailleur hanger alignment in part 1 and part 2 of this series, two cycling luminaries reached out with some fascinating related facts. Plus, a helpful comment worth sharing was posted. That’s how we’ll kick this off.
Make your own!
The helpful comment came from stalwart RBR contributor “Walt” who explained his homemade hanger alignment tool,
“For the DIY crowd (or for those who do not want to pay for a pro tool), I use a piece of square steel tubing of the appropriate length, drill a hole in one end to accommodate a 10mm bolt of the correct threads for the derailleur hanger, add a couple of nuts on the bolt to get the correct spacing (away from the hanger), and, then use a rigid tape instead of the adjustable pointer to measure the distance from the wheel rim to one edge of the square steel tube. Then proceed to align the hanger as Jim described. I have never had an issue aligning the derailleur hanger using this homemade tool.”
Thanks, Walt! The correct thread is 10mm. I assume that by “rigid tape,” Walt means a ruler or measuring tape. For sourcing the parts that he mentions you can find steel tubing at home supply/hardware stores and probably find the metric bolts and nuts, too. If you prefer to order from home, McMaster-Carr is a great source.
Calvin’s hanger torture test
Next we heard from Calvin Jones at Park Tool who had read the articles and wanted to share his research on the strength of aluminum hangers. This was of interest because aluminum hangers feel fragile especially when straightening them, and several readers in comments mentioned how easily they may break.
Calvin shared the following videos, which I think you’ll find as surprising as I did.
Calvin’s test strongly suggests that aluminum hangers are a lot tougher than they seem to be and should be able to withstand a few alignments. Still, it can’t hurt to keep a spare on hand just in case.
René Herse Nivex Derailleur – no hanger required!
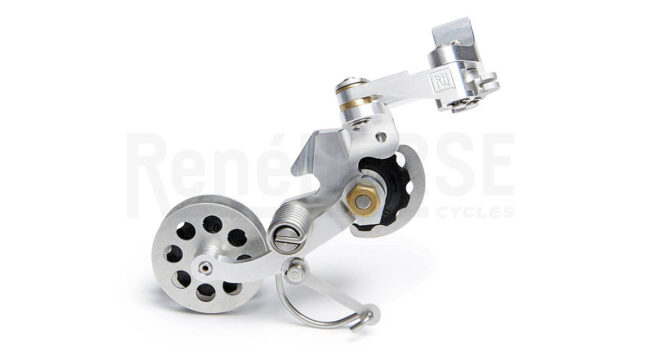
The last bit of hanger-related news is René Herse’s announcement this week that their Nivex rear derailleur is now in stock. The unique thing about this new old derailleur (it was inspired from a 1930s Nivex) is that it doesn’t require a derailleur hanger at all. Instead it mounts beneath the chainstay.
This means that there’s no hanger so there is no risk of bending it. Plus, the derailleur doesn’t protrude outside the frame so if you lay down the bike on its drivetrain side or crash on that side the derailleur won’t take a hit and get damaged.
You can learn more about this ingenious derailleur on Jan Heine’s René Herse blog here: https://www.renehersecycles.com/nivex-derailleurs-are-here/. And here are the required parts, the chainstay braze-on, Nivex derailleur, Nivex shifter and cable parts: https://www.renehersecycles.com/shop/components/derailleurs/nivex-rear-derailleur/.
Many thanks to Walt, Calvin at Park Tool and Jan at René Herse for sharing!
Jim Langley is RBR’s Technical Editor. A pro mechanic & cycling writer for more than 40 years, he’s the author of Your Home Bicycle Workshop in the RBR eBookstore. Tune in to Jim’s popular YouTube channel for wheel building & bike repair how-to’s. Jim’s also known for his cycling streak that ended in February 2022 with a total of 10,269 consecutive daily rides (28 years, 1 month and 11 days of never missing a ride). Click to read Jim’s full bio.
Very interesting test, between indoors and outdoors ! I would have bet a little bit of money, that the hanger would have bent far less times in the cold vs room temperature.
I thought the same thing, George.
Thanks,
Jim
With a bend test you are not testing strength but ductility. Probably the aluminum used is a 6061 aluminum, with temper unknown, but possibly T6. 6061 aluminum is fairly high strength for an aluminum, but has very low ductility. This alloy is a very commonly available alloy and is relatively inexpensive.. Also, aluminum’s properties that I am aware of do not change with temperatures, which is why these alloys are used to store LNG at -269 Deg F, and other liquids at even lower temperatures.
Thanks for explaining that, John, appreciate it,
Jim
I bought an Abbey DAG at the Louisville NAHMBS a long time ago.
Very expensive and very good.
Impresses your tool savvy friends 🙂
Here’s a link to that tool in case you want to see it:
https://www.abbeybiketools.com/collections/tools/products/hag
Thanks, David,
Jim
The RH Der requires a specific frame for mounting. Very interesting though
Good point, Matthew. In order to install the René Herse derailleur you need to also buy the braze-on for it, which I linked to in the article. Then you would either braze it onto your chainstay yourself or have a framebuilder do it for you. It’s a steel braze-on designed for steel frames. Once the braze-on is installed on the chainstay you then have the choice of leaving your steel derailleur hanger that came built into your right rear dropout, or you could remove it if you wanted to. But, you should probably make sure you really like the new derailleur first 😉
Thanks,
Jim
Most road bikes come with machined or stamped aluminum derailleur hangers that can be straightened. However, I have seen hangers that are CAST aluminum. These inevitably crack if they’re bent and straightened, requiring replacement. Replacing them with an aftermarket machined hanger is the best long-term solution.