
By Jim Langley
Jim’s Tech Talk
This is the second article on repairing bent derailleur hangers. In part one we covered common ways they’re bent and the shifting problems caused by bent hangers. And we recommended derailleurhanger.com as a good source for finding the correct replacement hanger for frames with bolt-on hangers (most frames today).
We also went into different methods to fix a bent hanger on the road. You can read the whole story here: https://www.roadbikerider.com/fixing-bent-derailleur-hangers/. For even more helpful tips, don’t miss the comments at the end of the article.
This article is about using a professional hanger alignment tool to fix bent hangers.
Why Use a Professional Tool?
The main reason to buy and use a pro-level alignment tool is to be able to align hangers accurately. Even minor bends can cause shifting issues such as hesitation or missed shifts. More serious ones can cause the chain to come off or the derailleur to shift catastrophically into the rear wheel.
You can use some of the workarounds that we showed last week to improve a bent hanger on the road and hopefully be able to get home. But, for precision alignment a good tool does a much better job. They serve two purposes, too. They are a gauge for determining how bent a hanger is and in which direction. And they are the lever used for straightening the hanger, too.
Should You Straighten or Replace?
Before breaking out your alignment tool, you evaluate the hanger to see if it’s fixable. If you have a steel hanger, as long as the hanger is just bent, it can usually be straightened. But, if the derailleur went into the spokes and that twisted the hanger and derailleur (or worse, tore the derailleur off or partially off) then you might be out of luck.
Still, it’s surprising how malleable steel hangers and dropouts are (the dropout is the part of the frame the hanger is built into). So you can sometimes straighten them even when they look ruined. Hanger alignment tools aren’t made for this. You use bending tools such as adjustable wrenches, Vise-Grip locking pliers, etc. You have to end up with a round hole, threads that still accept the alignment tool (and derailleur bolt) and a flat outside face on the hanger.
With a steel hanger that can’t be fixed, your best option is to have a framebuilder install a new one.
TIP: When trying to save a badly bent hanger be sure to install the rear wheel in the frame. That will reinforce the dropout so that all the straightening force is directed to the hanger and can’t affect the dropout.
Replaceable Hangers
Most replaceable derailleur hangers are made of aluminum. They are held on to the right/drive-side dropout with bolts and nuts or screws, the axle or a combination of these things.
Aluminum doesn’t like to be bent and it may break when attempting to bend it back – especially if it’s bent badly. So, in most cases, rather than trying to straighten an aluminum hanger, you would replace it with the correct one. It’s smart to keep the correct replacement hanger in your seat bag for this purpose on the road and at home.
However, and this is where the pro hanger alignment tool comes in, how do you know if your new aluminum hanger is correctly aligned? It may look good to the eye, but is it as perfect as it should be?
The only way to check it is with a pro alignment tool and that’s one of the best reasons to own one. They show whether your replaceable hanger is straight and they’ll also verify that when you swap out a bent one for a new one, the new one is straight (not always the case).
If you find that a new aluminum replaceable hanger is bent, it’ll probably be barely bent. But that can still cause shifting issues. And you can align these minor bends with the professional tool.
Using Professional Hanger Alignment Tools
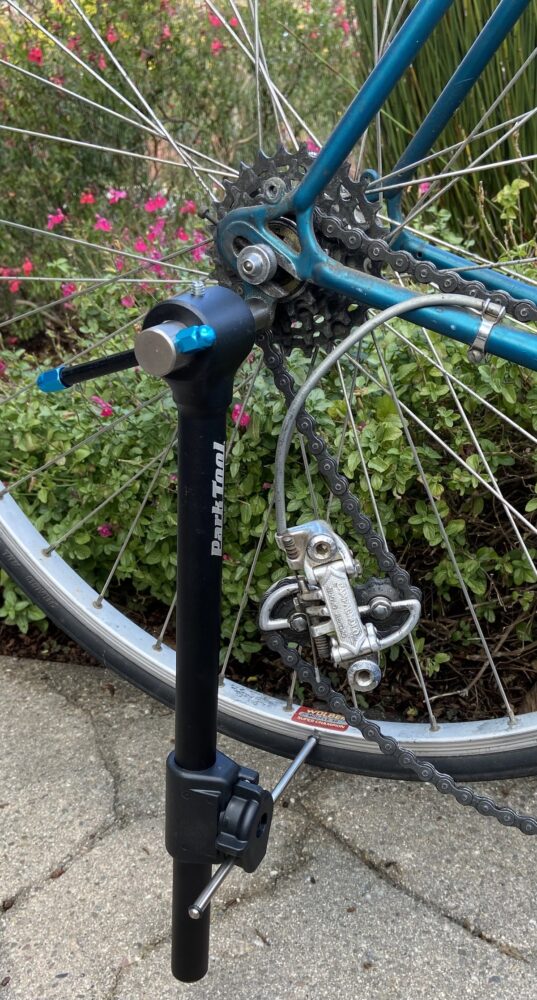
My photo shows the basic setup for using the most common type of hanger alignment tools. The tool here is Park Tool’s newest aligner the DAG-3, my favorite hanger fixer because it addresses all the shortcomings of most of the other tools out there.
These types of tools screw into the hanger and feature a 360-degree swinging arm that lets you compare the surface of the hanger to the face of the rim.
Notice that the rear wheel is in the frame. It should be fully tightened in the frame and centered, too.
The first step is to remove the rear derailleur. It’s easier to do this if you lift the chain off the chainring so that the chain is slack and there’s no tension on the derailleur pulleys. Then, with replaceable hangers, be sure to check any screws, bolts and nuts to ensure the hanger is attached tightly to the frame.
Installing the Tool – Don’t Strip the Hanger Threads!
To check hanger alignment, carefully screw the tool into the hanger. Traumatized hangers might have bad threads. Don’t force the tool in if it doesn’t start easily. Instead try saving the hanger threads by tapping them from the backside (closest to the wheel). The threads are deep enough that even if a few of the first front ones are bad, running a tap through will “chase” them and allow threading the tool in. (It’s a 10mm tap https://amzn.to/3P20qny.)
If you don’t have and don’t want to buy a tap, you can screw your tool in from the backside but the worse the hanger threads are the more chance you’ll dull your tool’s threads. Alternatively, if you have a threaded quick release rear axle, they’re usually 10mm thread and you could use that instead of the tool or tap.
Checking and Fixing Alignment
Once the tool’s in the hanger, let it hang as shown. Notice the label on the rim is at 6 o’clock and there’s a pointer on the tool that’s also there. That pointer moves in and out and it’s set here in the photo so that it barely clears the surface of the rim (it’s almost touching).
Once set the pointer won’t lose its in/out position unless it’s moved. The pointer is held in a sliding piece that moves up and down on the tool. This lets you move the pointer away from the rim so the pointer doesn’t bump into the rim and lose its position relative to the rim face.
Next, the rim and tool arm are rotated together to bring the label of the rim and the pointer on the tool to the 12 o’clock position. Because the derailleur hanger hole is offset below the wheel axle, the alignment tool pointer must be raised so that it’s next to the rim at the same place on the rim as it was at 6 o’clock.
Moving the tool pointer from the bottom to top of the wheel like this reveals if the derailleur hanger is bent in the vertical plane. If the hanger is straight the distance from the rim to the pointer will be the same at 6 and 12 o’clock.
If it’s not the same, you use the lever on the tool to gently align the hanger until the pointer gaps are equal.
Once the vertical alignment is spot on, you can check the horizontal alignment by placing the tool at 9 o’clock and then 3 o’clock the same way you did at 6 and 12. And you can use the tool to straighten as necessary. When you have the same gaps at 3 points on the wheel, such as 12, 9 and 6, you know the hanger is back where it should be.
More on Park Tool’s New Hanger Alignment Tool
Here’s my full review of Park’s DAG-3 Derailleur Hanger Alignment Gauge, which I consider the easiest and most accurate tool I’ve used to date.
Jim Langley is RBR’s Technical Editor. A pro mechanic & cycling writer for more than 40 years, he’s the author of Your Home Bicycle Workshop in the RBR eBookstore. Tune in to Jim’s popular YouTube channel for wheel building & bike repair how-to’s. Jim’s also known for his cycling streak that ended in February 2022 with a total of 10,269 consecutive daily rides (28 years, 1 month and 11 days of never missing a ride). Click to read Jim’s full bio.
Thanks for all your great information. Something I wonder about is since the derailleur hole is off set from the axle, is there any benefit to adding other reference points. such as 2, 5, 8 10 (clock reference).
Thanks again.
Matt
Hi Matt,
You could do that if you want but measuring at 6, 12, 3 and 9 should give you just as accurate an alignment.
Thanks,
Jim
For the DIY crowd (or for those who do not want to pay for a pro tool), I use a piece of square steel tube of the appropriate length, drill a hole in one end to accommodate a 10mm bolt of the correct threads for the DR hanger, a couple of nuts on the bolt to get the correct spacing (away from the hanger). and, then use a rigid tape instead of the adjustable pointer to measure the distance from the wheel rim to one edge of the square steel tube. Then proceed to align the hanger as Jim describes. I have never had an issue aligning the DR hanger using this homemade tool.
Thanks for the field repair ideas. I have had good luck with the Park tool during the past 3 years, and would say it has paid for itself. Most recently, I successfully straightened the integrated dropout/hanger on my daughter’s mid-1980s Cannondale. I know that bending aluminum is Ill-advised. My question is what experience others have had with breakage of an older aluminum dropout hanger? Do you get any warning, are their visible cracks, and what do you do once it happens? I’m assuming best case, no one gets hurt, and the bike gets turned into a single speed. However, maybe there are other options.
Bert: I have straightened several “vintage” Al hangers without issue….slowly and a little pressure at a time. The only failures I have had is when the hanger is already cracked (was going to have to replace it anyway but just a test to see what would happen) and once when it was severely bent.
I have had failures with “vintage” hangers which were not replaceable, probably already stressed or cracked. That is the best way I know to turn a multi speed bike into a single speed.
Great to see Park has stepped up the new tool.
I use an Abbey Tools HAG guage and I use the valve stem for a consistent spot on the rim when moving the guage to 3, 6, 9, and 12.
Bryan
I’ve seen two varieties of aluminum derailleur hangers, cast and machined. Cast hangers tend to be soft and brittle, so they bend pretty easily and anything more than very minor alignment tweaks will cause them to crack. It also seems that you can align them once, but any effort to do so again will cause them to crack.
Machined hangers are stronger, harder and will generally handle larger or multiple alignments better, but if you have to align a hanger, it’s a good idea to buy spares.
Whenever possible, I buy machined hangers and I always carry a spare on the bike, just in case.
One place to get machined derailleurs and other machined bicycle parts is at Wheels Manufacturing in Louisville Co.
Thanks, David,
Here’s a direct link to Wheels Manufacturing’s derailleur hanger catalog: https://wheelsmfg.com/derailleur-hangers.html
Thanks!
Jim
Thanks for another great article Jim. I’ve used the Park DAG 2.2 for many years with great success. I would really emphasize Jim’s use of the word “gently” for when you’re applying pressure to straighten the hanger. Tiny adjustments are key, kind of like when you’re truing a wheel. If you keep over-adjusting, you’re slowly compromising the structure of the hanger.
I have an original Shimano Dura-Ace TL-RD10 alignment tool I picked from a shop going out of business back in 1993. I couldn’t ask for a better hanger alignment tool!
Has anyone ever used the Wolf Tooth Hanger Alignment Tool ??
Yes, David I’ve used it and I reviewed it – and I’ve mentioned it here in this 2-part story about aligning hangers. Here are the links to the two Tech Talk’s on Wolf Tooth’s super innovative Pack Hanger Alignment Tool:
Part 1: https://www.roadbikerider.com/wolf-tooth-pack-hanger-tool-review/
Part 2: https://www.roadbikerider.com/follow-up-on-wolf-tooth-new-tool/
Hope this helps,
Jim
Thanks very much!