
By Fred Matheny
Unless you live in temperate climes where winter means slipping on a sweater in the cool of the evening, you probably equate off-season training with cold weather. Sure, you can retreat to the trainer and Zwift or the weight room to escape the arctic blasts. But what fun is that?
Cycling is an outdoor sport. Even at its January worst, cold weather shouldn’t limit your riding (or crosstraining). As the Scandinavians say, the weather isn’t too cold, you’re just underdressed!
What about your precious bike, subject to the perils of gritty slush and road salt? I have a solution for that problem, too.
If you know how to handle winter, both with clothing and equipment, you can ride into spring with all the fitness you need to begin a great season.
Here’s how to beat the Big Chill.
It’s a Cold Wind Blowin’
Before you venture outside in frigid conditions, it’s important to know about windchill. Wind decreases effective temperatures enormously. For instance, at a relatively balmy 40F degrees, a 25-mph headwind means that the cold you feel is equivalent to only 16 degrees.
CAUTION! Remember that even on a dead calm day, riding a bike creates its own headwind. If you’re riding at 15 mph, it’s equivalent to standing still and be- ing buffeted by a 15-mph wind with its accompanying chilling effect. If you’re riding 15-mph into a 10-mph headwind, it’s the same as the wind blowing at 25 mph. This has a huge impact on how cold you feel—and how you should dress.
TIP! To lessen the effect of windchill, plan winter routes so you travel into the wind on the outward leg. You’ll get the coldest part of the ride done early before your clothes become moist with sweat. When you’re damp and getting tired, the frigid blasts will be at your back, blowing you home.
Windchill below about 10 degrees can make cycling dangerous. It’s hard to stay sufficiently warm to ride long enough for worthwhile training, though an hour of pedaling in winter’s crisp air and sunshine certainly has other benefits.
The faster you go, the greater the windchill. So, it makes sense to reduce your ground speed while still keeping resistance high enough for a good workout.
One way is to ride a mountain bike on the road. You’ll go slower, but the fat tires and wind resistance of a more upright position guarantees productive pedaling resistance. As a bonus, you’ll spare your good road bike a soaking in the slush and salt.
Another benefit of knobby tires: They provide much better traction in any snow you might ride across.
Layers and Layers
You’ve probably heard about layering your clothes in cold weather. The idea is to trap body heat in several lightweight garments, which also sequentially wick sweat away from your skin to keep it drier. For cycling, this works much better than wearing a heavy, bulky jacket over a sweatshirt.
On your upper body, start with a thin base layer. Most of these are made of a synthetic material. Although synthetics smell like a hibernating bear after one wearing, they do a great job of wicking moisture from your skin. If they get damp—from sweating on a climb, for instance— they feel dry again quickly.
Some riders like wool base layers because wool has great insulating properties without accumulating the objectionable odor. Wool garments are a little harder to find, but many brands are introducing more and more Merino wool layers that are relatively soft and not itchy.
TIP! Turtlenecks are nearly essential for winter cycling because it’s so easy to lose heat from your unprotected neck. An icy wind on your throat or the back of your neck can make you feel cold no matter what you’re wearing. If the high top irritates your skin, lube the affected areas with petroleum jelly or a skin cream.
Over the base layer, add a short sleeve jersey for moderate temperatures or a long sleeve jersey or light fleece vest if it’s below freezing. On top, wear a lightweight windbreaker (often called a “shell”). It should block the wind but have underarm or back vents that allow some airflow. It should also have a full-length zipper for ventilation.
If it’s significantly below freezing, wear a second base layer or jersey. In arctic conditions, use a winter cycling jacket. It should have windproof panels on the chest, shoulders and front of the arms. The material on the back should breathe to let excess heat escape. Again, there should be a full-length zipper.
CAUTION! Never wear a cotton garment next to your skin. Cotton doesn’t wick sweat. Instead, it gets soaked, then feels clammy and cold. It’s one fiber that doesn’t belong in a cyclist’s winter wardrobe.
Legs
Legs are easier to keep warm than your trunk or extremities. Most riders are comfortable in leg warmers down to about 45F degrees. Lightweight tights work from there to about freezing. Wear heavier winter-specific tights with windproof front panels, especially on the knees, when the temperature is in the 20s or colder.
CAUTION! Don’t make the mistake of wearing too little on your legs even if they feel okay. You risk knee injuries if they aren’t appropriately covered. Also, your body will shunt blood from your feet to your under-protected legs, leading to a serious case of frozen tootsies.
CAUTION! Men—beware of penile frostbite. A cold wind can penetrate your tights and cycling shorts, freezing tissue that’s near and dear to you. Wind-front tights help. Tuck your base layers down around everything. You can also insert an old polypro glove, sock or piece of fabric down the front of your shorts.
Head
Lots of warmth can be lost through the head because the scalp is networked with blood vessels. A thin polypro skullcap under your helmet is usually enough to prevent excessive heat loss. Ears are a different story. They can become uncomfortably cold even in air that’s above freezing. A fleece-lined ear band will keep them warm without making the rest of your head too hot. Excess heat will still escape from the crown of your head.
When it’s colder, wear a thin balaclava under your helmet. This covers everything but your face and can be pulled up under your mouth or nose. Tuck it into your turtleneck or a neck gaiter to prevent air leaks. If the balaclava is properly thin, it won’t make you too hot or even require you to change the size of your helmet pads.
Speaking of helmets, it takes very cold conditions before you need to cover the vents. Otherwise, let the airflow keep your head from becoming too hot. If your head starts sweating, you’ll start sweating all over.
Feet
There’s an old saw in cycling that says: You can only be as warm as your hands and feet. When your extremities get cold, your core is next. When your core gets cold, your hands and feet can freeze because minimal blood goes there. Your body fights to keep vital organs warm by reducing blood flow from your torso.
So, let’s keep your feet toasty first, then warm up your hands.
Cold feet are probably the biggest complaint of winter cyclists, and for good reason. Few things are more painful than feet thawing after a frigid ride. But it’s not hard to keep your tootsies toasty even in subfreezing temps, at least for rides of 90 minutes for less.
Shoe covers (“booties”) are the key. They come in two types: neoprene rubber, or fabric with a fleece lining.
Neoprene is heavier, bulkier and stiffer than fabric, but it costs less. It does a good job of blocking wind, but it’s only fair against water. It holds in body heat pretty well. In fact, too well in one respect. Neoprene can cause condensation that dampens your shoes and socks. Dampness and cold are never a good combination.
Fabric booties are light and floppy. Most models can be rolled up and stuffed in a jersey pocket or seat bag. Wind resistance is good, and so is water resistance, depending on the outer material. Fleece lining helps insulate and is less likely than neoprene to cause condensation.
It’s hard to overheat feet, so wear booties even on days that are merely chilly. Remember, when your feet are warm, you’ve got a much better chance of feeling comfortable all over.
When shopping, choose booties that extend high up your ankle and have a snug top. You want plenty of overlap with your tights to keep feet heat in, not vented like a chimney. Make sure there are reflective stripes. It’s smart to wear things that can catch a driver’s eye. In the low light of a dank winter day, bobbing booties that shine in headlights make you safer.
If you ride in cleated shoes, you may need to cut a hole in each bootie’s sole. Make it just large enough to expose the cleat. Any more will let in cold air.
TIP! For frigid temperatures, or if you want to stay out for more than 90 minutes around freezing, you need extra foot insulation. Consider buying cycling shoes one size larger so you can wear thick wool or wool/synthetic socks. Don’t try to cram thick socks into your regular summer shoes. The tightness will restrict circulation, making your feet feel colder than if you wore thinner socks. If you plan to do a lot of riding in cold temperatures, consider spending the money a pair of winter cycling shoes.
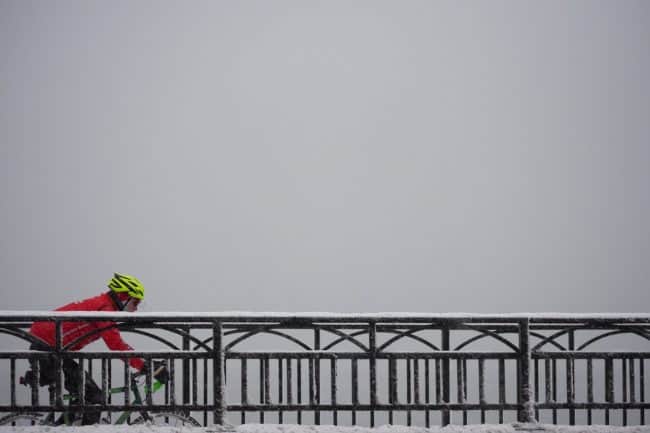
Hands
If it’s cold in the morning but will warm during the ride, wear regular short-finger cycling gloves under lightweight long-finger gloves. These gloves should be made of a stretchy woven fabric with a gripper material on the palm so your hands won’t slip on the handlebar. They’ll keep your hands comfortable on the cold metal brake levers. Simply strip them off and stuff them in your jersey pocket when it gets warm.
Lightly insulated gloves work fine to the mid 30s. Below freezing, go for so-called “lobster” mitts (photo). These put your fingers in three compartments—one for your thumb and one each for your first two and last two fingers. This pools finger heat for more warmth, but unlike with full mittens you still have the dexterity to operate a bike.
Winter gloves should have a tall, stretchy, snug-fitting cuff for plenty of overlap with your long sleeves. An air leak at your wrist will make your hands feel cold no matter how well insulated the gloves are.
In a cold rain, good luck. Shell gloves may keep your insulated gloves drier, but hands are susceptible to getting wet and chilled because they’re so exposed as you ride. Your best bet may be insulated lobster mitts, which still work fairly well when wet. Neoprene gloves are supposedly designed for the rain but still get wet inside, and the models I’ve seen lack insulation.
CAUTION! Don’t overdress your hands. Unlike with your other extremities, feet, there’s such a thing as too warm. If your hands begin to sweat and gloves get damp inside, your fingers can become uncomfortably cold real quick. It’s better to err on the side of cool but dry.
Want to get even more details about choosing your apparel for a winter ride? Here’s a guide to what to wear cycling at every temperature.
Hypothermia Is No Hype
Hypothermia is an insidious killer of the unprepared. It’s often associated with raging blizzards and treks to the North Pole. But hypothermia is more likely to strike in relatively mild weather when an unprepared cyclist or backcountry traveler gets stuck in an unexpected cold rain or wet snowfall. The body’s core temperature gradually falls to a level that can be fatal.
Symptoms progress from mild to uncontrollable shivering as the body tries to warm itself. Victims become fatigued, lose their sense of time and distance, and gradually become so confused that they make irrational choices like abandoning gloves or parkas. When shivering stops, a sense of profound apathy takes over and many victims die, unable to find their way to safety or perform simple survival tasks like starting a fire.
Avoid hypothermia by dressing in layers. Always wear moisture-wicking clothing instead of cotton. Be aware of weather patterns in your area and dress or pack your bike bag accordingly.
If you’re getting cold and begin shivering, especially if you’re wet, seek shelter immediately. Because victims are often unaware of hypothermia’s onset, watch for symptoms in your companions. Find a convenience store and buy something hot to drink. Eat enough to produce some body heat. Don’t set out again until you’ve added enough clothing to stay warm.
EXAMPLE! The closest I’ve come to hypothermia on a bike didn’t take place on a frigid Colorado ride. Instead, it was in Arizona in March, on the final day of Lon Haldeman’s PAC Tour spring training camp. I was riding the 90 miles from Sierra Vista to Tucson and got caught in a wind-whipped 38-degree monsoon.
With me were two friends, Ed Pavelka and Pete Penseyres. It was raining so hard that we couldn’t see the pavement clearly, and we were worried that overtaking vehicles couldn’t see us. Every time one passed, it kicked up a tsunami of spray that concealed us from other traffic. It was like riding in a waterfall. I was wearing tights, shoe covers, two layers of fleece, a balaclava, winter gloves and a shell zipped up tight. I was soaked and freezing.
Then Pete flatted. We huddled by the side of the road, three of us trying to force a wet tube into a sodden tire with fingers too numb to feel. Picture the Keystone Cops changing a flat. Our skin was literally turning blue. Without pedaling to generate body heat we immediately started shivering. When we finally got the flat fixed, we tore off down the road at time trial speed, riding as hard as we could to warm up.
It didn’t help much because the chill was core deep. Another flat would have meant true disaster. Eventually, we came to the camp support van. Piling inside, we sat shivering and dripping and eating till the heater worked its magic. The rain let up. We put on dry base layers and continued to Tucson with an epic-ride memory that has yet to fade.
Slick Roads
Running or cycling in cold weather can be dicey if you come upon an icy spot unexpectedly. The most dangerous condition occurs after the sun melts snow slightly. A thin layer of water spreads over the pavement, then freezes in late afternoon, creating a barely visible film of incredibly slippery “black ice.” When the roads are mined with such skating rinks, it’s far safer to choose an indoor fitness activity.
Even on a warmer day, you need to be careful anytime you ride through a shadow, especially in a turn. Without direct sunlight, icy patches often won’t melt. To make it worse, they’re hard to see when your eyes are trying to adjust from bright light.
If you brave slick roads—or the surface begins icing over because of falling temps—ride gingerly. In corners, slow way down, take a wide line and don’t make abrupt movements. If you’re losing traction in turns, use a mountain bike downhiller’s trick by unclipping your inside foot so you can use your leg like an outrigger.
Remember, it’s no disgrace to phone home or hitch a ride when the road becomes dangerous. It’s preferable to hitting the deck and breaking some- thing. Drivers may not be fully in control of their vehicles, either, making it risky for them to maneuver around a cyclist.
TIP! Snowy, icy roads are best tackled on a fat bike with studded tires or chains. The upright riding position is better for control. Studs or chains grip like a limpet, even in skating rink conditions.
Early Darkness
Even if winters are not icy where you live, it still gets dark early after the autumnal equinox. Just about the time you get off work, aching for a ride, the sun goes down. And Old Sol sinks with a thud in winter—there’s no extended twilight to give you a safety margin if a ride runs long.
The solution is a good lighting system. Bike shops and cycling sites are full of models in a wide price range.
For short jaunts on lighted roadways, opt for a simple headlight that operates on replaceable batteries. You don’t need to pay more than $25. Because there’s ambient light to see by, the headlight’s main purpose is to make sure that drivers spot you. Combine the headlight with a rear flasher and plenty of reflective tape and material on your frame and clothing.
If you plan to ride much on dark roads, consider a high-end lighting system with a rechargeable battery and bright LED bulb. Most models have different levels of brightness that you can cycle between. This extends the battery charge because you can use the lower level much of the time. But when you’re going fast enough to outrun it, the high level beam provides extra illumination.
TIP! Don’t be too frugal when buying a lighting system. After all, your riding enjoyment and safety is at stake. Pay enough for a headlight with plenty of lumens, weatherproof design, and a rechargeable battery.
The Beater Bike
If you ride in the off-season, you’ll be riding in sloppy weather. Rain and melting snow can make a mess of streets and highways. On rural roads, mud tracked onto the pavement by farm equipment turns idyllic country lanes into something resembling muddy singletrack.
Ride your good bike in these conditions? Forget it. The thought of risking your favorite mount on roads that look like the trenches of World War 1 is guaranteed to send you scurrying back to the comfort of the couch.
The solution? A bike for all seasons, a “beater” that laughs at the worst that winter has to offer. This is a bike that you can ride in the worst conditions imaginable, then simply hose off once the grime gets so bad that you can’t remember the frame’s color.
Now I’ll tell you something that you may not believe: You’re going to love this bike!
It might be old, it might be dirty, it might be fitted with a mismatch of cheap and discarded parts, but it’s the reason you can ride in winter. Almost no weather can stop it. In fact, it’s the bike that will get you out on wet days in the spring, too. Bad-weather rides tend to be memorable, so it won’t be long before you look at your beater fondly, remembering the challenging—even epic—rides that it made possible.
If you don’t already have an old bike that you can turn into your beater, look for one in bike shops, yard sales, or online at places like Craigslist or Facebook marketplace. Check local bike club newsletters or their Facebook groups. Ask other riders what’s gathering dust in their garages. Sure, you can buy a new bike built for gravel or cyclocross and outfit it for winter. But it makes sense to economize and buy something that’s already scratched and dented. It won’t break your heart the first time it gets filthy.
Of course, there’s one critical requirement when picking a bike: It must allow you to have the same riding position as on your good bike, following simple tweaks to the saddle and stem/handlebar locations. If you train all winter in one position, then jump on your summer scoot that’s set up differently, you’re asking for trouble.
Here are two off-season exceptions to that rule:
- If you wear thick tights over your cycling shorts, you should lower the saddle a couple of millimeters to compensate. The added material between your crotch and the saddle has the effect of reducing your leg length. In effect, it makes the saddle higher than on your summer bike.
- Raise the handlebar slightly in relation to the saddle if you regularly ride in lots of clothing. Layers around your midsection may make it harder to bend over in your regular riding posture. A higher bar also helps bike handling in slick conditions.
Mechanical Matters
To keep a beater running well, recycle old components. Toss them in a box when they come off your summer bike during upgrades. Then when your beater needs a part (or a part of a part), you can get several thousand more miles out of things that you might have thrown out.
EXAMPLE! My partner and cofounder of RoadBikeRider.com, Ed Pavelka, pretzeled his front wheel on a cross-country tour when he rode into the biggest man in Jessup, GA. The guy suddenly stepped into the street from between parked cars. The crash even cracked Ed’s helmet.
Tour director Lon Haldeman stomped on the wheel to remove the biggest bends, then finished the job with some rough-and-ready truing. Amazingly, it held up for the last two days of the tour. After getting home, Ed decided to put the wheel on his Bridgestone RB-2 beater bike to milk a few more miles from it. Now, 10 years and some 45,000 miles later, it’s still on the bike.
The rest of Ed’s beater is a collection of parts saved from the scrap heap, too. Other than the frame, seatpost, down-tube shifters and brake calipers, nothing is stock. Look closely under the grime and you’ll see an old Dura-Ace crankset and derailleurs—still working reliably even though they were once “too worn out” to keep on his Litespeed.
My beater just happens to be a Bridgestone, too—an XO-1 retrofitted with road bars. In eight years of winter training and summer dirt road abuse, it has gone through a number of different derailleurs and drivetrains. Now it has bar-end friction shifters mated to an old mountain bike cassette, components I scrounged from my spare-parts box in the garage.
It looks like something ridden by a 1950s English tourist—as his second bike. Would Ed and I use such archaic equipment for important events or racing? Of course not. But for winter training, these old Bridgestones (a Japanese brand no longer available) are perfect.
TIP! Don’t worry about your beater’s weight. Ed’s RB-2, fully outfitted for winter riding, is 33 pounds. My XO-1, with fenders and a seat bag containing two spare tubes and a mini-tool, comes in at 30 pounds. It’s a tank. But when I’m riding it on flat or rolling courses, I don’t notice the weight at all. Of course, on long climbs I’m slower on this bike than on my sub-20-pound Litespeed. But in winter it doesn’t matter because I’m not trying to drop anyone. And if I’m the one who gets dropped, well, I know the way home.
I believe that a heftier winter bike is actually a training advantage. Come spring, a regular bike feels like a feather. Pedaling those extra pounds all winter can even be viewed as a form of weight training.
I also have a second winter bike, a Gunnar Crosshairs with cantilever brakes, a triple crankset and clearance for fenders and wide tires. I bought this one for double duty and ride it year round.
I use it for winter training on paved roads and, equipped with cyclocross tires, it’s a great bike for riding loops that start out paved, deteriorate to gravel and finally end up as dirt jeep roads or mild singletrack. With the triple, it’s geared low enough to handle any paved road in my area including the fearsome ascent of the East Portal, a three-mile climb in Black Canyon National Park that averages 16 percent.
One thing a true beater must have is fenders. You gotta have fenders in winter. Without them, water, mud and grit kicked up by the front wheel coats the bike and soaks your feet and legs. A rooster tail of grunge wets your fanny and stripes your back. Road crud enters the headset and trickles inside the bike’s frame tubes via the seatpost.
Install fenders, however, and most of that grime and water is caught and directed back to the road where it belongs. Your body stays much drier (if it isn’t actually raining) and your bike stays cleaner. You won’t have to wash and lube it as often.
Fenders also protect your riding companions from wheel spray. In wet climates like England, Ireland and the U.S. northwest, you aren’t welcome on group rides without fenders. No one wants to suck gritty, tire-flavored water flying up from your rear wheel.
The best fenders are plastic and have mud flaps. The one in front is vital for keeping water off your feet. If your fenders don’t have mud flaps, fabricate them from a large plastic detergent bottle. Make them about six inches long and several inches wider than the fender itself. Drill through and attach with small bolts. Be sure to use lock washers.
TIP! Fenders may fit better and stop rattling if you use a tip from Grant Petersen at Rivendell Bicycles. He recommends attaching them with zip-ties rather than the metal or plastic brackets they come with. Simply drill small holes in the fenders so you can zip-tie the front one to the bottom of the fork crown and the rear one to the chainstay bridge and rear brake bridge.
No dropout eyelets on your frame for attaching fender struts? No problem! Simply zip-tie the struts to the fork or the rear dropouts. Wrap electrical tape first so no metal contact mars the finish.
Three final bike tips:
- Use wide tires. Winter is no time for skinny rubber. Thicker tires give you more protection against punctures and better traction. For even more flat resistance, use tires with a Kevlar belt under the tread. Remember, when you have to stop to fix a flat, you may catch a chill that you can’t shake for the rest of the ride.
- Use strong wheels. Your beater bike is a great place to install those heavy-but-tough 36-spoke wheels that are now outmoded for performance riding. A well-built wheel should last for years of winter riding. My Bridgestone XO-1 is still rolling on its original wheels after seven years of hard use. I’ve replaced a couple of spokes and re-trued occasionally, but even after miles on dirt roads and some singletrack, they’re going strong.
- Use reflectors. Decorate your beater like a sixth grader with bad taste. Even if you don’t plan to ride after dark, the sun may set on you occasionally. In winter, a puncture or wrong turn can turn a late-afternoon ride into a night ride real quickly. With reflectors and reflective tape on your frame, wheels and crankarms, you’ll still show up in car headlights. For the same reason, it’s smart to have a high-intensity, battery-powered taillight on your seatpost. You can reach down and click it on anytime you worry that dim daylight is making you less visible to drivers.
Coach Fred Matheny is an RBR co-founder who has four decades of road cycling and coaching experience. He has written 14 eBooks and eArticles on cycling training, available in RBR’s eBookstore at Coach Fred Matheny, including the classic Complete Book of Road Bike Training, which includes 4 eBooks comprising 250 pages of timeless, detailed advice and training plans. The Complete Book is one of the many perks of an RBR Premium Membership. Click to read Fred’s full bio.
The first paragraph of this article asks us what fun is riding indoors with Zwift and working out in the gym when the wintry outdoors is our alternative.
After reading the article and seeing the copious cautions to prevent anything from penile frostbite to the damage to one’s coveted road bike, the answer to that question becomes quite obvious.
I’ve been riding in Massachusetts winters for years, occasionally in sub 10F degree temperatures and frequently in sub 20F temps. This is one of the best articles I’ve ever seen. A few thoughts follow.
Most important, first, the goal is to be comfortable; it is not to be warm. Experiment with what works your your body. I recommend keeping a chart or other record of what you wear from head to toe in 5F degree increments. Tweek it as needed. With no record, you’ll be guessing, which may produce a bad outcome.
Wool glove liners under lobster mitts or the like will wick away moisture and keep hands comfy and dry.
Larger shoes for winter a big plus and a thin dress wool sock as a liner topped with a ragg wool sock works great. SPD cleats make it easier to walk on snowy sidewalks on your way to that mid-ride coffee break.
A wicking helmet cover is a good idea. You do not need all those vents letting in cold air, but you do need to let warm, moist air vent out. I’ve an old helmet on which I have covered the front half of the vents with duct tape and put a cover over. This reduces the cold air coming in from the front but still lets the warm air vent out the back.
The beater bike is a must. Get one with extra clearance so you can ride 32mm or wider cyclocross tires. I recommend fixed gear bikes in winter providing you are not doing serious hills. With a fixed gear, there are far fewer things that can go wrong. Having a mechanical problem in freezing cold is not fun. Also with a fixed gear, you can slow down by gently applying rearward pressure with the pedals instead of applying the brakes; on a slippery road, braking can cause a loss of control.
Exactly this!!!
“I’ve an old helmet on which I have covered the front half of the vents with duct tape and put a cover over. This reduces the cold air coming in from the front but still lets the warm air vent out the back.”
I’ve taped MOST of my helmet vents here in Portland, OR to keep out cold air AND rain. A thin wool liner under my helmet seems to wick perspiration away too.
I agree about covering the helmet. As the excellent article points out, we lose a tremendous amount of heat from our heads. I think that the head is even more important than hands and feet to keep warm, for the reason of diverted blood flow cited in the article. A helmet cover makes a huge difference for me, keeping me much warmer especially in the rain. A shower cap from a hotel toiletries give-away makes a good emergency helmet cover.
Like the mountain bike that is mentioned, a fixed wheel bike is great for winter rides. Less of a gear train to clean and more of a workout because you can’t stop pedalling.
Use zip ties to install that mud flap also.
To prevent hand sweat from dampening gloves or mittens, I wear light exam gloves as a base layer for my hands. Sure, my hands sweat, but the the gloves stay dry and warm.
Instead of, or in addition to, a turtleneck wear a buff or a turtle fur neck gaiter. Both are fabric tubes that you pull over your head and wear around your neck. The buffs can be used to cover your chin and as a head cover like a balaclava.. I’ve started using a buff and it’s made a huge difference in my comfort. They are very thin and can disappear into your pocket if it warms up.
Any data on the relative safety and effectiveness of blinking or pulsing lights versus solid-on lights for the front and back?
My own personal experience is that flashing lights seem to get drivers’ attention much, much better than a solid light during the day. I say this from first hand experience of watching cars carefully to see what they are about to do, and seeing the moment when the driver becomes aware of me.
Agree absolutely. AND I remain surprised and dismayed that so many riders wear black, grey and other dark colors, even at night and in bad weather. The fact that clothing manufacturers push dark colors and mags like “Bicycling” feature so many examples is really sad. It is NOT safe to assume that you are seen by the soccer mom driving the massive SUV while texting and with kids screaming in the back. For that matter, it’s not safe to assume that an old fart bike rider like me sees you either.
You don’t mention one of the cheapest ways to keep your toes warm: put plastic baggies over your toes before you put your shoes on. They keep the water out and heat in, and you won’t feel them once you are riding. This only works for a limited temperature range but it does work.
Wow, Great article Fred. Quite comprehensive.
One thing NOT to take on those first cold weather rides is ego Trying to ride your peak season paces while all bundled up is unrealistic……and discouraging to generally warm weather riders new to cold weather riding.
In the north the sun is low to the horizon most of the day, so plan a route where you aren’t riding into the sun. Also avoid a route going by trees or bushes planted close together. You get a headache from the strobe light effect with bursts of sunlight.
That said, it’s worth bundling up and enjoying a well-planned route in the cold!
I find that chemical toe warmers plus booties keep my feet warm in most conditions. Otherwise, I can’t ride much more than hour before my feet are freezing.
Good reminder about the chemical warmers. I sometimes carry those as a back up to activate in case weather turns colder than predicted….. or I have underdressed.
I don’t know where the writer is writing from. This note from Minneapolis, where I ride every winter through the winter down to 0 F. 1. Use a merino wool balaclava with a wool beanie on top. If you wish to wear a helmet on top of this, do so. I skip it. 2. Wear several layers of wool on top and skip the Gor Tex, which — sorry to say — does not breath well. Instead use a vest. 3. Lower body heavier weight wool tights or two lightweight pairs with knickers on top for blocking wind and venting well. 4. Heavy duty mitts, perhaps two. (I disagree with the author: Hands are super vulnerable in cold weather.) 5. I wear sorrel boots atop flat pedals. Works well. No special equipment here! 6. The bike: an old ’70’s road bike converted to a fixed gear, with lots of clearance. studded tire on front, knobbies on back. Fenders, generator front hub with lights front and back.
I have been on a bike of this sort for 20 years. I both run errands and do recreational rides alone and with friends on this bike.
Although I ride an e-bike in western Europe, I found some great tips in here. There’s been a nip in the air lately (37F and counting down). My new saddle with space to lighten the load of the coccyx made me want to know more about winter riding! Thank you.