
Jim’s Tech Talk
By Jim Langley
Last week we answered reader “Fixieguy’s” question on how rear derailleur limit screws work. Afterward another RBRer named “Bryan” asked if I could next explain how rear derailleur B Tension screws work. Since that’s another important rear derailleur adjustment to understand, we’ll cover that today.
The Rationale Behind Fixieguy’s Dual-Gear Bike
First, since a couple of you questioned why Fixieguy would go to the trouble to build a custom 2-gear drivetrain, and because I didn’t adequately explain it, I’d like to share his take on it because to me it makes a lot of sense (here’s the original article https://www.roadbikerider.com/rear-derailleur-limit-screws-explained/). He wrote,
As for the purpose of the Dingle Speed, in my case the bike was a 26” wheeled rigid frame mountain bike that was given to me. I decided I’d build a single speed mountain bike out of it. Then I considered that finding one gear suitable for both riding roads to a trailhead and riding the trail after getting there would likely be the worst of both worlds.
Instead, long story short, I decided to try the dingle speed. I did some research and concluded that two cogs and one chainring was superior to two rings and one cog. It did involve learning how to use just a small bit of derailleur cable to hold the derailleur in place while shifting using the adjuster barrel while off the bike. There is no real shifter. Basically I intend to use it as a poor man’s single speed gravel bike off road and a single speed road to get there and back. Basically it’s two bikes for the price of one free one.
Later, Fixieguy emailed me and said he wasn’t going to use the term Dingle Speed anymore for his new bike but was going with “dual-gear bike.” Because it’s not about “speeds,” it’s about gearing and because “Dingle” alone doesn’t mean anything.
A Related Rant
Notice that Fixieguy said he rides the road to get to the trailhead and then rides the trails. I really, really wish everyone had that approach to riding trails. I don’t know what it’s like where you live, but unfortunately, here in Northern California, the bulk of the morning weekend traffic on our formerly almost car-free backroads is now cyclists in pickup trucks and the occasional SUV or car driving to the trailhead to ride.
It’s a problem because they then have to find parking where there are limited spaces because no one ever planned for or expected so many people to want to park there. So there are vehicles parked all over the place. And naturally, there’s sketchy driving and passing because they’re trying to ensure they even get a parking spot.
Of course all those cyclists that could get there under their own power are now contributing to global warming – something all cyclists should care dearly about. And they’re negatively impacting the ride for road cyclists like me. I won’t even get into all the people dropping off their friends at the trailhead so they can do multiple shuttle runs.
B Tension Screw Use
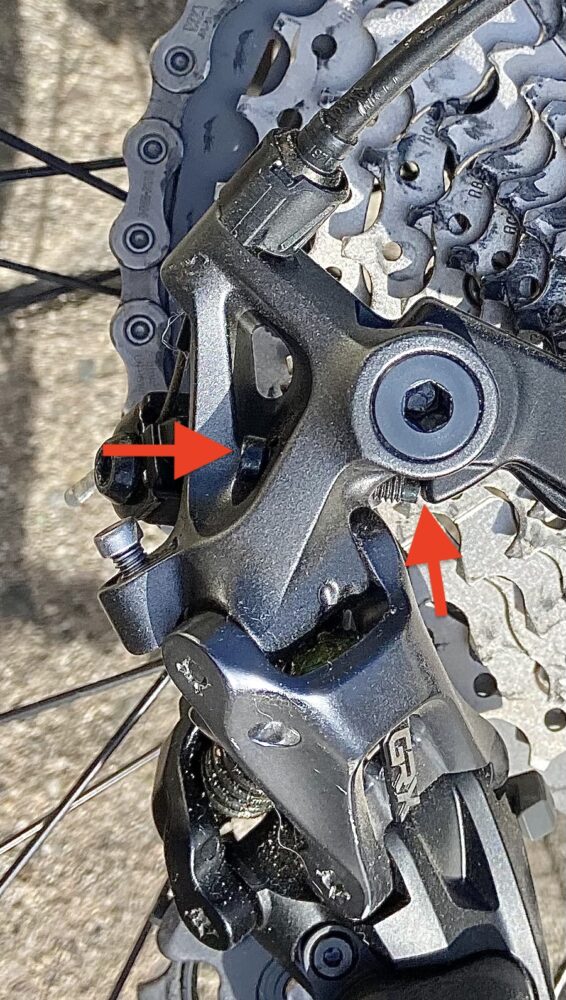
The adjustment screw usually called the B Tension screw is marked by the red arrows in the photo. Rear derailleurs didn’t always have these screws and the adjustment they provide. I was curious and did a little research but I couldn’t determine exactly when B Tension screws first appeared. But, I did find one on a SunTour derailleur from 1965 on the extraordinary history of derailleurs website Disraeli Gears: https://www.disraeligears.co.uk/site/suntour_competition_derailleur.html.
TIP: Because derailleur makers can be very specific about how B Tension screws are adjusted, I recommend reading the directions for your rear derailleur. You should be able to find the directions online.
What It Does
While B Tension screws can be in different places on different brands and types of rear derailleurs, they all work as follows:
- Clockwise turns of the B Tension screw move the derailleur back (to the rear).
- Counterclockwise turns of the B Tension screw allow the rear derailleur to move (forward).
The B Tension screw has two purposes. I’ll call them purpose 1 and 2 but that doesn’t mean one purpose is more important than the other.
Purpose 1: To perfect the clearance between the top derailleur pulley and the largest cog on the cassette (when you’ve shifted onto it).
Purpose 2: To wrap any excess chain slack
Purpose 1: Pulley Clearance

In the photo please notice that the pulley is close to the largest cassette cog but it’s not touching. This is the result of a correctly adjusted B Tension screw that is holding the derailleur just far enough back so that the pulley can’t interfere with the largest cog.
When first setting up new rear derailleurs, you check for this small clearance. If there’s no gap or too small a gap, you’ll notice it because the pulley will either bump into the largest cog and refuse to shift up onto it, or it’ll make the shift and then strike the chain and pulley making a rumbling noise or feeling as you pedal.
If that happens, clockwise turns of the B Tension screw will pull the derailleur back and the pulley away from the cog and solve the problem.
Always shift back and forth to check the adjustment and ensure the shifts are smooth and crisp and the chain and pulley don’t make any noise. Check the shift when the chain is on both the small and large chainrings, too.
Purpose 2: Wrapping Chain Slack
If you ride a bicycle that you bought complete (versus building a custom bike yourself), you might never need to use the B Tension screw to remove chain slack because the chain was probably sized correctly for the gearing on that bike from the get-go.
However, if you are into building custom bikes and changing gearing, the B Tension screw can work the trick by allowing you to turn it clockwise to remove any excess slack in the chain. In some gearing scenarios you might even want a longer B Tension screw for more adjustment (it’s a standard 4mm thread).
The only caveat is that if you move the rear derailleur too far, the pulley may move too far away from the cogs, which can affect the shifting. Ideally you’ll be able to remove the chain slack and maintain nice gear changes.
In closing, and I probably should have said this at the outset, but none of the derailleur adjustments we’ve covered in these two articles work properly unless the derailleur and the derailleur hanger (the part built into the frame) are straight (not bent). So if you find that the adjustments aren’t working as they should, that’s the next thing to check. Let me know if you’d like me to cover that next.
Jim Langley is RBR’s Technical Editor. A pro mechanic & cycling writer for more than 40 years, he’s the author of Your Home Bicycle Workshop in the RBR eBookstore. Tune in to Jim’s popular YouTube channel for wheel building & bike repair how-to’s. Jim’s also known for his cycling streak that ended in February 2022 with a total of 10,269 consecutive daily rides (28 years, 1 month and 11 days of never missing a ride). Click to read Jim’s full bio.
I was the one that asked, so thanks for writing this Jim!
Since you mentioned hanger alignment, you might as well cover it.
Maybe you can also add what to do if the hanger breaks or is broken?
What/where are good sources for the millions of hangers out there and what would you do if you broke a hanger on a frame that the hanger is part of the drop out?
Cheers!
Bryan
You’re welcome, Bryan – and I’ll cover derailleur hangers next Tech Talk.
Thanks!
Jim
Believe it or not, Bryan, you might want to look at derailleurhanger.com
-NJgreyhead
Looking forward to the next article, and in particular how you can accurately adjust a bent hanger without needing a dedicated (and generally expensive) hanger alignment tool.
I share that same rant about people driving to a trailhead when they could just as easily ride. This is my case to our local trails where people live maybe a 15 minute ride from the trails and what makes no sense to me is why you wouldn’t use that ride as a warm up. Instead they drive there and either ride around in circles for a few minutes or hit the trails cold. Ick. There is some concern that the route there is on a busy road, but there are sidewalks with no one walking on them, so just ride on what I call “concrete single track”. It’s bumpy, but not like you are riding with 23 mm tires at 120psi… Sheesh.
That’s an excellent point that riding to the trail is a great warm-up, Alex. I think a lot of the attraction of driving is being able to bring your truck and friends along. But to just go ride a local trail, I think that pedaling there with your friends should be way more fun.
Thanks!
Jim
Since the Dingle 2 speed project was mentioned again I would like to describe my method which has worked for me for several years:
Using a standard double chainring crank (Older D/A) with 42/38 chainrings paired with a Surly Dingle Cog 17/21T on a Gunnar Street Dog fixed gear frameset.
Typically I ride flat roads/smooth paths in the 42/17 then stop and switch to the 38/21 for rolling hills/rougher paths. With almost no difference in chain length the rear brake doesn’t need re-adjustment and the switch can be done in less than a minute.
Not sure if these are still available..they were also available 17/20 and maybe 17/19.
I bought a spare when I setup the bike but haven’t had to use it as the Surly cogs are very durable.
Hope this helps if anyone is interested.
Thanks very much for sharing your setup, Philip, appreciate it!
Jim