
Jim’s Tech Talk
By Jim Langley
Today’s topic was suggested by “Fixieguy,” who often posts helpful comments on this column. This time he emailed me asking for help setting up a new bike, which he called a “Dingle Speed.” Dingle Speed, I thought? What the heck is a Dingle Speed?
It turns out – as Fixieguy kindly explained – that a Dingle Speed is slang for a Single Speed that has 2 rear cogs. So the D is short for Double; at least as far as I can figure. And instead of one speed there are two speeds – so you can have a gear for the hills along with your cruising one. Good idea!
Maybe the D is for Derailleur?
The reason he needed my advice is because unlike on one-speed bikes and fixies, his Dingle Speed requires a rear derailleur. Which lets him change the gears and also takes up the slack of the extra chain length required to run 2 different size cogs.
But when he set up the rear derailleur it didn’t shift as nicely from cog to cog as he wished. And that’s when he reached out to me asking for tips on how limit screws work, which is what I’m going to get into here.
PLEASE NOTE: these tips are for mechanical rear derailleurs. Electric derailleurs have limit screws, too, but they can work slightly differently and adjustments can vary, too, so please refer to the correct instructions for your exact electric derailleur (you can find them online).
What are Limit Screws?
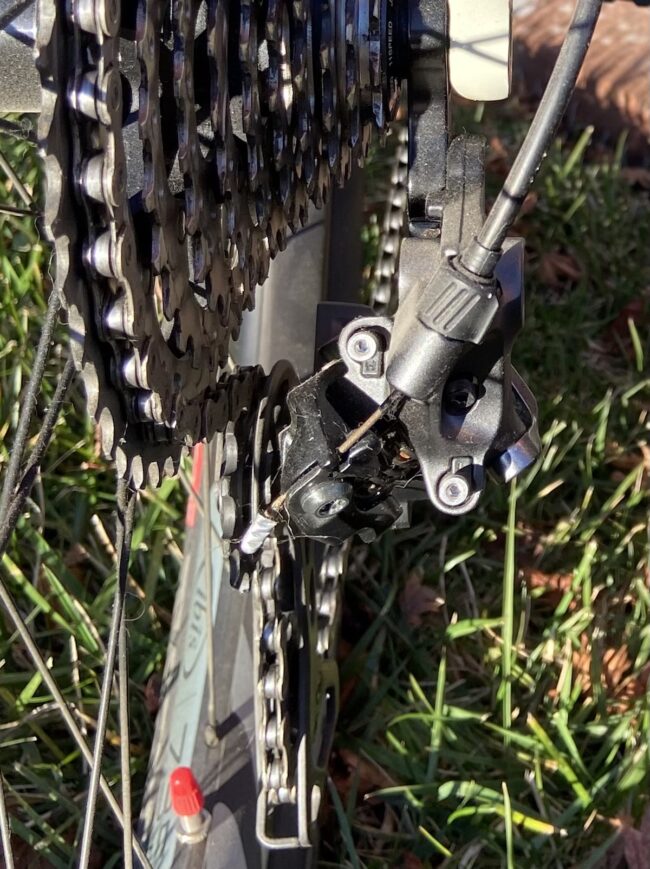
They are the two small screws that set the rear derailleur’s range of travel. The range is how far the rear derailleur can move beneath the cassette cogs, right to left and left to right. In the photo they’re the two silver hex screws.
If you’ve ever shifted into the spokes or shifted the other way and had the chain come off and jam between the frame and smallest cog, you’ve most likely experienced what happens when a rear derailleur limit screw is not adjusted correctly.
A Low and High Screw
There’s a low gear limit screw and a high gear limit screw. The low gear one is used to stop the rear derailleur once it has shifted perfectly onto the lowest gear/largest cog. The high gear one is used to stop the rear derailleur once it has shifted perfectly onto the highest gear/smallest cog.
The way the limit screws do their job stopping the derailleur in exactly the right place is by preventing the derailleur from moving any further. They do this by bumping into built-in tabs on the derailleur. This happens inside the body of the derailleur so it’s the pointed ends of the screws doing the work, not the heads that you turn with a screwdriver to make adjustments.
Just for Setting the Derailleur Range
That’s all the limit screws do. They have nothing to do with fine-tuning shifting on to any of the other cogs. They are only used for limiting the range of the derailleur to what’s needed.
A great thing about limit screws is that once they’re correctly set, they usually stay put and with any luck you might never have to touch them again.
Three Main Mistakes and How to Avoid Them
But the initial derailleur limit screw adjustment is an easy thing to get wrong. So let’s talk about the common mistakes:
- Hooking up the cable before adjusting the derailleur
- Turning the wrong screw
- Turning screws the wrong way
Start Without the Cable
If you try to adjust limit screws when the shift cable is already attached, the cable tension can prevent making a correct adjustment. I recommend setting the screws before the cable is connected or disconnecting it if it’s already hooked up.
Identify Which Screw is Which
The second mistake is common because they’re small screws and where they are located varies tremendously across makes and models of derailleurs. On some rear derailleurs the screws are marked with an L and H for low and high, which helps, though sometimes the lettering is so small you may need a flashlight to spot it.
If the limit screws aren’t marked with an L and H, you have to figure out which is which by looking at the derailleur carefully. Almost all derailleurs have springs that cause the derailleur to default to the high gear position – all the way to the right when it’s mounted in the bicycle. This means that you can identify the high gear limit screw because it will be the one bottomed out against the stop in the derailleur.
You should be able to see the high gear screw touching the stop. And if you look carefully at the low gear limit screw its end and its corresponding tab built into the derailleur should be far apart. The screw’s end won’t be touching anything.
TIP: If you’re not sure what you’re looking at, a good way to see the limit screws and stops to fully understand how they work is to remove the derailleur (taking the chain out if necessary).
With it off the bike you can operate it in your hand and look inside it. You can push on the derailleur and force it to “shift” up and then release the pressure and let it return. And as you do this, you can look inside the derailleur and see and feel how the screws stop it at each extreme. You might have to turn the derailleur around to different angles in order to see both screws and the stops they bump into.
Mistake Three and How Not to Make It
The third mistake, turning screws the wrong way, can be avoided by paying attention to one screw at a time, making one adjustment at a time. Start with the high gear adjustment.
TIP: If you look at the derailleur from behind and look at the pulleys and where they are in relation to the cog you can see how well aligned they are (they should be directly beneath it). You can also see the pulley cage move left and right with even a tiny screw adjustment.
Making the High Gear Adjustment
The chain will be on the smallest cog. It needs to run smoothly on that cog and the derailleur must not throw the chain past that cog or the chain can come off and possibly jam.
By turning the screw clockwise, you reduce how far the derailleur moves the chain to the outside. Turning it counterclockwise lets the derailleur move further. To get the adjustment correct takes trial and error.
To check your adjustment, pedal by hand and listen to the noise. If there’s a chattering noise, the adjustment isn’t quite right yet. It might only take a fraction of a turn of the limit screw to quiet the noise and get the adjustment perfect.
You also want to check to make sure the derailleur completes the shift to the smallest cog. To do this, you can push on the derailleur as you pedal by hand (use your thumb to gently put sideways pressure on the derailleur until it shifts) and then let go of the derailleur. If the adjustment is correct, the derailleur will shift onto the smallest cog quickly and smoothly and show no signs of wanting to throw the chain off the cog.
Making the Low Gear Adjustment
Make this adjustment carefully. You don’t want the derailleur to shift the chain into the spokes, which might happen if the limit screw is way out of adjustment. You are checking that the derailleur shifts fully onto the largest cog and stops there and runs smoothly there.
To shift the derailleur onto the largest cog, keep gentle pressure on the derailleur with your thumb as you pedal with your other hand. Or have a helper pedal for you.
Don’t use too much pressure when pushing on the derailleur with your thumb or you might get it to overshift by flexing its mount.
For this adjustment, you set the limit screw so that the derailleur stops directly beneath the cog and the chain runs smoothly and quietly on it (you’ll need to hold the derailleur so it doesn’t move from directly beneath the cog). And to check the shift, you release the derailleur as you pedal so that it can shift down a couple of cogs and then shift it back up to the largest cog. It should shift up smoothly and show no signs of wanting to go further and off the cog, into the spokes. Fine tune the limit screw until it’s right.
A Lot Harder to Explain Than to Do
Whew, that took some explaining. I hope these tips help if you’re new to adjusting limit screws or like Fixieguy, are dialing in a new custom ride. You limit screw experts reading this please feel free to weigh in with your favorite tips.
Jim Langley is RBR’s Technical Editor. A pro mechanic & cycling writer for more than 40 years, he’s the author of Your Home Bicycle Workshop in the RBR eBookstore. Tune in to Jim’s popular YouTube channel for wheel building & bike repair how-to’s. Jim’s also known for his cycling streak that ended in February 2022 with a total of 10,269 consecutive daily rides (28 years, 1 month and 11 days of never missing a ride). Click to read Jim’s full bio.
Personally, I like to adjust the limit screws with the shift cable attached (as that is how it needs to work properly). Not sure which way is better but I have had success with the cable attached. I take the slack out of the cable in the highest gear (smallest cog) and then adjust the H limit screw by pulling on the cable by hand to get it into the next smallest gear, release the cable and make sure it shifts onto the smallest gear without moving too far. Yes, it is trial and error. To adjust the L screw, shift up to the next to the largest cog and then pull on the cable by hand to get it to the largest cog. If it appears to shift too far, then adjust the limit screw so that it will not over shift (toward the spokes)). Then fine tune by pulling on the cable by hand to shift to the larger cog and release to make sure it is correct. Then adjust the cable at the RD to make sure it shifts properly using the shifter, Sometimes it is still necessary to slightly adjust the limit screws after the cable length adjustment has been made.
If this seems complicated (harder to describe than to do), there are several u tube videos (Park has a good one).
A question and a comment:
THE QUESTION: How much can the limit screws be adjusted to limit the number of rear cogs that the rear derailleur (RD) serves. Let’s imagine a 10-speed setup. Presumably, the “dinglespeed” would position its two cogs in the 5th (larger cog) and 6th (smaller cog) positions of the normal 10-cog cassette. (Are the places where the rest of the cogs would be replaced by spacers?)
In this case, the high limit screw would need to be adjusted so that the RD cannot move beyond (outboard) the 6th position. Can that limit screw be set to be that limiting? And same question for the low limit screw limiting the RD from moving beyond (inboard) the 5th position?
THE COMMENT: Singlespeeds are cool for their simplicity. Geared bikes are cool for their flexibility. IMHO, the dinglespeed is the worst of both worlds. I get that one might do it because it can be done, but really, once you’ve opted to depart Singlespeedlandia, why leave one foot still in?
Thanks, Jeff, that’s a great question. The stock index screws don’t usually allow setting the derailleur’s range much different than what the derailleur was made for i.e. 8-, 9-, 10-, 11-speed. So what Fixieguy did was buy one longer screw to replace one of the the stock ones. (He only needed one longer one.) They’re standard 4mm screws and he bought one 30mm long to handle the extra reach needed.
Thanks for asking!
Jim
Jeff,
Jim answered the technical part of your question well. As for the purpose of the Dingle Speed, in my case the bike was a 26” wheeled rigid frame mountain bike that was given to me. I decided I’d build a single speed mountain bike out of it. Then I considered that finding one gear suitable for both riding roads to a trail head and riding the trail after getting there would likely be the worst of both worlds. Instead, long story short, I decided to try the dingle speed. I did some research and concluded that two cogs and one chainring was superior to two rings and one cog. It did involve learning how to use just a small bit of derailleur cable to hold the derailleur in place while shifting using the adjuster barrel while off the bike. There is no real shifter. Basically I intend to use it as a poor man’s single speed gravel bike off road and a single speed road to get there and back. Basically it’s two bikes for the price of one free one.
Thanks for explaining the genius behind your Dingle Speed conversion, Fixieguy!
Jim
Well written Jim! Good explanation.
Next week can you cover the B screw and how that affects shifting?
Thanks
Yes, I can do that, Bryan. Thanks for asking.
Jim
I had a friend that set up a functional “DIngle Speed” years ago. His used a single rear cog with the RD locked in one position used as a “singulator”. For the second gear, he just kept the front derailleur and double chainrings. It worked well, as long as you like the gearing difference between the chainrings.
That’s another way to do it – if one can “stomach” having a double crankset (eek!) and oh, no! a front derailleur ? Seriously, Steve – appreciate the tip!
Jim
The Shimano Dealer’s Manual, at least for recent rear derailleurs (R9100, R8000, R7000, etc.), shows the limit screws being adjusted before the chain is installed. That makes it very easy to visually align the guide pulley with the inner and outer cogs, with nothing in the way. I do it that way if I’m installing a new drivetrain, which avoids all three of Jim’s “three main mistakes,” but would do it Jim’s way if the chain was already installed.
Thanks for pointing that out, Stephen!
Jim