A Few Bicycle Storage & Display Solutions
While looking for interesting new products to seek out and see in person at the Interbike bicycle show next week in Las Vegas, I stumbled upon a new (to me) bicycle storage device that’s also one of the nicest display stands I’ve seen (keep reading). That got me thinking about ways to store and keep your bike safe indoors.
Keep your baby inside
It’s important not to store or keep your road rocket parked outside because the weather will attack it and eventually damage every part in some way. You can protect it a little with a bike cover or tarp; however, moisture and air will still get at it and gradually deteriorate things.
If you have a garage for your bicycles, that’s a much better place to store them. However, if you live where there’s winter, the garage needs to be climate-controlled to offer the protection you need to ensure your bicycles don’t suffer over time.
Keep in mind that in some areas where the weather is nice year-round, there are other hazards. For example, if you live near the ocean, the salty air attacks metal, so your bicycle is not actually safe outside or under a carport. It needs to be inside.
Tip: Another safety reason to keep a bicycle inside is to keep it from being stolen from your yard. This is one of the most common ways bicycles are swiped.
Indoor bicycle-storage
Lots of couples disagree on whether or not bicycles belong indoors. When having this discussion, the point to make is, that fine road machines cost a lot and it doesn’t make financial sense to leave them outside or in a damp garage or basement where they’ll deteriorate, forcing you to have to replace them (or major parts of them) way too soon.
 Next, I offer two inexpensive and easy indoor bike storage solutions. But, first, just in case you guys agree that a fine road bike belongs on a living room wall, displayed/stored as a piece of art, behold Saris’ The Show Off ($274.99).
This elegantly simple bike hanger is like a little piece of art itself. It’s small and easy to use (just lift your bike and place its top tube on the Show Off’s cork-lined holder). And it even includes a built-in light. It will hold up to a 30-pound/30kg bicycle.
Or make your own
For a simple DIY wall display/storage solution, choose a good wall in your house. You need to be able to get close enough to it to lift your bike onto it. And you need the displayed bike to not get in the way of anything. Ideally, you wouldn’t store your bike in direct sunlight or near a heating or air conditioning duct.
Once you’ve picked the wall, lift your bike up, holding it level and place it at the height you want it so that it displays well and is easy to put in place. As you hold it there, have a helper make a mark on the wall at the bottom of one of the tires.
Next, bolt an approximately 45-inch/114cm long by 2-inch/5cm wide piece of wood on a wall right at the mark, making sure this wood piece is level. You now have a wheel “tray.” The next step is to lift your bike onto the tray. Place the inside pedal at 12 o’clock so that you can push the bike as close to the wall as possible (because the pedal will hit first).
Holding the bike in place, make a mark on the wall at the same height and at the center of the top tube. At this point on the wall, install an eye bolt. Be sure it’s screwed into something solid so it can’t pull out of the wall.
Now, you only need a nylon or leather strap to display your bike in your new wall stand. To do it, you lift the bike onto the wheel tray and run the strap around the eye bolt to the bike’s top tube and tighten the strap to hold the bike as close to the wall as works.
If you experience earthquakes where you live, you can take the extra step of wrapping an elastic band around a brake lever to lock a brake on. But, that’s not necessary otherwise. The level tray and strap will hold the bike in place. You can paint the tray, eye bolt and strap the same color as the wall to make everything almost disappear.
Or use a simple bike hook
Bicycle stores and home centers sell something called a bike hook, and it’s the cheapest and easiest way to hang bicycles inside. You only need to find a place where your bicycle can hang from one wheel. You measure to the height needed for your particular bicycle and then drill a hole into a wood wall or a stud inside the wall or a rafter overhead and screw the hook in. The hook can easily support any bicycle by one wheel and it won’t damage the wheel in any way.
For hanging several bicycles, just add more hooks. For the closest spacing, invert every other bicycle, i.e. handlebars up, down, up, down. You can also hang bicycles upside-down and horizontally by placing two hooks overhead, one for each wheel.
Or a simple bike stand
You can also use “leaning” style stands, like publisher John Marsh’s favorite, the Upstand. However, be aware that leaning bikes are always at risk of falling over. All it takes is someone bumping into 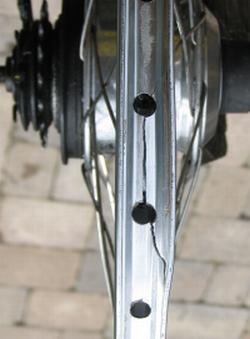 them. And bicycles falling over is one of the most common causes of derailleurs and derailleur hangers (the mounting point on the frame) getting bent. Brake levers can take a hit and get damaged, too. So, if you use a stand or lean your bicycle against a wall, be sure to do it in such a way to limit the chances of it getting knocked over.
Be sure to share your homemade bike display solutions in our Comments.
Postscript to our rim wear discussion
Roadie Stephen Weeks shared this great photo showing a severe case of rim wear. He saw the crack on the braking track outside and when he removed the tire, he saw this! Steve also wanted to caution people that overinflating tires to test the rim and tire could lead to a blow-out and flying rim or rubber shrapnel.