
Jim’s Tech Talk
By Jim Langley
This is the third Tech Talk about cassettes, that cluster of cogs (gears or sprockets) on the rear wheel of any road bike. I’m keeping the topic going because of the comments to last week’s installment.
Cogs Confusion
First, I want to explain something to readers “Henri” and “Walt,” who both shared the idea that there’s no need to tighten cassettes with a torque wrench.
Henri wrote “I’ve done most of my bike maintenance over the last 40+ years, including changing and replacing cassettes. When it comes to tightening the cassette, I have never torqued it after using a large crescent wrench because it is my view that the cassette is going to get tightened as much as it needs just by riding. Am I missing something?”
Walt agreed, “Henri: I do much the same as you. Just tighten with a wrench until tight/no torque wrench even though I have one…the action of pedaling keeps the cassette tight as long as it starts out tight. Never had an issue.”
Freewheels Versus Cassettes
Thanks for the comments, Henri and Walt. Please see the photo here, which will help explain why pedaling cannot tighten cassettes. And, also why tightening did tighten freewheels back before cassettes replaced freewheels on most bikes.
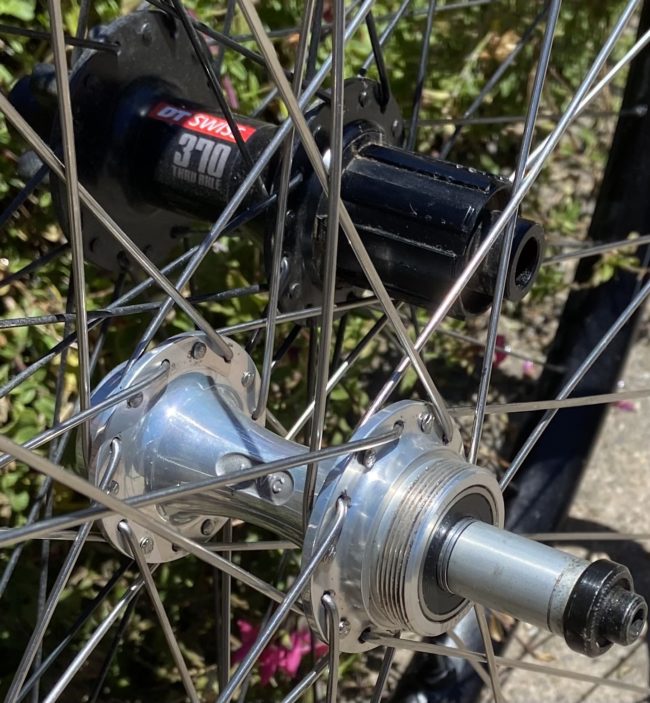
The silver hub in front is the old standard. See how it’s threaded? That hub is a freewheel type hub. Before cassettes became the norm, we used freewheels. These threaded onto hubs. And Henri and Walt, you are absolutely correct that pedaling a freewheel equipped bike would tighten the freewheel. In fact, sometimes they’d get so tight you’d break tools trying to remove them.
However, if you look at the black hub in the back, that is a cassette hub. Notice how the hub has splines or slots on it. The cassette cogs slide onto these splines. The only thing holding the cassette tight on the hub is the lockring that tightens down on top of the cassette cogs pressing them tight against each other.
On a cassette, pedaling the bike doesn’t tighten the cassette cogs. But what it can do is loosen the cogs. That’s because the pedaling force can slightly move cogs and if the lockring isn’t tight enough in the first place it can come loose on its own. That’s where torquing it comes into play to ensure that that doesn’t happen.
I hope this helps explain the difference and why it’s important to get cassette lockrings tight enough. An advantage to cassettes is that they rarely get stuck as badly as some freewheels did back in the day because cassettes are rarely overtightened.
Checking for Cassette Wear
The other comments I want to get back to everyone on is in regards to checking cassettes for wear.
A reader named Gilbert asked, “Will you be able to provide details on how to measure the wear on a cassette and any tools in the market that can gauge when the cassette needs to be replaced. This will be very useful to know.”
Bruce “0le” Ohlson agreed, commenting “I too am interested in measuring cassette wear. My desire is to spend the least amount of money replacing chains, cassettes, and chain rings. Wear on each one influences wear on the other two, so everything is a trade-off.”
Replying to Gilbert and Ole, Greg Przybyl said, “Rohloff makes a very useful cassette checking tool. Used it for years.”
Thanks for asking, Gilbert and Ole, and for the tool tip, Greg. Like Greg, I like and use Rohloff’s cassette checker – but not that much anymore (keep reading). Here it is on Amazon https://amzn.to/35jzSbt While searching I discovered that Unior has one, too: https://amzn.to/3pWiJ14.
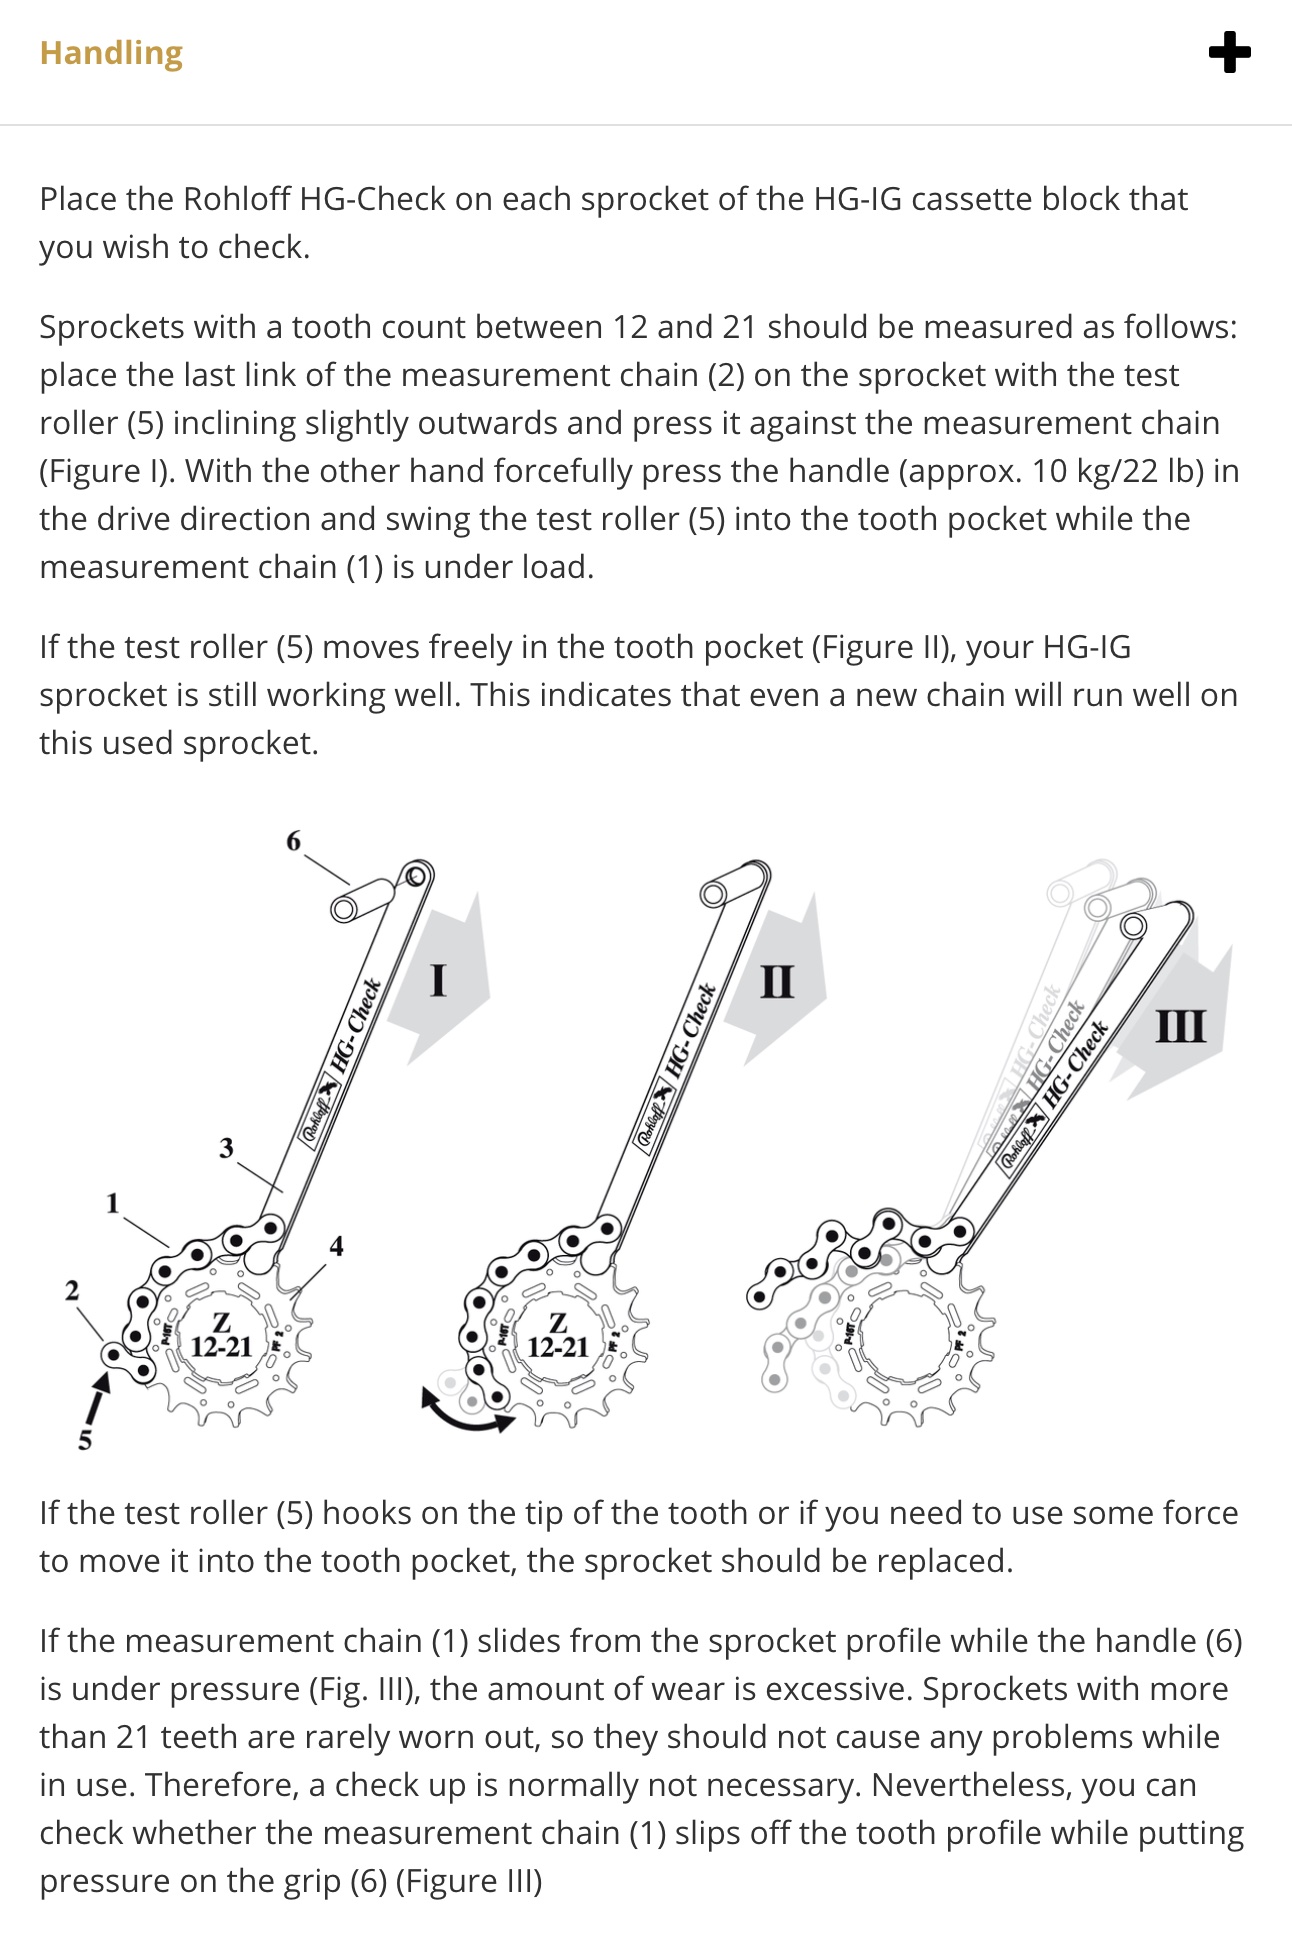
Rohloff HG-Check tool

Here’s how the Rohloff tool works. It simulates pedal pressure and shows if a 12- to 21-tooth cog is worn enough to possibly allow the chain to slip off the cog under hard pedaling.
Other Ways for Checking Cassette Wear
If you have a drivetrain with a smallest cog of 12 teeth, you might be perfectly happy checking your cassettes with the Rohloff HG-Check tool.
Modern drivetrains today, however, can have 10-tooth cogs and much larger ones than the 21-tooth cog, which is the limit of the Rohloff tool’s capacity. Maybe Rohloff or Unior will come out with a new updated tool to fit these modern cassettes. Because you can’t look at a cassette and tell with certainty how worn it is. And other than the tools, there’s no surefire way to measure them.
The Ride Test
But there is a check that will work for all bikes, which is to test ride bikes for “skipping.” That’s the sign that a cog is worn out. The teeth can no longer hold the chain and under extreme pressure the teeth allow the links to release and the chain jumps forward and then slams back down – an awful skip that can surprise you and even cause a crash.
You do this test during drivetrain maintenance, most typically after replacing a worn-out chain. Because a new chain will skip on worn-out cogs.
This test should be done on a straight smooth road, relatively traffic- and obstacle-free and ideally there will be a hill to climb at the end. Wear a helmet and keep your weight back toward the rear wheel, never forward over the front wheel. That way you won’t crash if the skip surprises you.
To check for cassette wear you test every cog on the cassette the same way, as follows (keep the chain on the small chainring in front):
1. You may want to spin around a bit and warm up because you’re going to push forcefully on the pedals for all your cogs – starting with the smallest (one of the hardest gears to pedal).
2. If needed, shift and make sure the chain is fully on the smallest cog and running smoothly. Now rise up out of the saddle and pedal hard as if you’re starting to sprint. Or, as if you’re going hard up a steep hill. Do this a few times to make sure there’s no skipping on that cog.
3. Next, repeat the process on each cog in order until you’ve tested every one.
4. At the end you should know if any of the cogs were worn out and which ones they are.
Fixing Cassettes
When you’ve determined which cog(s) is worn out, if you’re lucky you might be able to purchase that one cog. If so, you can unscrew the cassette lockring, replace the old cog with the new one and hit the road again.
You might wonder why all the cogs don’t wear at the same time. It’s because we ride in some cogs more than others. So, by replacing the worn cog(s) you can get a lot more miles out of a cassette.
If you can’t find the cog(s) you need to replace, you’ll need to replace the entire cassette. One place you can sometimes find individual cogs is on eBay.com, but be sure to read the description or ask the buyer to ensure you’re not buying another potentially worn-out cog.
Ride total: 10,029
Jim Langley is RBR’s Technical Editor. A pro mechanic & cycling writer for more than 40 years, he’s the author of Your Home Bicycle Workshop in the RBR eBookstore. Tune in to Jim’s popular YouTube channel for wheel building & bike repair how-to’s. Jim’s also known for his cycling streak that ended in February 2022 with a total of 10,269 consecutive daily rides (28 years, 1 month and 11 days of never missing a ride). Click to read Jim’s full bio.
Jim here’s another cassette checker on Amazon a little cheaper by KMC https://www.amazon.com/KMC-Extra-Sprocket-Checker/dp/B00KD6S05S
I don’t own one just giving info.
Thanks a lot, Kevin, appreciate it!
For those who are truly cheapskates (like me) you can sometimes get another cycle of use out of a fairly worn cassette. If when you put on a new chain and you get skipping on the cassette, try riding (gently) for a couple hundred miles. If you cassette was “on the limit” and not seriously worn, the new chain will “bed in” with the worn cassette and the skipping will be eliminated. Not sure what the mechanism is but it does work. Obviously if the cassette is seriously worn, this will not work but I have done it many times with success.
Another great article, Jim.
I wish the cassette checkers allowed measurements of larger sprockets. I’m an above knee amputee and have to ride with gearing on the larger sprockets with cadence of 90+ rpm to avoid damage to my only knee. I visually check for wear, but a tool that allowed checking sprockets with more than 21 would be nice.
About torque and cassettes – I have a smart trainer and noticed slipping and skipping problems. It felt as if I needed to check out the crank for wear issues based on what was happening, but it was a loose cassette causing the issues. I always use my torque wrench to properly tighten cassettes, but it clearly needed to be tightened. It’s now my practice to use the torque wrench on the cassette each time I take a wheel off for whatever reason. Maybe that’s overkill, but set to proper torque it certainly won’t damage anything.
I’ve been repairing and restoring bikes for family, most of whom have freewheels. As you noted, they can get super tight. I’ve had to use my bench mounted vise with the freewheel removal tool on most of them – and it’s so tight that it often moves the vise! Granted, if these weren’t in such disrepair I probably wouldn’t need to do that, but I’ve found that is the most effective way for me. I know not everyone has that setup available, but I’ve gotten to the point where it’s what I do all the time to remove freewheels rather than frustrating myself.
That’s a great tip to use a vise to remove super tight freewheels, Katherine, That way the freewheel tool is held in the wheel with the quick release so it can’t change positions, and the tool is then clamped in the vise. You then have the whole wheel to hold onto and turn to break the freewheel free. Sometimes it’ll make a loud “crack” when it lets go.
That’s how we always did it in the shops even going so far to have a floor mounted pedestal vise. These provide 360-degree access and are bolted to the floor so they won’t move no matter how many mechanics are turning the wheel 😉 Pedestal vises are great for straightening steel frames and all manner of bending and pounding tasks, too.
I don’t have a pedestal vise at home but I have something nearly as good, a Wilton bullet vise which is bolted to the workbench. Then, to ensure the bench stays put, it it bolted to the wall. So far I haven’t been able to budge the vise or wall 😉
Thanks!
Jim
that on-road test sounds dangerous
but it;s what i do, more or less
change the chain, then go for test ride, trying to make it skip
question about the checkers (and any cog wear test):
if it ‘passes the test’, with a new chain, is it possible for it to start skipping *later*?
or is the new chain the hardest test? does the chain ‘get used to the cogs’ and skip less after that?
also if you do try a new chain on an almost-worn-out cassette, is that going to shorten the life of that chain?
wle
Good questions, Larry. Kerry above in a comment mentioned that even old cassette cogs can “break in” to the new chain if you give them enough miles. I’ve seen that, too.
Ultimately I think it’s possible that a chain that passes the tool test will skip later – if it’s worn enough to just pass the test. I don’t think a new chain is a “harder test.” The tool is the same “new chain” test just without the extra force of a person actually pedaling the bike.
And, I’ve never actually checked to determine if a chain’s life is shortened by starting on worn cassette cogs. But, I seem to have to replace them in about the same amount of time whether I start with a used cassette or a new cassette, so I don’t think it changes the chain much.
Thanks!
Jim
I replace cassettes based on the noise test. Usually I wear out some of the middle sprockets first as those are the ones I ride in most. When I hear noise in those gears, I swap out my wheel with another almost identical wheel with the identical cassette. If I don’t hear the noise then, it’s time to replace the cassette. If I do that, I replace the chain at the same time.
Thanks, Bill, that’s an interesting way to do it. Appreciate the tip!
Over the years, I found the most cost effective way to manage chainring and cog wear/replacement costs is to keep a close eye on chain wear and replace the chain as it approaches its wear limit. A chain is cheaper than cogs and chainrings. Also keep your drivetrain as clean as your time allows. I end up doing a complete system clean with an ultrasonic machine monthly. But in the end, these parts are expendable and take pride when you wear them out. It means you’re out there riding!
Kevin – totally agree! I am obsessed with keeping the entire drivetrain clean and have definitely extended the life of my components at least 500 miles (usually more) by doing so. I clean my chain regularly and twice a year even floss the chain to an extra deep clean. OCD? Yes, but I keep more money in my wallet that way.
Jim: You are correct… I should have clarified on the difference between freewheels and cassettes. Having said that, I have tightened enough cassettes that I no longer need to use a torque wrench – but a torque wrench is the fail safe way.
Yes, freewheels are sometimes very difficult to remove…sometimes one has to essentially destroy them to remove them. I do not have a vice attached to the earth (best way to remove a freewheel) but I do use a 4′ pipe over my wrench and that “usually” works. If not, then I get Goober to destroy the freewheel to remove it.
Another easy thing to do with either freewheel or cassette is to check by hand to make sure that no individual cog moves EVEN SLIGHTLY. If on a freewheel, there is usually no way to tighten/need a new freewheel. If on a cassette, then tightening of the cassette lockring might work. If everything is tight and (as Jim explained) the chain still skips (and the chain is not worn) then freewheel or cassette/cog needs to be replaced.
All in my view and basis my experience.
Thanks for the additional tips, Walt!
i have “old” campy 8 spd. one can reverse the cogs with the wear and get more life. nice thing about “loose” cogs.
Si Little: Yes, some cogs are symmetrical and one might be able to reverse them to prolong life…but I have only replaced them with new. Some cogs are not symmetrical (designed to shift better) and I would not (personally) reverse them.
I do the on-road test for worn sprockets. Decades ago I discovered what was (for me) an easier, quicker, and more reliable method.
Instead of sprinting hard, I slow until I’m almost stopped, then do an energetic standing-start effort for a few pedals revs. Change gear to the next sprocket, slow to almost a halt, repeat.
I found that if the chain didn’t jump during a standing start, it’d NEVER jump.
Seems like a better on-road test to me. I would rather have a chain slip standing (almost) still than at speed.
Ditto on the check the chain and keep it clean. Saves time and money in the long run. My general rule is by the thrid chain i replace the cassette unless it skips earlier. Or the alternative is an internal hub with a belt drive. I have almost 30,000 km on my Gates belt, still going strong.