
So far, in this on-going series with tips for upgrading a road bicycle with new components, we’ve covered basic workshop setup and we’ve installed the bottom bracket and crankset. The pedals should be back on the bike, too.
From this point, assembling the bicycle is about getting the braking and shifting components installed and adjusted. This starts with installing your levers in order to optimize their fit and performance. So that’s what we’re tackling this week.
Getting the levers on the bike lets you accurately size and route any cable housing sections. Equally important is mounting the levers where they fit you correctly so that you ride efficiently and comfortably.
Tip: No matter how perfectly your front end is set up, if you grip the handlebars too tightly, lock your elbows and/or ride with your hands in one place most of the time, you risk suffering numb, tingling fingers, tight neck and shoulder muscles and tiring out too soon on rides. So make an effort to relax, grip lightly, bend your elbows and move your hands frequently to other parts of the bar.
It’s not very difficult to install levers, so I’m providing additional tips on related things, since when you remove levers you have an opportunity for other upgrades – like wider, or compact, or even stiffer oversize handlebars. Let’s get started.
This week’s resource
If you’re thinking of a different shape or type of drop handlebars to go with your new components and levers, the choices are almost endless. To help, visit the Road Bike Bar Geometry webpage. This site is a little old, but it’s the only one I’ve found that so clearly shows many of the strange and wonderful shapes handlebars come in. If you are shopping for more comfortable or efficient handlebars to solve issues or improve your rides, I think you’ll find it informative and helpful. Just know that it doesn’t include every handlebar out there, so you’ll want to do your own research on the ones not on the site.
Brief Levers-Related Glossary
Lever: the entire lever assembly
Blade: the long, thin part of the lever that moves when you squeeze or push
Hood: the part of the lever covered by rubber
Rubber hood: the soft protective covers on the hood
Clamp: the wraparound metal bands that tighten the levers to the handlebar
Handlebar drops: the bottom straight part of dropped handlebars
Handlebar hooks: the curved parts of the handlebars on the sides
Reach adjustment: a mechanism in some levers that lets you adjust the levers’ travel to fit hand size (great for riders with smaller hands)
CAUTION: When Working With Carbon Handlebars
Lever clamps can crush and ruin a carbon handlebar as if it’s a piece of cheap plastic. Don’t make that pricey mistake. If you’re lucky, your carbon bars will have roughened sections that make thelevers tighten and stay tight without much force with your wrench. But, whatever type of bars you have, tighten carefully a little at a time, try to move the lever to see if it needs more, and stop tightening as soon as the lever stays in place. It is actually preferable to leave levers a smidge loose so that they can move in a crash rather than break. They only need to be tight enough to remain in place when you’re reefing on them on the steeps. Do NOT overtighten.
Steps for replacing old levers with new
Even though you have to strip off the handlebar tape, replacing levers is easier than installing new ones because you can often use the location of the old levers to position the new (some handlebars even have markings at the lever location, making it even easier). However, levers – and especially the rubber hoods – seem to change shape with every new model year, meaning putting them in the same position as your old levers might not be perfect. So proceed as follows:
- Once the tape has been removed (isopropyl alcohol is cheap and it works great for removing any sticky residue), mark the position of the lever clamps on the handlebars with a Sharpie marker so you won’t lose your reference (keep in mind that you don’t want the clamps to remove your marks during lever removal or installation, so mark the bars well and let the marks dry).
- Also mark the point where the rubber hoods contact the handlebar, right at the ends of the tops of the hoods (not the sides).
- Remove ONLY ONE LEVER and slip on the correct new lever (right or left, depending on which one you removed). Using your marks on the handlebar, position the new lever like the old one and snug the lever just enough so it won’t slip around if you try to move it.
- Now, you can see and, more importantly, feel how the new lever and hood shape compare to your previous lever position. Do this standing over the bike and sitting on it as if you’re riding. It might be that the new levers feel perfect in the same spot as the old ones. But you may want to fine-tune the position. This is easy to do now that you have great references. You may want to review the positioning guidelines below.
For installing levers from scratch (no old levers on the bars)
Before you can install levers correctly, your handlebar angle needs to be correct. So, we’ll assume that’s the case. As a quick rule, a good starting position for most roadies is to point the ends of the drops at where the rear brake attaches to the frame. That will place drop handlebars and levers in a comfortable and efficient position for most riders. To install your new levers, you’ll need a straightedge or something that works as one. Here’s how to proceed:
- Slip the left and right levers onto the handlebars, making sure to put them on the correct side (it’s easy to get this wrong). Move the levers up to where they look about right and gently tighten them so they stay in place.
- To find a good starting position, rest the straightedge against the bottom of the handlebar drop and hold it there or you can tape it in place if it’s easier. The straightedge should now extend forward. (See photo.)
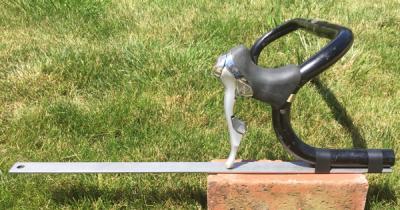
- Now, loosen the lever that’s on the side of the straightedge and move it up or down until the tip of the lever’s blade contacts the straightedge. Snug the lever so it will stay put but don’t tighten it yet.
- Next double check that the straightedge is in full contact with the very bottom of the handlebar. Also check that the lever is lined up with the handlebar hook and aiming straight ahead, not canted in or out. Don’t be tricked by the sometimes angled shifting ‘buttons.’ It’s the lever that you want lined up with the bar.
- Note that as you tighten the lever fully, the blade will usually move down a little so plan for that when you locate it.
- With both levers positioned via the straightedge, they will be in the same place. The next step is to stand over the bike and sit on it as if you’re riding and try out the lever position. Once you’re happy it’s right, tighten the levers in place.
Lever positioning guidelines and tips
If you’re not sure whether you’ve found the best lever position, there are some clues that will help. First, soreness in your hands or wrists is a common sign of the levers being too high, forcing you to bend your wrists excessively to operate your levers. You want the levers to fit your relaxed, natural arm, wrist and hand geometry.
Tip: If you can’t feel the right position, have a friend take a photo of you sitting on your bike on a trainer from the side and you should be able to see what’s wrong.
Another goal of proper lever positioning is being able to comfortably reach the levers for braking and shifting, and from all hand positions, too. To test for this, see if you can operate the brakes from the hoods and from the hooks. If not, the levers are too low or too high on the bars.
The reach to the levers also has to do with your hand size. Fortunately, some levers have reach adjustment now, which lets you reduce the travel of the lever so that even smaller hands can exert optimum power.
One last tip is to look at the transition between the handlebar and rubber hoods. Some handlebars are designed to create a longer, flat platform where the bar meets the hoods. With these handlebars, you want to mount the levers to fully use that platform. If you do this and find that the levers are hard to reach, it usually means you need to fine-tune the handlebar angle slightly to move and optimize their position.
If you’ve got some great tips for installing levers, please add them in the Comments below the Newsletter version of this article. Next in the series, after a break of a couple weeks, we’ll install the brakes!
Hi there. Very useful guide. Are all brake levers compatible with all handlebars? My lbs have told me that they are unable to fit the latest shinano 105 hydraulic levers to my Giant defy advanced (2016) which I find a little surprising. Thanks
Hello,
Is it possible to install interrupter levers on non-hydraulic disc brakes?
Thank you.