More Road Tubeless Tire Tricks and Rim Strip Talk
 Jim’s Tech Talk
By Jim Langley
As a follow up to last week’s edition where we looked at slow leaks and flat tires caused by rim strips – and solutions – I wanted to provide two additional tubeless tricks that can come in handy. Plus, I’ll share a few of the interesting comments that came in.
If you missed last week’s issue, here’s a link to catch up: Slow Leaks? Frequent Flats? Check The Rim Strips.
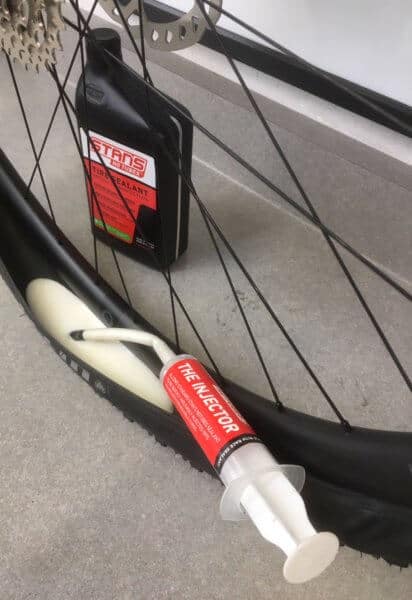
Tubeless Injectors
Here’s a pic of my Stan’s tubeless injector, which has become one of my favorite tools. They’re only about $10.
All this tool is, is a syringe that holds enough sealant so that you can inject the goop into the tire via the tubeless tire system’s valve. This is an easier way to get the sealant inside the tire than pouring it in and then having to try not to spill any sealant when you put the tire back onto the rim.
To fill the injector with sealant simply stick its hose into the sealant container and pull the plunger back to draw the sealant into the injector’s “tank.” Follow the instructions to fill it to the right amount for your specific tire size and width.
Thankfully, tubeless valves have removable cores for the purpose of injecting tires with sealant. To use them, unscrew and remove the core. There are special tools for this such as Stan’s. Or you can just use a tiny adjustable wrench or pair of pliers to grip the core by its built-in wrench flats (look closely).
Once the core is removed, screw the injector hose onto the valve and you can then inject the sealant into the tire. With a little luck none will leak out.
Tip: To avoid sealant leaks and the possibility of the valve not taking in the sealant, hold the wheel upright and place the valve a little below 3 or 9 o’clock. That way the valve hole will stay open and the sealant will go down and into the tire.
Removes Sealant, Too
What I like about the injector most, though, is that it’s great for removing sealant. When changing tires at home, carefully remove one side of the tire and then rotate the wheel so the sealant pools at the bottom. Place the hose into the puddle and pull the handle and the injector makes easy work of sucking up the sealant.
You can squirt it into a paper cup (or the sealant bottle) and then re-use the sealant (assuming it’s still clean). Removing sealant this way is a lot less messy than pouring out the sealant from the tire or soaking it up with rags, etc.
Injector Care
The only thing to keep in mind with injectors is to rinse them out well or else the sealant can dry and gum them up. Also, remove the plunger when the injector is not being used. If you leave it inside the injector, the o-ring that forms the seal can get compressed and the injector will stop working.
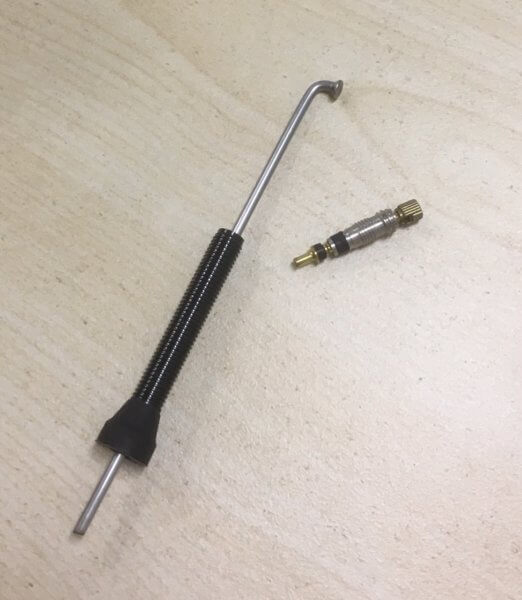
Fixing Clogged Tubeless Valves
When you run tubeless tires long enough you may find that you either can’t let air out of a tire or you can’t get air into it. This can be annoying.
What causes this issue is a clog at the valve inside the tire. Over time the sealant forms a “skin” over the valve hole preventing air in or out.
Luckily, the fix is easy. Simply remove the tubeless valve core as described above. Then, you can use any sharp object you have handy to poke into the valve and pierce the sealant clog below. In my picture, you’ll see that I sometimes use a cut-down spoke since we wheelbuilders always have spokes on hand.
Don’t use something too small diameter, like a pin, because it won’t poke a large enough hole. And, you will probably end up with another clog soon.
Your Comments
I found Barb’s response the most surprising because I’ve never heard a story like hers before.
She explained, “My husband left his bike in the car on a hot day. When he went to ride it, he found he had 32 punctures! Yep, the rim strip had melted into all the holes and the spokes had then punctured the tyre. Ever since then, he’s reduced the pressure in the tyre when he’s left the bike in the car.”
Fixieguy offered clever tips for valves that are getting cut:
“I’ve had a problem where I have gotten punctures very close to the valve stem. One solution was to stop using the little nuts that screw onto the valve. They can pull the tube up too far out of the rim and cause the edge of the rim valve hole to cut the tube. Another solution has been to put a second layer of rim tape on the rim.
A third preventative is to cut a two inch length of an old irreparable tube in half, take one of the halves, punch a tiny hole in its center, and slide it over the valve before inserting it into the tire and inflating. It provides a double thickness around the valve area to help prevent the valve hole cutting the tube.”
William found a burr at the valve hole,
“I encountered two problems on the same new Bontrager wheel about 15 years ago, which caused a number of flats until resolved. The first one was a misaligned rim strip tape causing the flat like you described. The second was at the valve stem, but not due to defective inner tubes (my first thought). There was a burr at the valve hole which worked its way through the inner tube. A little deburring solved the problem.
Cloth tape rules and I now keep a supply of different sizes on hand. I have also used fiberglass reinforced packing tape in a pinch.”
Dave told how he ingeniously fixed a super slow leak,
“I had a slow leak that would take a couple of days or more to show up after changing a tube. The leak was so slow I couldn’t hear or see a cut in the tube. I finally found the problem by filling the tube with air and putting one section of the tube at a time in a bowl of water. I finally got to a spot in the tube where bubbles were coming up and noticed that the hole was on the rim side of the tube and not the tire side.
By then measuring from the valve stem to the hole I was able to find the exact spot on the rim that was causing the problem. It was a small burr on the plastic rim tape that was wearing a hole in the tube over time so I replaced the rim tape and no more flats!”
Then, there were more votes for using cloth rim strips.
Chuck said,
“I’ve worked on bikes for years. I always use cloth rim tape. Plastic strips always cause a problem eventually. They deteriorate over time and cause flats. When customers come in for new tires and tubes they get cloth rim strips.”
Richard agreed,
“I am an old man avoiding tubeless. Velox rules!” Editor’s note: Velox is cloth rim tape.
Chris VandenBossche says stick with cloth, too,
“My first good road bike came with a pair of low-end Mavic wheels that had plastic rim strips. About a year or so after I bought it I had a series of flats and like Jim, a mechanic friend quickly figured out my problem. I bought some adhesive cloth rim tape and never had to think about rim tape on those wheels again.”
Thanks for sharing your tips and tricks. Here’s to flat-free miles!
Ride total: 8,989


You’ll never have the problems Fixieguy mentioned if you use non-threaded (smooth) valve stem tubes. They also ensure that you won’t chew up the rubber inside of any pump head that attaches to the valve stem for inflating.
I’ve used Michelin Ultralight tubes for years with excellent success.
Stans? Not good for Shimano wheels as it will corrode the inside of the rim.
My bike came with tubeless tires and rims. As long as any puncture was small, the sealant did the trick, but when I hit a nail, the hole was too big to fill. I carried a spare tube with me for this very reason, but due to some arthritis in my hands and tightness of the tire on the rim, I was unable to remove the tire from the rim on the road. As a result, I have switched back to traditional tube tires that are easy to put on and take off. I like riding on tubeless tires–lower pressure and less chance of a blowout–but if I can’t fix it on the road, and I don’t have a follow vehicle to replace my wheel, I’m kind of stuck. Is there a better solution?
Which wheels and which tires specifically? Brand and model and tire size? I am working on an article about this right now because I have been facing a similar issue and was able to resolve it. The short version is that it is a LOT about technique and practice and less about hand strength. I am just now getting the hang of it myself and also had to have someone pick me up, so I feel your pain!
My first puncture after I adopted tubeless tyres a few years ago failed to seal effectively. When I eventually got home I inflated the tyre to 100 psi. It was fine for about a minute and then pffftt!, the sealant blew out. The sealant was Caffelatex. After some research I bought some OrangeSeal, which claimed that it contained little particles to seal 2mm holes. No problems since. I’ve had a puncture which sealed without my needing to stop. So..not all sealants are equal, and OrangeSeal has my seal of approval.
Thanks for the feedback.
I’ve had good luck both with Caffelatex and also Orange Seal. I’ve had bad luck with Finish Line. I am currently using Orange Seal, like you.
I use Stans – this has been my first experience with tubeless- no flats yet! I have heard Orange Seal may be better for larger punctures. So far I like it and btw, you don’t need to inflate it as high.