 Jim’s Tech Talk
By Jim Langley
Three times this month I helped roadies with almost identical problems. If my mechanic’s life was on social media, the mystery I was asked to diagnose and fix would be trending. So, I figure there’s a chance you might run into this issue on your own rig or your buddy’s.
To ensure you’re ready to save the day, I’ll explain more about it and then provide some remedies. Feel free to comment at the bottom to share your best tips.
The three riders all complained about tire trouble: slow leaks and flats. Two run tubeless-ready road tires with sealant. The other is on standard tires with tubes. All were sure there was something wrong with their valve because they could hear air escaping there.
Slow Leaks on Tubeless-Ready Tires
The tubeless riders realized their tires were softer than usual when they checked them before rides. They knew that tubeless tires sometimes lose air, so they just pumped them up. But, when the tires kept going soft, they started looking for leaks and that’s when they heard the air coming out by the valves.
They next tried tightening their valves to stop the leak. That’s a good idea because tubeless-ready systems require an airtight connection between the valve and the rim. The sealant in tubeless-ready tires will travel with the escaping air and can seal the gaps around a loose valve.
Yet, if the valve is very loose, the particles suspended in the liquid sealant might not be able to do the job. Plus, the valve is designed to seal on its own so long as it’s sufficiently tightened. Over enough time (usually months), sealant dries up, too, meaning it can’t travel to leaks and seal them forever.
Multiple Flats on Standard Tube Tires
The person with the standard tire and tube setup was frustrated because she’d suffered back-to-back flats. She thought they were both due to bad valves because when she fixed the second puncture by installing a new tube, she flatted again before even getting to put the wheel back on the bike.
She had just finished inflating the tire and hadn’t even removed the pump from the valve when there was a loud hissing as all the air rushed out of the tire. And, it felt and sounded to her like it came right out of the valve.
When it comes to tire trouble, always start with a full inspection
Flat tires and slow leaks are among the most frustrating problems for many cyclists. They can render otherwise perfect bicycles unrideable, can strand you by the side of the road and can be tricky to fix – even if you have a spare tube and pump.
The good news is that with a little Sherlock Holmesing anyone can figure out why tires aren’t holding air and what to do about it. But, it can take some careful investigation and thought.
I recommend starting by taking the tire (and tube if you have one) off the rim. That’s the only way to see what’s going on inside the rim and around tubeless-ready valves.
And, with standard tire systems, removing the tube is the best way to inspect the tube and the valve that’s built into it. Also, when the tire is removed it’s much easier to inspect it and the rim inside and out.
It Wasn’t the Valves
Because I’ve been fixing flats and slow leaks forever, I knew that it was unlikely that the valves were to blame for the slow leaks and flats. Leaking air will follow the path of least resistance and escape at the point of the biggest hole, which – unless there’s a large puncture somewhere in the tread or sidewall – is usually the valve hole.
So, when I took the tires off I was looking for something much more common, namely faulty rim strips. The rim strip is the plastic, rubber or cloth piece that goes onto the rim to cover all of its spoke nipple holes. In a tubeless-ready system, it seals these holes so that the air and sealant can’t escape.
In a standard tire-and-tube system, the rim strip, 1) protects the tube from being cut by the sharp edges of the holes in the rim; 2) it prevents the pressure in the tube forcing the tube down into the holes where the tube might get punctured by the end of a nipple; and 3) in the event of a spoke that is long enough to stick out through a nipple and past the rim hole (more common that you’d expect), the strip protects the tube from being punctured by it.
Three Bad Rim Strips
What happened with the first tubeless-ready slow leak was that the non-adhesive plastic rim strip had been scrunched up to one side inside the rim. This partially exposed two rim holes letting the air and sealant get down inside the rim and escape at the valve hole.
What usually causes a rim strip to move like this is not enough care when installing the tire. Tubeless-ready tires need to fit tightly which means they can be tough to install. If you don’t pay enough attention when putting tires on, the beads of the tire can pull the rim strip out of position.
The tire may still go on and work fine for awhile. But, as you keep riding and topping off your tires as usual, the rim strip at that spot where it’s too close to the rim holes will eventually yield to the air pressure opening gaps and causing a slow leak (or even a fast one).
In the second tubeless-ready tire, I discovered that the rim strip was too narrow for the rim. In this case, the strip was just a little too narrow. This can happen if the rim holes are staggered left and right. A too narrow rim strip might work on a rim with all the holes down the center but that same rim strip won’t work when the holes are staggered and thus wider. So, this was a case of the wrong rim strip for that rim.
TIP: Because rim strips can move like this, and not fit correctly, it’s a good idea to get in the habit of checking them whenever installing new tires. To do this, once you’ve got the tire on the rim, yet before you pump it up, carefully go around the wheel pushing and rolling the tire to the side to see if the rim strip is laying flat and covering the rim and its holes the way you want all the way around. Be sure to check both sides of the tire/rim. If you spot a problem anywhere, fix it before finishing tire installation.
Then, with the tubed tire, it actually had a broken rim strip. But, it was a little hard to spot because it was split down the middle near the valve and I didn’t see it until I took the strip out and flexed it looking for defects.
The split was opening when the tire was fully inflated letting the tube protrude into the rim hole where the sharp spoke nipple was popping the tube. That’s a worst case scenario that would have kept popping tubes.
New Rim Strips All Around
For all three wheels, the fix was replacing the rim strips.
For tubeless-ready rims, there are options. One is going with the wheel/rim manufacturer’s recommended rim strips. Some wheel and rim makers sell strips specially made to work with their rims. Usually, they’re recommended because they are sized to exactly fit the inside width of their rim to seal it from leaking and also ensure tires go on/off without too much difficulty.
You should be able to learn if proprietary rim strips are available for your wheels by checking the maker’s website or by calling and asking to speak with tech support.
For standard tube tires, bike shops sell universal rim strips. Just make sure you get the right width strips to fit fully inside your rim. Just like with tubeless rim strips, you don’t want the tube-type strips to be able to move and expose the dangerous rim holes and nipples.
Make Your Own Rim Strips
Lots of mechanics today make tubeless-ready rim strips from Gorilla Tape. It’s adhesive so it won’t move out of place even when installing/removing the tightest tubeless tires. And it seals great. Also, it comes in a width that fits some rims perfectly, or you can cut it to the exact with.
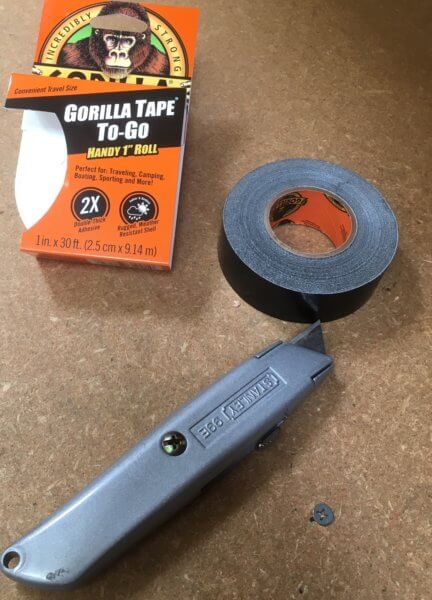
1-inch (25.4mm) wide Gorilla Tape , is the width that fits nicely inside many road tubeless-ready rims. Or, if you have super wide rims, with a wall-to-wall internal width greater than 25.4mm, you can purchase Gorilla Tape in the 1.88-inch (47.75mm) and cut it to the exact width required.
To do this, place the roll of tape on its side on a flat surface (photo). Get a utility knife (“box cutter) with a new blade to cut the tape (a used/dull blade can result in a jagged, rough cut).
Now, you just need to put a shim under the knife (or under the tape if you prefer) that puts the blade at the exact height to cut the tape to the right width. With this setup you simply hold the knife while pressing the tape into the blade and turning the tape. A few turns of the tape and you will cut deep enough to have enough tape to cover the rim.
Taping the Rim
When taping the rim, start just past the valve hole and press down on the tape to make sure it’s sticking to the rim all across and following the rim’s shape (often you need to press it down into a concave channel inside the rim). You don’t want air pockets between the rim and tape.
Take your time as you tape the rim and get the tape sticking all around and up on the edges. If you get a bubble from an air pocket, just pull the tape up off that spot again, and use a little more care pressing it down. To prevent these air bubbles, it helps if you pull the tape taut as you apply it.
When you get back to the valve hole, cut the tape to allow about three inches of tape past the valve hole so it overlaps the first part of your tape job. Stick that last section of tape down like you did the rest.
All that’s left is to make a small “X” cut with your utility knife right above the valve hole (I like to push the pointy end of a valve up through the rim from below to make a small mark on the tape showing me exactly where to make the cut). When you insert your tubeless valve and tighten it, it will spread the little “X” cut making a tight seal around the valve.
Ride total: 8,982
My first good road bike came with a pair of low-end Mavic wheels that had plastic rim strips. About a year or so after I bought it I had a series of flats and like JIm a mechanic friend quickly figured out my problem. I bought some adhesive cloth rim tape and never had to think about rim tape on those wheels again.
I’ve worked on bikes for years. I always use cloth rim tape. Plastic strips always cause a problem eventually. They deteriorate over time and cause flats. When customers come in for new tires and tubes they get cloth rim strips.
I had a slow leak that would take a couple of days or more to show up after changing a tube. The leak was so slow I couldn’t hear or see a cut in the tube. I finally found the problem by filling the tube with air and putting one section of the tube at a time in a bowl of water. I finally got to a spot in the tube where bubbles were coming up and noticed that the hole was on the rim side of the tube and not the tire side. By measuring from the valve stem to the hole I was able to find the exact spot on the rim that was causing the problem. It was a small burr on the plastic rim tape that was wearing a hole in the tube over time so I replaced the rim tape and no more flats!
I am an old man avoiding tubeless. Velox rules!
I encountered two problems on the same new Bontrager wheel about 15 years ago, which caused a number of flats until resolved. The first one was misaligned rim strip tape causing the flat you described. The second was at the valve stem, but not due to defective inner tubes (my first thought). There was a burr at the valve hole which worked it’s way thru the inner tube. A little deburring solved the problem. Cloth tape rules and I now keep a supply of different sizes on hand. I have also used fiberglass reinforced packing tape in a pinch.
Beware of Gorilla tape. Stan’s says it’s porous and soaks up sealant and allows moisture inside the rim cavity which causes corrosion. Folks say that it has a difficult to remove tape residue as well. I use Stan’s yellow tape, even though it’s rather pricey, for my tubeless rims.
I ride Dura Ace wheels and although they’re made for tubeless tires
I use regular 25c tires with inner tubes on them. I don’t use rim tape and have no problems with chafing punctures. Also my tires stay hard for several weeks befor needing more air..
My husband left his bike in the car on a hot day. When he went to ride it, he found he had 32 punctures! Yep, the rim strip had melted into all the holes and the spokes had then punctured the tyre.
Ever since then, he’s reduced the pressure in the tyre when he’s left the bike in the car.
I’ve had a problem where I have gotten punctures very close to the valve stem. One solution was to stop using the little nuts that screw onto the valve. They can pull the tube up too far out of the rim and cause the edge of the rim’s valve hole to cut the tube. Another solution has been to put a second layer of rim tape on the rim. A third preventative is to cut a two inch length of an old irreparable tube in half, take one of the halves, punch a tiny hole in its center, and slide it over the valve before inserting it into the tire and inflating. It provides a double thickness around the valve area to help prevent the valve hole cutting the tube.
Your use of the pronoun “she” in your general story really bothered me. If you are telling a nonspecific story, then use non specific gender pronouns. Its very offensive to the female,biking,community because this post assumes to the public that “she” doesnt know whats wrong with her tire or how to fix it. Not that maybe this could have also been a man. And that there are countless women out there that know how to diagnose and fix a flat tire.
Earlier in the article it explains: “The three riders all complained about tire trouble: slow leaks and flats. Two run tubeless-ready road tires with sealant. The other is on standard tires with tubes.”
“They” referred to the TWO riders mentioned who were riding tubeless. And “she” referred to the third individual rider on standard tires, who was actually female.
It was not a general example, but a specific story about three different people, two of whom were riding tubeless.
We fully respect and support women’s cycling, and did not intend to suggest that a woman would be any less able than a man to diagnose or repair a bicycle.
Thank you for replying to the “She”. If it was a man then it would have been “He”. I don’t get the sensitivity. Keep the shiny side up!!
Person who goes by “Bikerchick” is offended by gender specific pronouns. That’s a good one.
Wait is this a joke?
‘Bikerchick ‘gender sensitivity. Embarrassingly funny. Bet she wears a pink helmet ?…. but, don’t call her a girl!
Interesting comment on Gorilla Tape absorbing water. I have found it useful to keep some GT wrapped around my seatpost to use primarily as a tire boot, should I get a tear in a tire on the road when using tubes. I have found that using a dollar bill can backfire if it gets wet, and it can be expensive if all you have is a twenty. GT does not make a good long-term boot, as the flexing causes it to eventually fail. Velox is good, but it also absorbs moisture. I’ve had name brand plastic rim strips split at the spoke holes, and others shift to expose the sharp edges of non-ferruled spoke holes.
I have found that thicker rip strips can lead to mounting issues on very tight-fitting beads, leading me to favor the thinnest reliable materials. After experiencing disappointing results with a big-name tubeless company’s rim tape, I tried kaptan tape and I believe it is the secret sauce for both tube and tubeless setups. It is cheap, strong, doesn’t tear when you pull it tight, and is so thin that you can wrap multiple layers and still have a thinner strip than most other materials. The adhesive is plenty strong enough without making the tape hard to remove, and it does not leave much residue. My approach is to use a tape width narrower than the rim and wrap three layers, one each as far to either side as necessary and a third down the middle. Then I poke out a hole for the valve and the result will last for the life of the wheel if necessary. The only downside I can think of is that on-road spoke nipple replacement could be an issue, but that’s really only a concern of long-distance tourists.. I think I would cut the tape at the spoke hole and just stick another piece of any suitable tape back over the area when done.
gorilla tape is the best option,velox and zefal cloth tapes move around,off the shelf rim tapes are either too thin or not sticky enough,folk say gorilla tape is too hard to remove,thats just the point it should be hard to remove so it does not move about on the rim,get a wide roll of black gorilla tape and cut it to size with a stanley knife blade,for $12 one roll of gorilla tape will get you ten rim tapes,maybe more