
Jim’s Tech Talk
by Jim Langley
There were so many great tips in the comments about last week’s Tech Talk on using chain quick links, we’re sharing some of the best ones here with some photos. And, offering another tip for quick links I think you’ll be able to put to good use.
Read part 1 and the Comments
First, if you missed part 1 and/or don’t know what a quick link is or why you’d want one, you can catch up here: https://www.roadbikerider.com/bike-chain-quick-links-guide/. Also, the comments which you’ll find at the bottom of the story are well worth reading. For example, reader Charlie Elsey provided a link to KMC’s online chart showing which of their quick links are reusable. Great resource, Charlie, thanks!
On Reusing Quick Links
And, reusing quick links is a bit controversial in that the makers say that some models are not to be reused, while roadies often reuse them anyway. I wrote more about this issue in a previous Tech Talk here. My advice is to figure out exactly what quick link you have and whether or not the manufacturer says it’s okay to reuse it. If not, then don’t risk it.
YOUR TIPS
Chain Holder Tools
I mentioned that the easy way to install and remove quick links is to first lift the chain off the chainring. This creates slack in the chain.
Readers, Walt, John W. Willis, Bob and Bryan prefer to use simple home made tools for this. The advantage is not having to handle the chain as much as when you lift it off and put it back on the chainring.
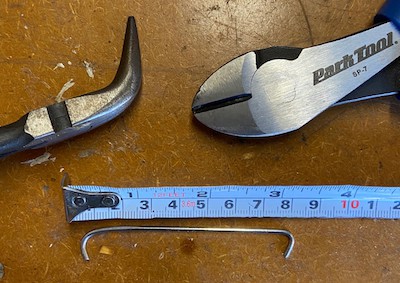
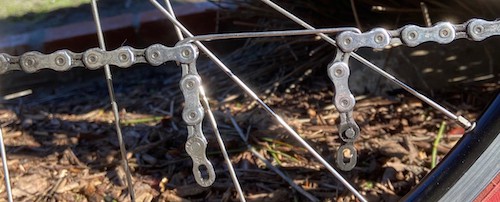
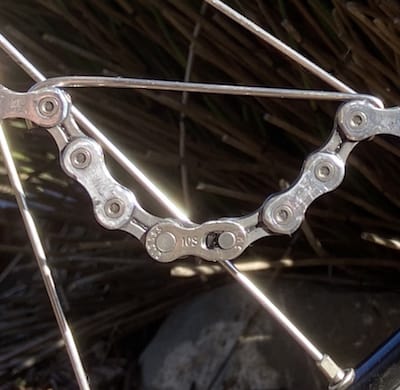
Walt explained, “When removing or installing a quick/master link, I have found a way to work on the chain which, for me, is easier than just removing the chain from the chainring. I made a simple tool by taking a 6 inch piece of an old round spoke and bending about 1/2 inch of each end slightly more than 90 degrees to form hooks on each end. I then pull the chain to get some slack and hook each end of the tool into the chain on each side of the link to be worked on. This leaves the master link or the two free ends of the chain loose (without tension) and easy to work on.”
And, John W. Willis wrote, “A simple, large paper clip can be unfolded and used in the same way to provide slack and allow the ends of the chain to be free of tension while working to reconnect them with a pin or a quick link.”
The photos show my version of Walt’s chain holder. Like him, I made it out of a spoke. I cut it to length with diagonal cutters and bent hooks on the end with needle nose pliers. John’s paper clip tool could be made by hand so it’s even simpler.
No-tools Quick Link Opening
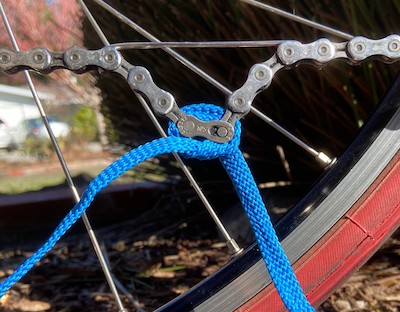
A roadie named Richard offered a cool way to open quick links without bicycle tools. He explained, “A brilliantly simple way to remove a quick link is with a cable or even a shoelace. Thread it through the side plates so that it goes around the pins at either end of the link, cross the ends on the opposite side of the chain and pull parallel to the chain.”
I’ve heard this trick before but forgot all about it until Richard reminded me. I have never tried it, so I gave it a go. I only had a pretty oversize shoe lace on which the rolled ends would not fit into the link. So, I smashed one end flat with a rock until it fit.
That made it easy to pull the lace around the link. Then by tying and tightening a knot the link should open. But only if you follow Richard’s advice and pull parallel to the chain. At first, I wasn’t aligned that way – even though I thought I had it right – and pulling harder and harder did nothing. Once I got the lace ends pulling parallel, it opened easily.
You can see from the photo that you could make do with a much shorter shoelace, which would easily fit in your seatbag for on the road use.
What about Campagnolo?
Reader Roy Bloomfield asked the great question, “What is your reason for not mentioning Campagnolo chains?”
I replied, Roy, it’s because Campagnolo has not provided quick links with their chains yet. However, this morning I learned that Wippermann is now offering a Campagnolo-compatible 12-speed chain that has a Wippermann Connex link. So, that’s a way to add a quick-link to Campy’s 12-speed chain. I heard that this new chain and link won’t be available until spring. In case you’re running one, Wippermann already has 11-sp Campy-compatible chains and Connex quick links. Here’s a link to those: https://www.cantitoeroad.com/Connex-11s0-Chain-_p_525.html.
Fellow Campy rider, Kerry Irons then chimed in that he has been using KMC quick links with Campy Chorus 11s chains for the past 45,000 miles with zero issues.
Meanwhile, Roy did some research and wrote back that he read that SRAM makes a quick link that works well on the Campy 12-speed drivetrain.
I hope this is helpful for those of you with Campagnolo components. Maybe at some point Campagnolo will join the other major makers and come out with their own quick link.
One More Quick Link Tip
Since some quick links are not designed to be reused, I save them for use as chain-sizing tools. I keep a used 9-, 10- and 11-speed quick link in a little container in my toolbox for this purpose.
How this works is, when I’m setting up a new bike drivetrain with a new chain, I don’t know for certain what the correct length the chain should be until I try it out (new chains come with extra links from the factory). With my bike-fitting quick links, I install the new chain temporarily to determine exactly how many links to remove. That way, I will never “cut” a new chain too short.
To size a chain, I start with it at full length out of the box. On some makes/models, it’s necessary to remove one outer-plate half link so that the quick link can be inserted. This requires having an open inner-plate half link on both ends of the chain (you can call outers and inners just “links,” but technically, each individual chain link is comprised of two half links).
Once the new chain is installed with the used quick link, I can shift the bike. And, I do that to make sure the chain is the right length to BOTH: 1) be able to smoothly make the shift to the big/big cog/chainring combination (both up onto it and down off it); and 2) have no slack or rear derailleur pulley cage rub when it’s on the small/small combination. Usually, there’s slack in the new chain, and with it on the bike and shiftable like this – thanks to the quick link too – you can remove a link at a time until the length is perfect.
Having the chain connected and shiftable with the used quick link this way makes sizing easier than trying to do it other ways. Be sure though to remove the used quick link when you have the chain the right length and insert a new one.
Thanks everyone for the comments and great quick link tips!
Ride total: 9,513
Why not to simply size a new chain against the removed old chain?
There is an inordinate amount of baling twine on the sides of the roads. I’m sure that would work for taking the tension off the chain to fiddle with the quick link/pin insertion. And I certainly agree with al0 about sizing the new chain against the old.
You can certainly use the old chain to size a new chain, if nothing else is changing (chainring size/cassette size/derailleur size) alo and maude. That’s a good, fast way to do it.
Just be careful if you’re laying the old/new chains side by side on a workbench to size the new one. On a really worn-out old chain it’s possible to miss the fact that that old chain isn’t as long as it looks. You have to look at how the individual links line up and make sure you “cut” the new chain at the right point.
Because of this, I usually prefer to count the links on the old chain. Even though that takes longer, I am always sure to cut the new chain the exact same length.
But in the story, I was actually talking about setting up a new drivetrain with new components where you can’t use the same chain length in most cases. Hope that explains,
Jim
ditto the above. particularly with a ‘bent chain, which takes about 2 1/2 “standard” chains.
One reason that using the old chain to size the new chain may not be preferred is that the old chain may not be the correct length. I have seen many chains installed by a bike shop that were not the correct length.
Here is an easy way to size a bike chain. L = 2D + N1/4 + N2/4 + 1, where L is chain length in inches (2L = number of links), D is distance between center of rear hub and center of crank in inches and N1 and N2 are the number of cogs/teeth in the largest chain ring and largest cassette cog. L should be rounded up as appropriate (e.g., if Ĺ = 53 1/2, use 54).
There is a more exact formula which involves higher math but the result is usually within one link of the result when using this simplified formula.
Using this formula, I have never had a miss-sized chain. I have also made many friends among bike mechanics by sharing this formula (I consider myself a bike mechanic but have had no formal training, just lots of experience. I am also an engineer and often stay at a Holiday Inn – a joke if one remembers that commercial).
Excellent point about sizing chains, Walt. I too have seen plenty of chains that were sized wrong – even straight from the factory.
And thanks for the chain length formula. People who trust their math will like that a lot. I prefer my seeing is believing approach, which the quick links make easy. With new components, almost always I’ll remove one link at a time, test shift the bike – remove another link – test it again and so on until I am satisfied that the chain length is perfect.
I wish I remembered the Holiday Inn joke, but don’t.
Thanks again,
Jim
that shoelace tip is great for “on the road” opening of the quick link, thanks!
As for removing a quick link without chain pliers you can also put one end of the quick link bushing in a groove of the big ring between the teeth and tap on one half of the link to release it. Tap on the other bushing end, not the plate.
Thanks, KP. I’m not sure I quite understand, but I’ll experiment and see if I can figure out your technique. It sounds like a great tip! I’ll take a photo and share it and give you credit if I can get it to work.
Appreciate it!
Jim
I had a link to a picture but must have deleted it. This may help explain it a little better.
Set the master link at 3 o’clock on the crank, then pull an extra link of chain so the master link now sticks out in a ‘ > ‘ at 3’oclock.
Hit it with a rock and it should pop open.
This from a forum, On a roadside repair I’d tap it with a multitool, definitely would not use a rock. You only need to tap half the link so it is pushed back and the viola it’s opened. This method is good in an emergency but I used at at home until I purchased chain pliers.
Good information here! I got the Wolf Tooth pliers, but I have to admire the shoelace hack!
BTW, there are two “n” in Wippermann. 🙂
Boy, how’d I miss that, Steve?! Must be getting old. Sorry about the typo. I think we can fix it, so with any luck it might get the second n sometime soon here. Apologies to my friends at Wippermann and thanks for letting me know, Steve.
Hope you’re staying warm and upright on your snowy commute every day!
Jim
Walt;
That formula would take me longer to figure out the math than doing it Jim’s way.
I never made it past Grade 10 math, but did have an excellent career after going to shop class and was always employed!!
Cheers
Same with me, Bryan! Thanks for the laugh. I have never found bicycle formulas to work very well – and there are quite a few of them out there. Some famous ones have been published over the years with mistakes in them, too. So, I would much rather put the parts together to be 100% sure something works. And that goes for fitting someone to a bicycle, too.
Thanks again,
Jim
Can you use the shoe lace trick to instead lock a quick link into place?
For installing a quick link on a recumbent bike chain, it’s very difficult to pull the quick link into place and lock.
Anyone have other suggestions for locking into them into place?
If there’s a way to use the shoe lace to lock a quick link, I do not know what it is, Andrea.
What I would try though is: placing the quick link a few inches away from the crankarm. So, you would put whichever crankarm is pushed by your strongest foot (right or left) at 12 o’clock. Next you would make sure that the quick link is only a few inches away from the crankarm on the top run of chain. So if the crankarm is a vertical line at 12 o’clock, the quick link is located on the horizontal part of the chain about 6 inches to the left of the crankarm (it it’s your right crankarm).
With the crankarm and quick link in these positions all your force will reach the quick link and be able to lock it when you push hard on the crankarm with your hand or foot. You would use your foot when sitting on the recumbent seat. Having the crankarm at 12 o’clock will make it easy to lock the link.
Hope this helps,
Jim
Come on guys…that is not higher math…adding and division is grade school;-). It is much easier and much less time consuming that the trial-and-error method. I can size the chain in less than two minutes using the formula and I have never had it fail. If not certain, check the chain length by your trial-and-error method after using the formula as a starting point. I’ll bet that it works.
As for the Holiday Inn reference, google “i stayed at a holiday inn express meme”.
I do enjoy all of the input, tips and ideas.
Thanks for the lead for understanding the Holiday inn joke, Walt. I watch a lot of TV but it’s all recorded, so I fast forward through the ads and hadn’t ever seen the ad the joke is based on. But I get it now. Thanks.
I’m sorry but I’m still not understanding the formula and wonder if maybe there’s something missing? You wrote: “Here is an easy way to size a bike chain. L = 2D + N1/4 + N2/4 + 1, where L is chain length in inches (2L = number of links), D is distance between center of rear hub and center of crank in inches and N1 and N2 are the number of cogs/teeth in the largest chain ring and largest cassette cog. L should be rounded up as appropriate (e.g., if Ĺ = 53 1/2, use 54).”
Question: it says in the first sentence “2L = number of links).” But, in the formula, there is no “2L” only “2D”
It seems like either there’s a typo or something wrong in the formula to me?
Thanks,
Jim
Jim,
I believe that your confusion stems from the convention used by manufacturers specifying number of links (i.e. 114, 116, 120 links). Their count includes both outer-plate links and inner-plate links, as opposed to your definition of a chain link including both an outer and inner plate link. I have used this formula when building a bike to make sure the chain was long enough for my build. There is also a more exact formula (as is the above simple one) on the Parks Tool web site.
Bill
Jim,
This formula is a simplification of what Mechanical Engineers use to determine belt length on a belt and pulley drive. There are four sections of chain: two straight sections, both equal to D. The crank center to rear wheel center distance . That is where the 2 x D comes from.
The other two sections are the curved section of chain around the large chain wheel and large cog.
Bicycle chain has a pitch of 1/2 inch, the distance from roller to roller. This means two things in making a simple formula: 1) if you calculate L, the length of chain in inches, just multiply it by 2 to get the number of links. And, 2) the distance around a chain wheel or a cog in inches is equal to the number of teeth divided by 2.
I said above that our chain has 4 sections. Two straight sections (2L) and two curved ones. The two curved ones go half way around their respective sprockets.
If the distance all the way around the sprocket in inches is the number of teeth divided by 2 ( since pitch length is 1/2”), then the distance halfway around the sprocket, in inches, is N / 4.
Putting it all together,
L = D + D + N1 /4 + N2/4 + 1
The “+1” accounts for the fact that the derailleur takes up a little more chain through the jockey wheels.
All that said, there is some judgement involved in evaluating the angle of the derailleur when going big wheel to big cog, as well as shifting through the gears. I also wonder if my long travel derailleur ( I run an 11-34 cogset) would demand an extra link.
Even though I am a professional mechanical engineer and an amateur bicycle mechanic, and I love formulas, I would use the formula to estimate chain length (or multiply by 2 to estimate number of links), but then add 2 or three and sneak up on it like you do, Jim.
But I would put a yellow paint stick mark on the chain to check the formula result!
Steve
I like to keep things as simple as possible so:
1. I use reasonably cheap chains that are throwaway items.
2. Before I ride, I wipe down the chain – 20 crank revolutions forward on the top; 20, backwards; and 20, on the side.
3. Every 250 miles or after a rain, I lube the chain and wipe it down before the next ride.
4. I measure the chain in four places with the .5 inch fixed length chain checker and replace it at .5 inch wear.
This approach eliminates taking the chain apart, minimizes the expense of chains and extra links, and saves a lot of time, which has a lot of value for me, I have chains that have lasted from 5,000 to 1,500 miles. The main determinant of chain life is how often it has gotten abraded by sand and dirt from the rain and splash back.