
Jim’s Tech Talk
By Jim Langley
Recently, while watching an otherwise excellent video about a new tire, I was reminded of how a simple mistake causes so much frustration. In the video, which was produced by one of the largest cycling channels right now, the technical editor made the point that the tire was difficult to install probably because the tube was getting in the way.
When my daughter Sarah was in high school and I’d say something that she thought was stupid, she’d say “hell-oooo?” That’s exactly the reaction I had watching the video. As in, ‘hello-ooo, didn’t anyone ever teach you how to correctly install a tire?’
I left a comment on the video in the hopes it helps some viewers and maybe even the editor. I want to explain here, too. Because flat tires are the most common breakdown and everyone benefits from tips that make the job easier.
There are lots more tire installation tips that I’ve provided in past articles, but today I want to keep it simple and focus on four tube-related tips because they can make tire installation so much more difficult if you don’t understand and utilize them.
Four Tube Tips
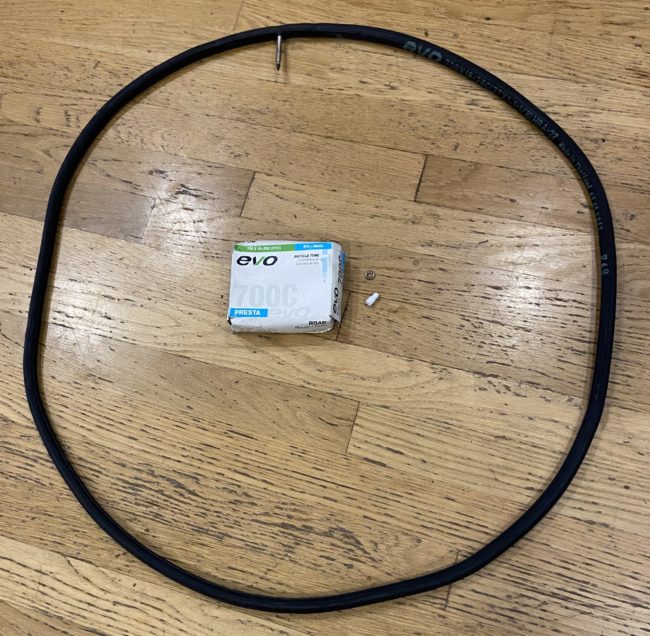
- Use tubes that are a smaller width than your tires (at least 1 width size down). The reason to do this is because you want the tube to fully fit inside the tire and never stick out from under it or bunch up inside it. You might not be able to tell in the photo, but the tube shown is ultra skinny – about 19mm diameter. That’s the size that I use for 25c tires.
- Always inflate the tube BEFORE putting it in the tire. Don’t get ahead of me now… only inflate it enough to get any wrinkles out of the tube and round it into shape. For we aerobic animals an easy way to do this is to open the tip of the valve and blow the tube up with our lips. You’re much less likely to put too much air in doing it this way than by doing it with a pump, but you can use one if needed. Just don’t pump it past its resting width. The tube in the photo is aired just right.
- Always close/tighten the Presta valve tip after you’ve aired and rounded out the tube. This ensures that the open valve tip doesn’t get hit letting the air out as you are installing the tube. Since there’s so little air in the tube, it can be a little challenging to close the valve without losing air. The trick is to pull up on the tip as you tighten it. That seals the valve and prevents any air loss.
- When mounting the tire, make sure that the tube is fully up inside the tire all the way around and that it stays there. That goes for the base of the valve, too. The cylindrical section of the valve should protrude of course, but the part of the valve joined with the tube needs to be up inside the tire.
A Few Additional Tricks
By following these four steps the tube can never get in the way of the tire because it’s tucked inside the tire. If it tries to come out, just tuck it back in. If it’s not rounded anymore and flopping around wanting to fall out, there must have been some air loss. If so, add more air and tuck it in again.
When should you put the tube in the tire? I do it first, before I put tires on the wheel. But, if you have trouble keeping the tube inside the tire, such as with folding tires that don’t always cup the tube and help hold it, you might find it easier to put one side of the tire on the rim and then put the tube inside the tire with the help of the rim holding the tire round. Just use care to put the valve in the rim straight.
A tube that bunches up inside the tire and gets in the way is the wrong size. If it’s really oversize, it can be nearly impossible to get it to stay inside the tire. But if it’s all you have, that’s still the goal and you can usually make even wrong size tubes fit if you pay enough attention to keeping them tucked. But it can really slow down tire installation.
Note that even though the tube you’re installing is barely inflated, that little bit of air can be enough to cause a problem. If so you’ll only notice it when you go to pop on the last tightest small section of the tire. If you run into that situation, simply let a little air out of the tube. Since the tube is already tucked up inside the tire, which is almost entirely on the rim, the tube should stay put. And letting the air out will provide the small additional slack in the tire on the rim to push it on and finish installation.
Lastly, if you make sure that that last tight section of the tire you are putting on is right at the valve, it should make popping it in place easier. Because the thick, wide base of the valve is up inside the tire and not in the way. And because opposite the valve stem the tire doesn’t have anything under it either, so you should have ample slack to finish the installation. Disclaimer: if you have your technique down and you finish tire installations across from the valve (not at the valve), that’s great and you can ignore this tip.
It may take a little practice to get these tube tips down but they’ll help you when you do. Now, let’s keep it going. Please share your best tube and tire tips!
Jim Langley is RBR’s Technical Editor. A pro mechanic & cycling writer for more than 40 years, he’s the author of Your Home Bicycle Workshop in the RBR eBookstore. Tune in to Jim’s popular YouTube channel for wheel building & bike repair how-to’s. Jim’s also known for his cycling streak that ended in February 2022 with a total of 10,269 consecutive daily rides (28 years, 1 month and 11 days of never missing a ride). Click to read Jim’s full bio.
I squeeze the tube and casing both sides down into the “gully” where the spoke nipples are. That gives a little extra and allows use of hands, not levers. Another simple trick, I/m/o.
Any tips for getting on really tight tyres? I was always taught to never use tyre levers (to avoid pinching the tube) to get tyres back on a rim, but I just changed a tyre on my son’s bike and the only solution seemed to be to use tyre levers – and even then I almost broke them! Any tips greatly appreciated!
I kept my hard mounting tires in the hot sun for a couple of hours and it made a difference.
That sounds like a great idea
I’ve had to mount a tire on the rim without the tube and leave it for a week in order to get the tire to stretch enough for a safe mount with tube! Sadly, my favorite old tire is now manufacture too small for my rims. I chucked two that I’d had as spares for a year, couldn’t get them on without ruining a tube. How would that have gone out on a ride!!!
With folding tires, the first time you install them, they can be a real bear. Once they’ve been installed and inflated for a while, it will be easier to remove and reinstall them.
The initial installation just takes persistence and attention to detail. Work as much of the tire on as possible, using Jim’s instructions. When you get to the final, tough section, let most of the air out of the tube and keep working on it. Repeatedly check to make sure that the tire bead is all the way down in the rim well, all the way around. If you have someone to help you. Have them push the tire into the rim well while you work the tire over the rim. Sometimes, a bit of lubrication (talc or soapy water) between the tire and rim at the tough section of the tire will help it pop over.
The “solution” that works best for me is that I only use Hutchinson Fusion 5 tires. Can change a flat with no tools every time.
I once stopped to help a cyclist who was walking home with a flat tire. I couldn’t believe how easy it was to remove and mount her tire. I saw she was using the Hutchinson Fusion 5’s. From that point forward, it’s the only tire I use due to how easy it is to mount and remove.
…And I do not work for Hutchinson.
You might check the thickness of the rim strip or rim tape. If it’s too thick, the tire bead might not seat deeply enough to allow the remaining bead from seating.
KoolStop makes or markets, a wonderful tool: the KoolStop Tire Jack. Its use makes the impossible very do-able with tight tires.
Lastly, some rims were designed with little thought to actually installing the tire. There is just not enough of a canyon in the rim to allow tire bead seating.
Good luck!
Oh, and one further thing, on a new Cannondale mountain bike I got a flat tyre. When I tried to remove the tube I realized, after a few minutes, that the tyre was stuck to the rim on one side, but was free on the other side. This is the first time I’ve seen this. Can someone explain what the purpose is?
If the tire seems to be adhered to the rim, it’s not intentional. It’s either that the tire-to-rim fit is tighter on that side or that the rubber at the bead is lightly stuck to the rim. Either way, it will pop off with a bit of effort. It’s also not uncommon for the tube to stick to the inside of the tire, but it will peel out. too.
Another tip – the tube can be sticky and hard to adjust it’s location up against the tire. To make it easier to move the tube around, I always put baby power on them. Especially if you don’t put the tube in the tire before installing the tire, it makes it a lot easier to get the tube into the correct place.
One more slight aside, always talc up your tube – Note, I didn’t say baby powder which is mostly cornstarch that turns nasty when it gets wet, but talc, like what’s used to put inside a wetsuit for divers – and that both prevents the two from sticking to a tire making a flat more likely, but helps to ease the mounting of a tube inside the tire.
Do a quick online search for “tire talc” and you’ll find exactly what you need. Barring that, get UNSCENTED talc, as the perfumes in some talc products can damage rubber.
You can also use Teflon (PTFE) powder inside the tire and on the bead. It lowers installation loads at the bead and is better than talc at reducing rolling resistance due to relative motion between tube and tire when deflected at the road surface. PTFE powder (mu = .04) has about 5 times less interface shear drag than talc (mu = .1 – .3) in the same conditions and is highly inert. When using tubeless tires with tubes, PTFE powder on the bead will allow you to get the tire off the rim easier, especially on big MTB wheels. I avoid sealant and stick with tubes ( and thorn strips) to eliminate the mess and prevent rim/tire sticking on my trekking bike. No fun when you cannot get the wheel off the rim in the middle of nowhere.
A couple of comments:
1) Fully agree that tire levers used to lever on a difficult/tight tire can damage the tube (and even break/cause injury). To avoid this with difficult tires to mount, I use a tool (Bike Hand or Tire Lever Jack) which makes mounting the last section of tire much easier and does not run the risk of pinching the tube. These tools are especially useful for mounting new Gatorskin tires.
2) When putting the last side of the tire on the rim, I always push up on the valve stem to ensure that the tube near the valve is not caught under the bead (I start to mount the last side of the tire at the valve stem).
2) After installing the tube and mounting the tire, to insure that the tube is not caught under the tire bead, I partially pump up the tube and then deflate it completely then go around the tire pushing in on the tire and looking along the bead to make sure that the tube is not showing. Do this on both sides of the tire starting at the valve.. I have seen mechanics at bike shops (who almost never do this), pressure up a tire with a resulting loud bang when the tube is caught under the bead.
Thanks for sharing your great tips, Walt!
Jim
The ONLY tool to use to get on those stubborn tires: Kool Stop Tire Bead
Jim,
Great suggestions for a basic procedure that all of us do. As you may recall, I also ride motorcycles and the tip of using a smaller tube really makes changing a tubed motorcycle tire on the road easier. Blowing the tube up by mouth was a great tip. I have found that a small baggie of baby cornstarch powder makes a good dry lube for tubes. When in the shop, I use cornstarch on the tube and a little squirt of Windex on the last bit of tire bead to go over the lip of the wheel. This is helpful on new bicycle tires and essential on motorcycle tires.
Thanks for the great tips, Harold!
Jim
At home, I wear a pair of leather gloves. They really help you push the tire up with your thumbs when installing. They’re way better than just using your bare fingers.
That’s a nice tip, Johnny, thanks!
Jim
One issue which I have not seen addressed is the possibility of the tube being in a twisted position within the tire. If this occurs, the tube will be kinked sharply after inflation, thereby planting the seed for a future flat. To prevent this condition I do the following:
1. Mount one side of the tire to the rim.
2. Position a FLATTENED tube (as it comes packaged) in the tire. Installed in its flat position, any twists that are
present will be readily apparent and the tube can easily be re-positioned.
3. Keeping the FLATTENED tube in the tire, mount the other side of the tire to the rim. It will be easier to mount
with the tube away from the rim, and the chance of lever damage to the tube is minimized.
Thanks, Burt, but when you inflate the tube the way I explained that takes any twist out of it. Also, if you put a flat tube (no air) into a tire it’s likely that it will get trapped under the bead of the tire. That’s why you should inflate tubes before putting them in the tire.
Thanks for the comment,
Jim
Kudos to all the comments = all good advice I would offer (esp. using talc).
The one piece I disagree with is the first: using a smaller tube. Yes, that makes installation easier, but installation should be the result of good process and technique, not undercutting the design function of the tube and tire. Sizing down would be like wearing size 6 socks on my size 12 flippers = easier to get into my hiking boots, but contrary to what the socks are supposed to do.
An extreme example is: one time in desperation I grabbed a skinny road tube for back-up and stuffed it into my mountain bike seat bag. Later, using it to fix a thorn-flat in my 2.2 knobby, I had a hard time getting it to seat the MTB tire, and cautious of over inflating it like a balloon ready to burst, I ran the pressure low and promptly got a snake-bite flat.
So my vote is for matching tube size to tire size and doing a good (careful) installation.
All that said, I do have a question for mountain bikers/fat tire riders: after struggling multiple times to get MTB tires seated on my MTB rims, I finally took it to a shop: the shop tech spray soaped the inside of the tire and power-inflated the MTB tube/tire to 100psi, combined with slamming the tire sidewalls on the bench to get the last final POPS. I’ve done the same at home– but what the hell to do on the trail, esp. with many miles to go? Rather than struggle endlessly inflating/deflating/re-seating/inflating in hopes of getting the bead seated properly, I end up with the bead refusing to nest into the rim at one or more points, creating a wiggle that is incredibly annoying (and maybe hazardous) at speed. All of this after trying multiple widths of rim tape to cross off that possible source of a mis-fit. And, this happens regardless of tire make or size variation (always between 2.0 and 2.3). Advice?
Gary / Ventura
Thanks, Gary,
I should have explained better in my article I think. The reason you use a smaller size tube is because tube sizes and tire sizes are rarely accurate. So if you buy a 25mm wide tube it could still be oversize for your tire. And any oversize tube makes tire installs harder – sometimes a lot harder especially for someone who hasn’t changed lots of tires.
So, by buying one size down you usually get a tube that fits nicely and is easy to get in, too.
Now on your MTB tires, you didn’t say if you were running tubeless or not. But tubeless is a solution to your problem in most cases because you’re less likely to flat in the first place. If you do flat you can plug the hole with a tubeless kit like the ones from Dynaplug and not have to worry about seating the tire again since you never took it off.
Now if you’re running tubed tires and you can’t get them to seat after putting in your spare tube, you could try spraying water from your hydration pack or bottle on to lube the beads. Another trick is to find a tree with a branch that has a notch. You can slip the tire/wheel into the notch and wiggle the wheel in there to get the notch to pull on the tire and get it to seat. Some tires if you get enough air in them will slowly seat themselves as you ride along, too. But, you usually have to over inflate an MTB tire for this to work and you would need to carry a pump that can put in enough air.
Those are some tricks that can work,
Jim
I own several bicycles but there’s one I have, no flats yet (7,600 miles), that helps me sold the flat/tube problem the most. It’s a tubleless, 38×700 Pathfinder. I love’m and believe that the best way to deal with flats is not to get them in the first place by investing in the right tire and wheel combination.
Otherwise, I actually follow almost all the suggestions here, except the ones that counter logic (like installing the tube flat, etc.).
I find it interesting that you recommend a tube on the small size. Years ago, I used to buy pre-injected tubes from a company in Colorado. The owner there recommended the opposite. His theory was that a slightly oversize tube has to stretch less, and consequently, the rubber would not be as thin, thus reducing the probability of punctures.
A lot depends on the specific tube in question, as sizing can be all over the map. Generally, tubes are bit on the small side so they’ll work with the smallest tires in their specified size range. That might allow a “size-up” tube to work, but I would never count on it. Perhaps that explains your shop owner’s advice. While it’s true that a tube that stretches less may be less prone to punctures, putting too large of a tube in a tire is going to be a headache and should be avoided.
Thanks for the comment, Richard. Tubes one size down from the tire size won’t stretch enough to become much thinner at all from what they were when flat.
Thanks again,
Jim
Thanks for the reply Jim (and all the good advice over the years.)
You highlight one of the key frustrations of tires: inconsistency in sizing (sometimes even within a single maker = I just tried to install a new Gatorskin, replacing the same model & size I’ve used over many years, but this one is a shade oversized, scuffing the rear brake bridge.)
Still, I prefer more rather than less tube: I have a fantasy that the relatively larger tube is less stretched and thus slightly thicker and more flexible/resistant to our local goat-head thorns, etc. Whatever.
And, partly because I’m an old fart and also because of the horror stories I’ve read about trying to fix a recalcitrant tubeless tires in the field (typically resolved by dropping in a tube!) I’ll stick with the known / simpler technology of tubes: it’s not that big a deal to replace a tube/fix a flat. The tubeless ‘plusses’ – lower and/or more discrete pressures giving better feel, few to no snakebites, self-sealing punctures, etc. are not sufficient gains for me, esp. compared to the fussiness & messiness of setting them up.
Bottom line, all riding is a balancing act, including choosing your own degree of messing with the mechanicals; I lean into the 80/20 rule (ok, 90/10) — if its mostly working, I’d rather be riding than trying to get that 10%. Life’s short, the road is long, Allez!!!
While I haven’t switched to tubeless on my road bikes (I have too many perfectly good clincher wheels and I’m too cheap to buy/build new tubeless wheels), I will never go back to using tubes in gravel bikes, MTBs and fat bikes. The benefits are huge because flats are more likely off-road, and they’re not as finicky to set up as road tubeless.
Altho I’m not going tubeless, I would like to learn: in what ways are mountain/gravel/fat bike Tubeless tires easier to set up than Road tubeless tires? Seems like same principles and thus practicalities would be in effect.
Also just for fun, the most flats I ever got in one day was on a thorny road between two pueblos in New Mexico!
gary
Some of the differences, Gary, are that tubeless tires on off-road bikes are usually wider thus holding a greater quantity of air and also inflated to lower pressures than road tubeless. It usually results in easier tire installation since leaks are more likely with higher psi, and fewer flats (for some riders almost no flats).
Hope that’s helpful,
Jim
Powder all new tires and tubes with cornstarch or baby powder. Use liberally and shake off excess. This allows the tube to move around inside the tire thus helping to prevent pinch flats and making installation easier.
Maybe the absolute best tip.
I would also suggest aligning the tire logos with the valve stem. This will make it easier to find the cause of a flat. After removing the flatted tube and finding the hole, you can find the position on the tire to remove the culprit.
Good idea….. never thought of that !
makes sense, thanks.
Iam trying to put a tube in my ride on lawn mower .I get it in and it won’t take air .I did notice something the stem is in the middle of the tube and the hole on the rim is on the side .