
Jim’s Tech Talk
Last week’s Tech Talk on getting the tools to be able to tighten a loose cassette received some questions worth answering, and comments worth sharing. So we’ll keep the cog conversation going for another week. If you missed part 1, you can read it here: How to Fix a Loose Cassette on a Bike.
First up, Doug Kirk raised a couple of great issues. He wrote, “What? No mention of how much you can harm your freehub riding with loose cogs? They can damage the freehub well before they get loose enough to audibly rattle (especially if you’re old and don’t hear too well anymore!). It’s a good idea to try to wiggle them occasionally when lubing the chain!! Next week talk about removing/replacing a cassette? If so, please emphasize there are no threads that are easier to crossthread than those on the locknut and freehub.”
Freehub Damage
Thanks, Doug. Freehubs can get damaged from loose cassette cogs because the cogs move more under pedal pressure. The cogs are mounted on a spline built into the freehub. There are raised edges on the freehub splines and tabs on the cogs which bump into the edges preventing the cogs from spinning on the freehub during pedaling.
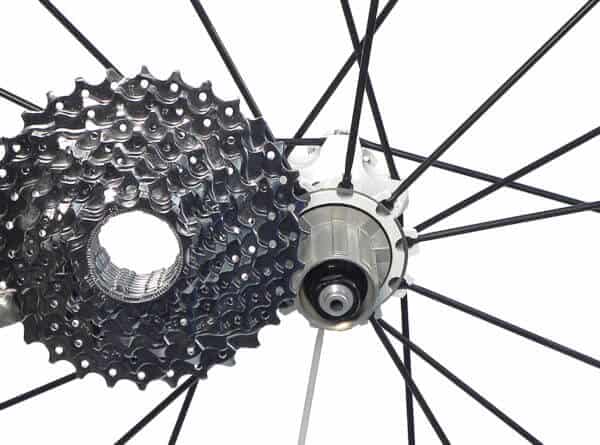
When the cassette cogs are loose on the freehub, they can move back and forth on the spline and when you pedal the tabs can slam into the freehub spline putting indentations in them. If these indentations get bad enough, a cog might slip under strong pedal pressure surprising you and possibly causing a crash.
With enough wear like this, it can be difficult to mount the cogs on the freehub, too. Usually this means it’s time to replace the freehub body with a new one. If the wear isn’t too bad, you can clean up the raised edges with a file and keep it working in most cases. But, the best plan is to keep cassette cogs tight.
A good way to keep the cogs and freehub healthy is to lubricate the freehub splines with a light grease when installing the cassette. The lube helps ensure the cassette cogs are nice and tight and stay that way. Also, when putting on the cogs, turn them clockwise so that they are against the freehub’s splined interface edge. That way they won’t move upon the first pedal stroke.
Doug’s tip of checking the cassette cogs to see if they’re loose during every chain lube is a nice one. That should prevent a loose cassette. His advice to be careful when threading on a cassette lockring is spot-on, too. The threads on the lockring can be especially fragile and there are only a few of them. So, use care to start it straight and don’t add any tightening force until you’re 100% sure the lockring is going on straight.
Tightening A Loose Cassette On A Ride
Meanwhile, RBR reader “Richard,” said, “I was a bit disappointed reading the article because I thought I was going to be presented with an emergency how-to (because you mentioned you heard the loose lockring while riding).”
Sorry not to answer your question, Richard. Luckily, another rider named Len Pedersen offered a tip he uses. He said, “I have found that if you have to reassemble or tighten the lockring while out on a ride you can jamb 2 tire irons into the lockring and tighten the lockring enough by hand to get to a bike shop or home.”
I would add that a lockring tool is so small you can easily carry the one for your cassette in your seatbag. You should be able to secure the lockring enough turning the tool by hand to get home or to a bike shop. Or, you could carry an adjustable wrench that fits the lockring tool. If that adjustable wrench is too big and heavy, try finding a smaller one and filing its jaws until it fits your lockring tool. That way you could end up with a smaller and lighter wrench. Or come up with your own homemade wrench.
Richard also shared a helpful tip. He explained, “I always use the quick release to hold the lockring tool in place. The last time I failed to do so, the tool slipped a bit. I destroyed the “custom” ultra-light lock ring I had and butchered the teeth on the tool to the point where I needed to replace that as well. I had no idea they were that fragile (but I must admire the precision to which they were made before I messed them up!).”
Tools For Working On Cassettes: Get A Chain Whip, Too
Lastly, roadie Robert Ray pointed out another key tool for working on cassettes. He commented, “I know that you’re talking about loose cogs, which can be tightened with the lockring tool as you explained. But, I was surprised you didn’t mention a chain whip. When it comes time to switch out a cassette, you need a chain whip, too.”
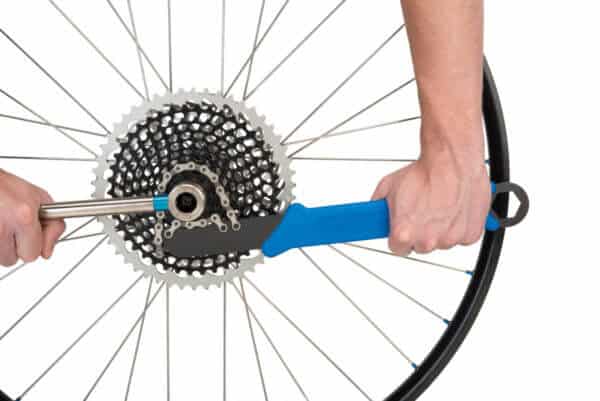
Excellent point, Robert. If you try to remove a cassette with only a lockring tool, the cassette will just spin – just as it does when you backpedal. In order to loosen the lockring, you use a chain whip tool to hold onto the cassette and keep it from turning when you turn the lockring tool to loosen the cassette. Here is Park Tool’s latest model of chain whip tool.
One final tip is to be careful when mixing lockrings between different cassettes. Because some cassettes with 11-tooth smallest cogs have a specific lockring. If you make the mistake of using a lockring from a cassette with a 12-tooth bottom cog, you can experience skipping when riding on that 12-tooth cog. Look closely at the lockrings and you might see that the 11-tooth one is marked 11-tooth only.
Thanks for the questions, comments and tips!
Ride total: 8,870
Next article: Bontrager Circuit MIPS Road Helmet Review.
Your photo of using the tools for cassette removal makes me cringe!
Both left and right hands in that photo will be pushing on the tools.
1- Never push on a tool with a closed fist….that is a recipe for skinned knuckles! Push with an open palm instead so if the tool does slip, there is less of a chance of damaging you knuckles.
2- When using a chain whip and cassette tool, try and use the tools more like scissors. If you put the chain whip at a 3 o’clock position, and the cassette removal tool at an 4 o’clock position, then try squeezing the two tools together to loosen the lockring.
Hope that helps.
Cheers
Bryan
That’s actually the product photo that comes straight from Park Tools!