
Jim’s Tech Talk
By Jim Langley
Tool Up to Fix a Loose Cassette
The other morning on my short almost all-downhill commute to the office my Cervelo S5 started making an awful rattle. I knew straight away what it was because nothing else on road bikes makes quite as loud and metallic a sound. What had happened is the cassette lockring had loosened. That’s the small part that threads onto the rear wheel’s hub to lock the sprockets in place. The whole part, lockring and sprockets, is called the “cassette.” And the individual sprockets are called “cogs.”
It’s a simple design and easy part to work on and fix as long as you are capable of removing your rear wheel and have the right tool for the brand of cassette used on your bike. You can have a bicycle shop mechanic do it for you because it’s a quick and inexpensive repair. But, if it happens the day before a bike event, it’s nice to have the tools to do it yourself to take care of it ASAP. I always keep the tools in my traveling toolbox for use at events, too, just in case.

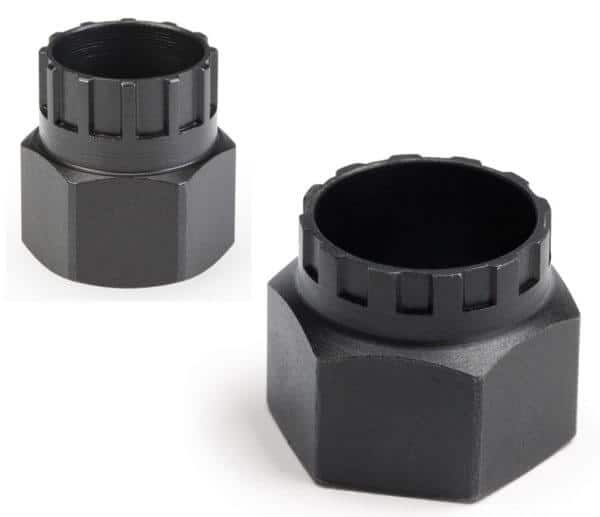
Cassette Tools to Have on Hand
The two most common tools fit Campagnolo and Shimano/Sram cassette lockrings respectively. The tool to fit Campagnolo lockrings is Park Tool’s BBT-5/FR-11 and the one for Shimano and Sram lockrings is Park’s FR-5.2 Cost is less than $10 each.
To use the tool you will also need a way to turn it. A large adjustable wrench works nicely. But you can use anything you have that grips the tool, such as water pump pliers, also known as “plumber’s pliers.” If you do a lot of cassette work, you can get a type of lockring tool that has a built in handle (so you don’t need the large adjustable wrench). Park Tool makes one of these, too, for Shimano/Sram cassettes, their FR-5H (about $42).
Loose Lockrings Can Affect Shifting
When a cassette lockring loosens you will experience the loud rattling noise and you will probably feel it, too. Because the cogs are steel and if they’re really loose they’ll be jumping around enough to sound like rocks in a rolling tin can.
The other issue loose cogs can cause is poor shifting. Because the cogs are moving out of position the chain doesn’t land on them perfectly when you shift. Don’t try adjusting your derailleur to fix this because it won’t help. You have to fix the cassette.
Using the Lockring Tool
To tighten the lockring, remove the rear wheel. Depending on which type of lockring tool you have and the type of quick release on your bike, you might be able to slip the tool right over the quick release. If not, you’ll need to remove the quick release.
That’s as easy as holding one end while you turn the other counterclockwise until the QR comes apart and you can pull it out of the axle. Don’t drop and lose the little springs. And note that they go on either side of the hub with the narrow end facing in. Take a photo before you take the QR apart if you think you will need it.
Tightening Lockrings
Once you can get the tool on the lockring, all you have to do to tighten it and fix the loose rattling cogs is to turn the tool clockwise with your large adjustable wrench (or whatever other tool you had to turn the lockring).
Many lockrings have indentations on their surface that mate with similar ones on the last cog. This helps keep the lockring tight. This features makes tightening and loosening the lockring sound and feel notchy as if it’s ratcheting on, which it is. It feels a little strange but keep turning until the lockring is tight.
In the rare event that the lockring has come off the cassette and is loose, start it gently by hand turning it clockwise. The threads on some lockrings can be delicate so be careful not to crossthread it or force it. Be patient and keep trying until it starts threading on correctly and straight.
To make sure the lockring has done its job and tightened the cogs, hold onto the largest cog with one hand and try to jiggle, turn and move the smaller cogs with your other hand. They should all be rock solid as if they’re one piece now. If not, you may need to investigate further.
Other Issues You Might Run Into
Sometimes dirt gets in between the cogs and spacers if you ride with loose cogs long enough. This can make it impossible to get the cogs tight until you clean the dirt off the cogs. Once that’s done, tightening the lockring will lock the cogs down tight.
It’s possible to have a broken spacer on a cassette, too – the little black plastic pieces between cogs. In that case, you will need to replace the spacer because without the exactly correct spacing the cogs won’t tighten.
Once you have the right tool and have the procedure down, fixing a loose cassette is an easy and fun job. You’ll also be ready to replace worn out cassettes or switch to different ones for hillier or flatter terrain, too.
In this video, ace mechanic Calvin Jones of Park Tool shows all about cassettes. He demonstrates tightening the lockring in the very first part of the video.
Ride total: 8,863
Jim Langley is RBR’s Technical Editor. A pro mechanic & cycling writer for more than 40 years, he’s the author of Your Home Bicycle Workshop in the RBR eBookstore. Tune in to Jim’s popular YouTube channel for wheel building & bike repair how-to’s. Jim’s also known for his cycling streak that ended in February 2022 with a total of 10,269 consecutive daily rides (28 years, 1 month and 11 days of never missing a ride). Click to read Jim’s full bio.
What? No mention of how much you can damage your freehub riding with loose cogs? They can damage the freehub well before they get loose enough to audibly rattle (especially if you’re old and don’t hear too well anymore!. It’s a good idea to try to wiggle them occasionally when lubing the chain!!
Next week talk about removing/replacing a cassette? If so, please emphasize there are no threads that are easier to crossthread than those on the locknut and freehub.
Thanks for the ideas for more cassette tips, Randy.
I was a bit disappointed reading the article because I thought I was going to be presented with an emergency how-to (as the intro mentioned he learned of the loose lock ring while riding).
As to using the lock ring tool…. I’ve never heard of a QR small enough to fit the lock ring tool over, even the Campy tool.
Meanwhile, I always use the QR to hold the tool in place. The last time I failed to do so, the tool slipped a bit. I destroyed the “custom” ultra-light lock ring and butchered the teeth on the tool to the point where I needed to replace that as well. I had no idea they were that fragile (but I must admire the precision to which they were made before I messed them up!).
Hi Richard,
If you follow this link and look at the second photo of the Abby Crombie cassette tool you’ll see that it slips right over some QRs. The idea is saving time for quick cassette swaps.
https://www.abbeybiketools.com/collections/tools/products/crombie-thru-axle-std-handle
Thanks for the feedback,
Jim
Thanks. This was helpful. I often change my own cassette and wondered about how hard to tighten it. Also I don’t usually grease the locking ring’s thread. Will do so in future.
I have had Shimano cassettes with a very thin, flexible “washer” already in place on the lock ring. Does it help prevent the lock ring from coming loose?
Yes, Ray, it seems to help.
I have found that if you have to reassemble or tighten the lockring while out on a ride you can jamb 2 tire irons into the lockring and tighten the lockring enough by hand to get to a bike shop or home.
Nice tip !
Thanks
Thank you for describing the noise I have occasionally been hearing. I just checked the cassette and found movement. After tightening the lock ring the shifting sharpened up too. I had been unable to identify the cause of that noise. Thank you again!
Use a TORQUE wrench, torque to 35 ft.lbs. it won’t come loose. Bike shops mount the tool in a vise & turn the wheel, but if you haven’t installed about 50 cassettes use a torque wrench!
I know that you’re talking about loose cogs, but I was surprised you didn’t mention a chain whip, which is integral to working with free hubs. (not when they’re loose, but to work on.).
Robert Ray
A few years ago I traced a noise to a loose cassette that I had recently mounted on an older wheel. The hub was a Shimano FH-6402, which was the first Ultegra-level 8-speed, 130mm OLD freehub (prior versions were 7-speed, 126mm spacing). Turns out that, on that freehub, the splines go all the way to the end, and work just fine with a 12-tooth smallest cog. But an 11-tooth does not go on fully, so I was tightening the smallest cog against the end of the freehub, not against the other cogs. The issue can be solved with a 1mm spacer, but it’s a reminder that there are sometimes obscure compatibility issues when we mix new and old parts.
I never had change cassetes till now. I have one good tool with arm included, for shimano.
I do not figure why the threads are so narrow, so few, and after a few turns, I don’t feel pressure, but it starts do make sounds, tick.. tick… tick… if I keep turning it. Done it twice, one time one wheell now at bike, one cassete with cogs separated, that I took to one mechanic, and it come tight but waving as if bent, I loose ir again, kept order of all, put it again, and tightening I did almost one turn hearing that sounds, feeling very few pressure. It is running well, the waving is gone, its tight.
Now I installed other, all in one piece, except the 11 cog, and the same happen, it feels tightened, but I had turn the tool, and stopped early hearing those tick tick. I do not understand what it happen, because on videos I always see people tightning it getting to considerable force and resistance, and mine seem to keep turning with one finger force, getting resistance very slowlly with that anoyng sounds more and more coming. With fear of ruining the threads, I stopped even early now, but seem tight. So odd. Sorry for english mistakes, regards from Portugal.
Can a rear dimension freewheel cassette sprocket be switched out with a Shimano cassette sprocket? It is for a 18 speed mountain bike.
I have also found with some cassettes that after tightening, the smallest cog still slips. The issue I believe is that the “teeth” which engage the hub wear a bit (especially if ridden when loose) and the only solution was to replace the small cog. That solved the problem (for me at least).
I just received this May 2021 newsletter with this article. I assume that it must be somehow a repeat as there are comments dated April 2018.
Strange???
Yes, that’s correct, Walt.
I agree with Russell in his comment above. Torque wrench is best, the lockring almost always lists the Nm max torque on it. I usually see 40 max Nm so Russell’s 35 is a good suggestion. Of course, you need the correct torque wrench and socket (1” for everything I’ve ever worked on). Obviously, not everyone will have this since quality torque wrenches can get expensive, but that’s the ideal way.
If not, a 12” adjustable wrench will work, but the torque wrench should always be the first option.
Here are two indispensable tools from Feedback Sports for cassette removal:
https://www.feedbacksports.com/product/bottom-bracket-cassette-wrench/
https://www.feedbacksports.com/product/cassette-pliers/
Unfortunately the wrench is out of stock, but likely available through second party retailers.
The Park tool FR.2G has a guide pin which keeps all “lined up” nicely
Pedros has a similar tool
Yes, it is possible to remove (some) cassettes as described…but not all (some are too tight to remove with pliers). Also, damage can occur.
One can make a chain whip with a piece of old chain, a piece of flat metal from a hardware store and a couple of small bolts and the tool which fits the cassette is not expensive (and will fit most cassettes).
For a freewheel, it is a different story…there are many different freewheels and several tools are required to fit all freewheels. And many freewheels take a significant force to remove.
Damn it, based on this arricle I assumed I don’t need a chain whip so I didn’t get one. Now obviously I’m home, realizing you can’t do much without a chain whip. YOU NEED A CHAIN WHIP, otherwise you won’t be aboe to exert the required counterforce! Why would you forget to mention this…
Benedek: Actually, the article only discusses the tightening of a cassette. So, you do not need a chain whip to tighten the cassette (as you tighten in the direction in which the cassette hub will not turn/move). However, if the cassette is tight, you will normally need a chain whip to remove it (since that requires unscrewing the lock ring in the direction in which the hub turns freely).