Home Bicycle Workshop Tweak & Easy Toolboard Making

Jim’s Tech Talk
By Jim Langley
Seeing as how I wrote the RBR e-book Your Home Bicycle Workshop, available in our bookstore – you can probably understand that my shop is where I’ve been spending lots of time lately. There are always bicycle projects needing attending to. And during these, ideas come to mind on ways to make a shop work even better.
The idea for the latest tweak had to do with the jumble of lube, grease and other chemicals in bottles, jars and cans cluttering the bench and shelves. Seems every little bike part has its special needs these days from titanium prep to carbon assembly paste, to various Loctites to the many different greases and lubricants. It just turns into a big mess after a while as you can see in my before photo.

Besides the disorganization of having the stuff all over the place so one has to look to find it, it’s also annoying to have lubes on the workbench where they’re in the way and where bottles can fall over. Another benefit to keeping everything in one place is making it less likely you’ll run out of something important – because it’s easier to keep track of what’s almost empty.
Closer at Hand
But, the real problem wasn’t the disorganization or mess of having everything all over. It was that when a certain item was needed, it was almost always while I was holding a component close to the bicycle held in the repair stand. This meant having to put the component down, walk over to pick up the needed goop and then being able to dose the part.
I realized that what was needed was a way to keep every possible concoction needed close enough to the repair stand so that it could always be reached from there and without having to put down the part being worked on.
A while back I added a shelf on my windowsill. It’s where the Fausto Coppi postcard and mechanic’s torch rests in the photo. I like how it provides a reachable tool location and I have tried keeping some lubes there.
The Obvious Answer
But in order to put all the lubes, etc. close, required even more space. And, the obvious answer came to me the other day. Which was to make a second shelf above the first.
The only tricky part was ensuring that the mini-blinds would still flip up to let light in. The first shelf is beneath them so it was a non-issue. For the new one, I cut slots for the three blind-control strings and that did the trick.
You can see the blinds open in this after photo and see all the bottles, cans and sprayers altogether on the shelf. Also, the workbench and other surfaces are open and ready for use.

Easily Changed
You never know if you’re going to like an upgrade until you use it for a while. So, I see all of them as temporary and build them to be easily taken down. This new shelf can be removed by taking out four screws. The blinds were untouched.
Already, I’m thinking that I might switch the things on the bottom shelf to the top and move all the chemicals down onto that shelf. That would make them even easier to reach.
Making a Neat, Organized Toolboard the Easy Way
Friends and customers often comment when they come into my garage bike shop and see the toolboard. They like the tidiness of it and how nicely the tools are displayed as if they’re jewelry rather than wrenches, screwdrivers and an assortment of specialty items for bikes.
It’s not difficult to make a toolboard like mine, so I’ll share how I do it. Choose a wall that works for the tools you own for your bicycle service and repairs. It doesn’t need to be too wide or tall a space because ideally it will let you reach whatever tool you need without moving too far from the bike you’re working on. My basic toolboard is 72 by 36 inches (183 x 91.5cm).
I don’t Recommend Pegboard and Hooks
Pegboard is an option for hanging the tools. But, I find plywood easier to use. Because with pegboard you need quality materials. Not all pegboard is thick enough to resist warping. And pegboard hooks tend to be hit or miss. If you get bad ones the tools will hang loosely and fall off.
Pegboard usually needs to spaced away from the wall, too – unless it has a frame already.
You can figure all this out and make it work, but even with good pegboard and hooks, you’re forced to follow the pattern of the pegboard’s holes.
That’s why I prefer ¾-inch plywood with 6-penny bright finishing nails as the tool hangers. You can put nails anywhere you want to place your tools however you like them. You’re not restricted to the spacing of pegboard holes or the design of the hangers.
Keep in mind that even if you only have a low wall where you want to work, it’s possible to make a nice toolboard out of a wide but narrow piece of plywood by leaning it against the wall in that space. If it’s attached with hinges to the wall, you’ll create nice storage space behind the angled toolboard, too!
Making Tool Holders
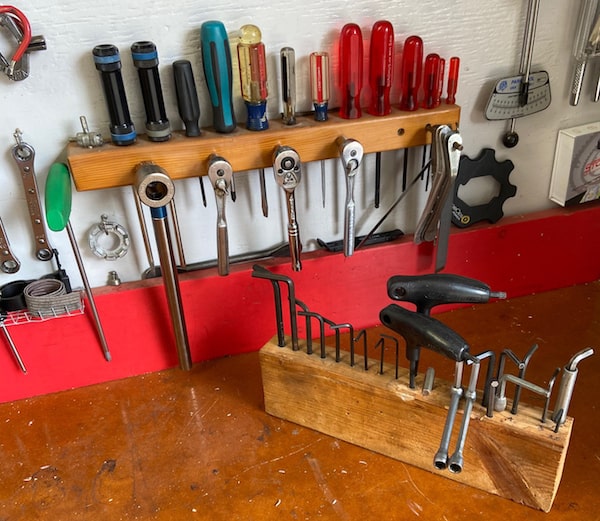
For pliers and screwdrivers, you can see in my photo the simple wood racks to make for them. It’s as easy as drilling holes in the wood pieces to receive the tools you choose. You then screw the wood tool holders to the plywood.
The holder with the allens on my workbench is just to show a portable one I made a long time ago. You can see that it’s just a piece of 2 x 4 lumber with holes drilled on the edge. The one in this photo attached to the wall is a piece cut from the 2 x 4 so that the finished edge faces out. I coated it with polyurethane to keep it from absorbing grease and grime and give it a nicer look.
The screwdriver tool holder started off just for them. I later drilled holes on its outside edge for other tools to hang on it. The long tool is Park’s Cassette Lockring Tool With Handle.
Next to it are three ¼-inch drive ratchets, with respectively a 6, 5 and 4mm allen socket attached. Lastly are tire levers, which are actually hung on the handle of a General tapered reamer (handy for enlarging undersize holes).
The other wood holder on my board shown in the other photos is mostly for plier type tools. That one is also just a piece of a 2 x 4 mounted on its wide face. The reason for that is that the holes need to be deeper or else the pliers may fall off – especially the oversize ones.
If you study my toolboard you’ll notice that tools often used together are placed near each other. For example, the pliers in the wood holder are just below the cable cutters and the 3-way Y allen wrench (red). Because those tools are often used together when working on cables. Think about this in designing your layout.
Making a Toolboard Template
The trick I use for lining everything up nice and neat and where I think is best is to make the whole toolboard on a piece of cardboard first. Lay the cardboard flat on your workbench and lay your selected tools out on it. Be sure to make and place your wood tool holders for the screwdrivers and pliers on the cardboard too.
With it mocked up like this, work on a few bikes with your beta toolboard. See if the tools you reach for the most are close enough to you. If not move things around. Look at the tool spacing. Is it easy to reach and get each tool off the toolboard the way you have it? If not, adjust things. Check and recheck and make sure you put all the tools you need on the toolboard.
If you’re not sure, go away from it for a bit and come back with fresh eyes and take another look. Still not sure? It’s okay. You can always move things and find ways to make room later. If you look at my photos you’ll see tools added later like the green handled extra long T25 screwdriver that hangs at the end of my screwdriver holder – a recent addition.
Finishing the Template
Once you have your cardboard toolboard to the point you’re really happy with it, look at your tools and determine how best they will hang from a nail or sometimes two nails. Look at my photos for ideas if you’re not sure.
Then, either poke holes in the cardboard where those nails will be hammered in, or use an indelible marker to mark the hole locations. Be sure to mark the corners of the wood tool holders, too, so you know where you had them.
With the cardboard template done, you are ready to make your finished toolboard on the wall. I like to paint the plywood with semi-gloss paint so that grease and grime wipes right off. Garages can be dark places so I choose light colors for my toolboards. I’ve seen darker colors that look really nice, too. It’s your choice and you can always change it later.
Making the Toolboard
To finish the toolboard now is simple. First – and this is important – take a photo of your tool arrangement on the template. Alternatively, draw a line around every tool, or write what goes where on every hanging location.
Next, remove all the tools from your cardboard template. Now, hold the template against your plywood wall. Take time to level the nail holes/marks so that your tools hang in a straight line. Then pound in 6-penny finishing nails into all the tool hanging holes/marks you made.
For the wood tool holders, poke through the cardboard to mark their placement on the plywood.
Once you’ve pounded nails through every hole and marked the tool holder location(s), pull the cardboard template off the wall leaving only the nails behind. The last step is to add your tool holders screwing them on to the toolboard. Be sure they’re level.
Hang Your Tools on Your New Toolboard!
The last step is hanging your tools on the nails and putting pliers and screwdrivers, etc. in the wood tool holders. You should now have the exact toolboard that was on your template.
If any tool hangs poorly just add a nail to support it more. If you’re not happy with where a tool is located, it’s easy to change it, too – just move its nail.
Some mechanics like to outline their tools on the toolboard. This is helpful when many tools are in use and removed from the board. Because the outlines tell you where to put the tools back.
To outline the tools, take an indelible marker such as a Sharpie and draw a line around the tools. Some people don’t like the look of outlines and believe a good mechanic remembers which tool goes where. You can also do like you did with the template and take a photo of your toolboard to look at if you ever forget where a tool belongs, too.
I hope these tips and ideas inspire you to upgrade your home bike workshop. Have fun and if you do something worth sharing, please do!
Ride total: 9,597
Another tip is old bottle cages mounted to the pegboard or something similar, they are great at holding spray cans and keeps them in reach and keeps a nice tidy workbench.