Essential Tools for the Job
Over the years I’ve found that a beginner’s stumbling block to home wheel building and maintenance is often the lack of equipment, and the expense of that equipment.
Really, though, these “issues” are more perception than reality. In short, it’s possible to effectively work on wheels with a minimum of special tools.
Sure, as with most aspects of road cycling, you can go “all out” and spend lots of money on equipment if you want to. And some of it – as I’ll discuss later in this article – is nice to have. But almost none of it is necessary.
Bare-Bones Wheel Building & Maintenance
For many years, I used the bare minimum of equipment, and my wheels didn’t suffer because of this. In fact, wheels can be maintained with just a spoke wrench and little else. The frame and fork can be used as the stands for the wheels, and your thumb as a gauge for the “wobbles,” or lack of true.
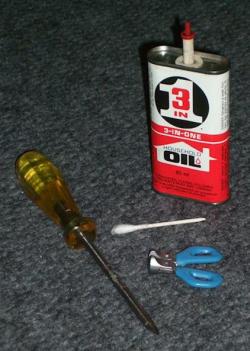 For building wheels, we can add to the list of required tools some lubrication for nipple threads and seats (any oil is perfectly OK) and a sharpened Q-Tip for a nipple-starter for hollow rims. That’s it! Anything else just adds expense and complexity.
Can’t be done, you say? I suppose I’m the proof that it can, as I did it this way for the first 48 years of my wheel building life. Let me share with you some quotes from famous wheel builders who tend to agree with me.
From Gerd Schraner‘s book “The Art of Wheelbuilding”: “It is always the wheel builder who makes a good job of truing wheels, not the truing tools. It is therefore not necessary to have the latest high-tech, sophisticated toy to attain a high quality wheel. I learned how to true wheels using an old bicycle fork and my fingernail to measure misalignment.”
From engineer Jobst Brandt in his definitive book “The Bicycle Wheel”: “The only tool essential for wheel building is a spoke wrench. The bicycle can 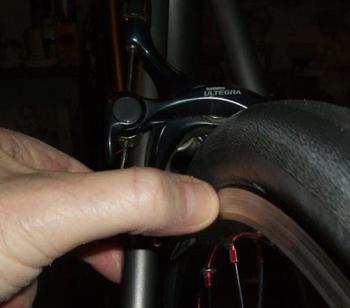 serve as a good and adequate truing stand. Brake pads can be used as a reference from which to observe wheel alignment. Some builders prefer to use their thumb as a gauge even when using a well-equipped stand.”
The All-Important Spoke Wrench
So the basic cost of entry into wheel maintenance and wheel building is a good spoke 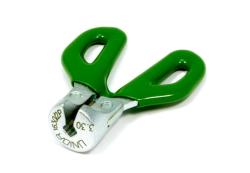 wrench, which can be had for under $20. Make sure you get a good quality wrench. Especially important is finding one that fits the size of the nipples you’re using. Get the new type of wrench that touches all four corners of the nipples’ square shank, not the type that just grips two sides.
I would also advise against getting a multi-sized wrench, as they tend to be of poorer quality and offer a less-than-perfect fit on nipples. I only own one size of wrench, for the most common nipples – 14-gauge – and it should be all you need, too. My favorite spoke wrench is this model from Unior.
Some factory pre-built wheels, like Mavic Ksyriums, use proprietary spoke wrenches, so you’re going to have to do some sleuthing before you buy one for your personal wheels.
Dragged Into the Modern World of Wheel Building
In the past four years of my home wheel building career I’ve been dragged kicking and screaming into the hi-tech world of modern wheel building by some well-meaning people! Firstly, Roger Musson, a UK wheel builder and author of the excellent eBook “The Professional Guide to Wheelbuilding,” insisted on sending me one of the wooden wheel stands that he uses for his wheel building classes.
Check my wheel building page (scroll down near the bottom) for photos of Roger’s finestand plus one you can make yourself by using any old bike fork: http://miketechinfo.com/new-tech-wheels-tires.htm
My site will also tell you what other minor pieces of equipment are useful and how to use them – like simple inside calipers for gauging wheel dish and centering, plus a modified Phillips screwdriver to be used as a nipple driver.
More recently, Brandon Hunziker from www.BikehubStore.com urged Ric Hjertberg of www.Wheelfanatyk.com fame to donate one of his incredible digital spoke tension meters to my cause.
I guess they couldn’t sit idly by knowing that I was still building wheels using the same methods and tools used in the Dark Ages!
In fact, for 52 years I’ve used “perceived tension” for deciding how much spoke tension to add, and the “pluck/ping” method of judging relative tensions. Both of these methods work extremely well, especially after you’ve gained a certain amount of experience using them. I’ll touch more on this in a future column.
In the meantime, I must admit, Ric’s tension meter is an interesting tool to use and a very well-made piece of equipment. I hope to do a review of it in the future for RBR.
High-Tech Wheel Building
Of course, as with all technical jobs there are tools designed to help make the job easier, faster and more precise (even though I’m willing to debate the need for all of those!), and as I mentioned above, the sky really is the limit. For instance, you can buy any one of a multitude of wheel stands from under $100 to the highly-technical $2,350 “P+K Lie Special 250” with all its bells and whistles.
For the tool fanatic, there are dishing gauges, tension meters, nipple drivers, sorters and starters, spoke rulers, cutters and re-threaders. The Wheel Fanatyk digital spoke tension meter even has an accessory digital output cable that allows you to link to a PC and upload your spoke tensions to a spreadsheet! My low-tech mind boggles! What the heck would I do with that information?
Just Do It!
I hope you can see that a lack of specialized tools shouldn’t prevent you from getting your start in maintaining and building your own wheels. Indeed, if you own a bike and have a spare $20, you’re in business!
My own website is dedicated to getting you started by using the minimum of tools and equipment, and I have a lifetime of proof that this approach works. With a spoke wrench and some lube, you could build a wheel on the side of the road in an emergency.
Let me share a relevant story. Many years ago I got into knife making. Career custom knife makers use equipment costing many thousands of dollars – band-saws, belt-grinders, drill-presses, buffers, millers and other very expensive large power tools. I wonder how many of them started their careers with all this stuff? The answer is: probably none.
I started with a hacksaw, files, sandpaper, and a tube of polishing compound – plus a $25 drill press for the handle pin holes. Basic hand tools allow basic workshop skills to be developed without the confusion and expense of technical equipment; home wheel building is no different.
My next column will cover basic concepts of wheel building and maintenance – general information that everyone needs to know.
Q&A: What’s Your Big Tip?
Since The Wheel Builder column started, questions are trickling in. I’ll try to cover one or two at the end of every column.
Question:
Is there one important thing about wheel building that stands out above all others? What’s your big tip?
Answer:
That’s a great question, but one that Ican’t answer with one word or phrase. This is the simplest answer I can give: Always build with care and passion and go as slowly as you need to go, with the skills you currently have, to achieve those things. And when it comes down to spoke tension and wheel truing, the most important thing is getting relative spoke tensions as even as possible.
Mike Tierney writes The Wheel Builder column for RBR. Read his full bio. He is a life-long cyclist from the UK who has spent most of his adult life in Canada. Mike has been a passionate home wheel builder for the past 52 years and specializes in taking the mystery out of wheels and wheel building for Newbies. Hundreds of cyclists have built their first wheels with online help from his wheel building website, MikeTechInfo.com. Send your questions about wheel building and wheel maintenance to Mike at [email protected].