Basic Concepts, Part 3: Equalizing Spoke Tension
In Part 2 of this “basics” series, I touched on the topics of spoke twist and stress relief. Today, I’ll talk about the need for equalized spoke tensions and which way to turn nipples – with a big tip that you won’t forget!
Equal spoke tension
When we tension all the spokes of a wheel, massive compressive forces are placed on the rim by the spokes, which is what gives the wheel its great strength and stability. In fact, a bicycle wheel is one of the world’s strongest structures relative to the weight of its parts.
But we must be careful to place equal tension on all the spokes in the wheel so that they’re all doing an equal share of the work. When some spokes do less work than others, metal fatigue is the result – and usually the reason why spokes break (almost always at the spoke’s elbow).
Actually, too little tension is worse than too much, as low tension creates greater tension fluctuation between the spoke’s loaded and unloaded state each time the wheel rotates. This constant fluctuation leads to metal fatigue.
It’s almost impossible to get all the tensions dead equal because no rim is produced that is dead flat or perfectly round, and there are also very slight variations in spoke wire gauges.But the aim is to come as close to equal tensions as possible — and we eventually end up with a compromise between wheel trueness and equalized tensions. Going back and forth twice between equalizing and truing is usually sufficient.
Two Methods of Judging Spoke Tension
There are two methods of judging equalized spoke tensions. My favorite is by plucking a spoke and listening to its tone, and attempting to get all the spokes on the same side of the wheel to the same tone (and therefore the same tension). Important: Don’t compare spoke tones on opposite sides of the wheel, though, because different spoke lengths and tensions are needed for correct wheel dishing (to accommodate cassettes or brake discs).
We can use the pluck-and-tone method to help equalize tensions when we’re truing the wheel, too — if we have, say, three spokes to tighten to remove a wobble, give the ones with the lower tone (looser tension) more of a turn than the ones with a higher tone. This way, we do two jobs simultaneously: truing and equalizing.
It’s just the same with loosening; loosen the higher tone spokes more of a turn that the lower tone ones.Plucking spokes with the fleshy pad of the index finger mid-span on the spoke is just fine. We don’t need to use fancy guitar picks or have a classical guitarist’s manicured picking-hand fingernails.
The other way of checking relative tensions is with a spoke tension meter. To use one, we check all the tensions (on one side!) and adjust the spokes to even out the readings on the gauge. I find the pluck-and-tone method much faster and just as accurate as using a tension meter, but your ear might not be as tone-sensitive as mine. Practice will improve this skill tremendously, and being within about 10% is just fine.
The Big Tip!
Many novice wheel builders have issues with which way to turn the spoke wrench. They get a bit distracted and occasionally turn the wrench the wrong way. Do this two or three times in a wheel build,  or when you’re trying to true a wheel, and you’ll become completely disoriented, spoke tensions will be all over the map, and frustration will set in.
The best cure for this is to loosen all the spokes in the wheel and start over again. This is why, on my wheel building website, I suggest removing all forms of distraction when building a wheel in order to concentrate fully on the job at hand.
A nipple on the end of a spoke works no differently than a bolt on the end of a nut — turn the nut clockwise (looking from the threaded end of the bolt) and the bolt goes “shorter.”
So, to tighten a spoke, we turn the nipple clockwise, which shortens the effective length of the spoke by pulling more of the spoke into the nipple, and this pulls the rim sideways (toward the side of the wheel of the spoke you’re working on). But this is easy to forget if we’re not concentrating totally.
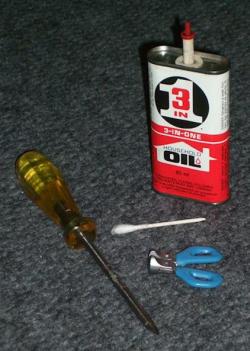
To help you remember which way to turn the wrench, drill a small countersunk hole in the wrench or at very least mark it with a Sharpie. Do it on the right side of the wrench and then rotate the wrench 180 degrees and do it again on the other side. Take a look at my wrenches.If you mark your wrenches, all you have to remember to do is to push on the dot when tightening a spoke! And turn the wrench the other way to loosen a spoke.
Follow-Up to Reader’s Spoke Twist Problem
You might recall that in a previous column I answered a reader’s question about fixing a badly twisted Sapim CX-ray spoke. I advised him to replace the spoke, as it was twisted a full turn. I also provided some additional instruction off-line. Here’s his reply:
“Mike, just wanted to let you know that I ended up replacing 3 spokes on the wheel. A couple of others were twisted, too. Just not as badly. I followed your instructions, and I invested in a Sapim ‘spoke holder’ to keep the spokes from twisting while tightening them. I also bought the spoke wrench you recommended. After replacing the spokes, I trued the wheel on the bike using the ‘brake pad’ method, since I don’t own a truing stand.
“Everything worked out great, and it really was as easy as you said it would be! I’m a testament to the fact that anybody with a good spoke wrench, a Q-tip and some lube has what it takes to maintain their own wheels.“
I don’t think I’ll be building my own wheels just yet (not enough time in the day), but I surely feel comfortable enough now to maintain my wheels. Thanks again to you for sharing your knowledge with RBR readers, and I’m here to tell any of them still apprehensive about working on their own wheels: You can do it! Like Mike says, it’s not rocket science!”
Mike Tierney writes The Wheel Builder column for RBR. Read his full bio. He is a life-long cyclist from the UK who has spent most of his adult life in Canada. Mike has been a passionate home wheel builder for the past 52 years and specializes in taking the mystery out of wheels and wheel building for Newbies. Hundreds of cyclists have built their first wheels with online help from his wheel building website, MikeTechInfo.com. Send your questions about wheel building and wheel maintenance to Mike at [email protected].