
Jim’s Tech Talk
by Jim Langley
See what I did there in the title? It has a double meaning, in that you can make this gift and give it to your favorite cyclist. Or you can make it for yourself. Actually, you might decide to do both because it’s a helpful thing to have on hand in your home bike shop. It’ll easily fit in that Christmas stocking.
Even though I’ve used various versions of this gizmo since I first became a bike mechanic, I don’t have a name for it. But, it could be called a front end holder, keeper or maybe a bike saver.
All it is is a strap that goes around the front wheel and frame. I’ve used rubber bands, string, tape, all manner of things I had on hand. But, eventually I started making nicer ones, which is what I’m suggesting you do for a gift.

Handlebar Holders Can Prevent Damage
The front end holder is used a couple of ways. For me, the most common use is for when the bicycle is suspended, held in a repair stand. In this position the weight of the handlebars and front wheel will cause the front end of the bike to swing to the side quite forcefully if you let it.
You can try to remember to always angle the bicycle in the repair stand downward enough so that gravity keeps it straight. But then, if you raise the front end – say to see the front brake better, then it’s easy to forget the front end is free and have it come crashing into your frame.
Frame Protectors
If this happens and the handlebars smack into the frame, it’s possible for them to dent the frame or scratch/chip the paint. While a carbon frame if hit hard enough might crack.
These things can happen in a crash, too, which is why some riders protect their frames with products such as Shelter protective pads. And, why some bikes, such as all mountain types often have built-in rubber bumpers to prevent it.
Handlebar Holders Help for Other Adjustments, Too
The other purpose of the front end holder that I like is for keeping the bike standing straight with both wheels in alignment when it’s on the ground. And, it keeps the bike in place since the wheels can’t roll.
Because the wheels are lined up, you know that the bike is as level as the ground/floor it’s on. And that’s the optimum bike position for leveling a seat, setting the handlebar angle and perfecting the front/rear lever alignment on the bars, too.
How to Make Your Own
The way I make my favorite holder is with a toe strap. These come in pairs so you’re set if you want to make yourself one. You might be able to find a used single strap at your local bike shop. Though, with clipless pedals so popular, I’m finding that toe straps aren’t as ubiquitous as they used to be. Get a leather or nylon toe strap and if it’s used, make sure the buckle works. Sometimes they get bent or corroded and stop working.
If you don’t know how to thread the end into the buckle look at my photo. The strap should be under and resting against the roller. That puts the buckle teeth beneath the strap where they bite to hold the strap locked in position.
To tighten the strap simply pull on its free end while you hold the strap from moving with your other hand. To open the strap, pull on the little tab above the roller on the buckle. This opens the buckle jaws and lets the strap end slide right out.
Then, to make sure that the metal buckle on the strap doesn’t ever contact and scratch the frame or rim, I cut a length of an old inner tube just long enough to slip over the strap. And, I make sure the rubber stays between the buckle and the frame/rim whenever I use the holder. The rubber also adds grip so that the holder doesn’t slide up the frame tube it’s on.
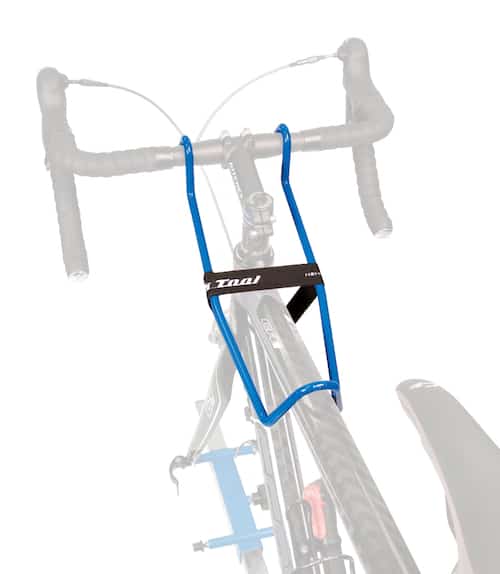
Park Tool’s Handlebar Holder
In case you’d prefer a professional tool to hold your front end from swinging around, check out Park Tool’s. It’s a more elaborate design, plus it will keep the front end in place even when the front wheel has been removed.
That’s a nice benefit because the levers on modern road bikes are plenty heavy enough to cause the front end to fall right or left and smash into the frame. For example, my new Shimano GRX right lever alone weighs 300 grams – over half a pound!). Park’s Holder costs less than $20.
A Gift They’ll Enjoy
My homemade holder is a simple thing yet if they don’t have one, they’ll really appreciate your gift every time they use it. Plus, toe straps come in handy for many other uses.
If you make a holder and come up with some improvements please share them with a comment. Happy Holidays!
Ride total: 9,494
REI has velcro D straps for a few dollars that work very well. I’ve been using them for years. Much easier to use than a toe strap and it won’t scratch the frame.
Great tip!
Big Velcro strap woks as well, good if you can’t find a toe strap, toe straps are getting rare these days. Also use smaller Velro straps and rubber bands to hold brake lever while adjusting brake pads. Holds tight enough to keep pad in place while still allowing placement adjustments. You can even jam a thick piece of paper or other suitable object (difficult to find paper matchbooks these days) to toe-in the pads. Remember, tighten the pad fixing bolt slowly as it is will help keep the pad from turning.
I’ve always found a length of discarded tube to work great for this purpose. It’s as quick and easy to use as anything. Like many cyclists I keep a bunch of them of different lengths in my car as well for securing bikes in the rack to avoid wheel spin, rubbing together, etc.
I have used a short length of 3/4″ nylon strap with a fastex buckle for many years. I can change the color of the nylon to match the particular bike, and it is easy to carry in my saddle bag for when I need to lean my bike against a lamp post etc. I think my friend, Chuck Fearnow coined the name “hobble” because it keeps his steed from running away, especially when loaded with panniers on a bike tour.
I use a piece of elastic cord with a loop on one end and a big button on the other. I stretch the cord around the tube and rim and slip the loop over the button.
I like the “Flop Stop” made by Feedback Sports. It can double as a frame stabilizer when the bike is on a roof rack. If it is windy and the car is being driven at freeway speeds the bike can catch the wind and heel over, or try to. My roof mounted bike is a tandem, which is big and is pressed even harder is a stiff side wind.
Thanks for the excellent tips on what you like for keeping your handlebars in place, everyone. Appreciate you sharing. David Kamp mentioned Feedback Sports’ Flop Stop, which is $21.99 and looks very nice: https://www.feedbacksports.com/product/flop-stop-handle-bar-holder/
Thanks again!
Jim
A bungee cord works great.
I use the Feedback Flop Stop as well. I feel it’s better than the Park Tool version since one of my bikes has cables on top of the top tube and Park’s model wouldn’t be a great choice because of this (not knocking Park, I love most of their tools). Stores slim too and my LBS was intrigued when I brought in one of my bikes with it. Extends and secures easily, secures to seatpost and a variety of handlebar sizes. Highly recommended. I also use the Feedback Sport model mechanic stand and their truing stand.