
Saturday, as I was sipping a well-earned post-ride beverage at a local tap room, my cellphone came alive from a text that read “Help! I think I ruined my frame, Jim!” It was Tony, who has a few nice road bikes, and who knows enough about fixing them that he would only text me if it was something serious.
I called him straight away. He said he was just riding along, had gotten to a steep little pitch, and shifted into his easiest gear when he heard an awful crunch that locked his pedaling and forced him to step off his bike.
Looking at his drivetrain for what could be the problem, he said he was horrified to see that his rear derailleur was now inside his rear wheel and only connected by the cable and housing and chain. It had been torn clean off his frame! Hence the text about his frame being ruined.
A very common problem
Before I tell you what I told Tony, I’ll start by saying that it’s important to know how this breakdown happens, because you can avoid it. And, because most of the time I’ve run into it as a mechanic both in the shop and wrenching at cycling events, people are mystified how it could happen to them.
There are two things that make shifting into the wheel a way too-common failure:
- Somehow the bicycle fell over onto its right side (the drivetrain side) and landed hard enough that the derailleur hanger on the frame got bent inward.Keep in mind that this can happen without your knowledge, such as when your bike is parked at a rest stop and someone knocks it over, thinks nothing of it, and stands it back up. Also, know that on bicycles with aluminum derailleur hangers, which is the most common type today, it doesn’t take much force at all to bend the hanger like this.
Once bent, you might not even notice that the shifting isn’t as crisp as it was before and just keep riding as usual. Then, one day, like Tony did, you reach to shift into your easiest gear and the derailleur, which has been bent too close to the spokes, gets caught by one of them and pulled right into the wheel.
If you’re lucky (and now you know how this can happen, so you can remain alert to his possibility), you’ll hear and feel the catastrophe about to happen and be able to stop pedaling before the derailleur goes into the wheel. You might even hear the tick, tick, tick of the spoke hitting the derailleur and be able to shift the other way. You can then have your bike repaired.
- The other way this accident happens is if somehow the rear derailleur low-gear limit screw was not adjusted correctly. Limit screws don’t come out of adjustment on their own. But if you ever tried adjusting your screws you might have messed up the setting – as I did when I was a budding 15-year-old wannabe mechanic who made this mistake and ended up doing exactly what Tony did.
Fixing the hanger and derailleur
Luckily, I was able to put Tony’s mind at ease after asking him a couple of all-important questions. What I asked him is what you need to determine right away if this ever happens to you. First is whether the hanger is an integral part of the frame (i.e. part of the dropout) or a removable hanger attached with screws (you may need to remove the rear wheel to see the screws). And second is whether the threaded hanger hole that the derailleur was screwed into is broken, rather than just bent.
In Tony’s case, it was an integral hanger and bent but not broken. This meant that he couldn’t replace the hanger and would need to fix it. So, he was happy to learn that Wheels Manufacturing makes a 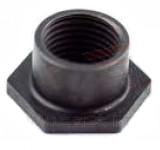 Dropout Saver Kit for $60 that makes it relatively easy to install a threaded insert (see photo) so the hanger will work almost as new again.
Of course, Tony had to realign the hanger and likely replace his bent derailleur, and maybe his chain and a spoke or two (he hasn’t told me yet). But he could stop worrying that he needed to buy an entirely new frame.
Steel bikes like Tony’s usually have integral derailleur hangers. Other frame materials usually feature removable and replaceable hangers. Here, too, Wheels Manufacturing comes in very handy with a seemingly endless selection of hangers so that you can replace yours if you ruin it.
Alignment is important
It takes a lot of force for a derailleur to get torn off the hanger. So much that it’s possible for a lot of things to get damaged, including the hanger, derailleur, chain, wheel, axle and the dropouts of the frame. There are professional alignment tools for dropouts and derailleur hangers that ensure – assuming your bike doesn’t fall over – that your derailleur won’t shift into the spokes again even with your new parts.
Park Tool’s DAG-2.2 is one of those. Most shops have these, and if you fix or replace a mangled hanger, I recommend paying to have a pro mechanic align everything correctly again.
If you can’t get to the bike shop right away, you can ballpark hanger alignment by looking at your rear derailleur and cassette from behind the bike. When perfect, an imaginary vertical line will bisect both derailleur pulleys and the cog directly above them. If the hanger is bent, a large adjustable wrench with its jaws set to just slip over the hanger (remove the derailleur first), will let you align it, but do it gently.
Note that this only works with a new derailleur, not a bent or damaged one (when they go into the rear wheel, they usually get bent beyond repair). Always carefully check the hanger and derailleur installation and adjustment before riding.
This happened to me! with my 27.5″ cannondale catalyst. i changed the derailleur, everything was fine… but the cogs were touching the sprocket. tried the B screw, nothing. so i assumed the new derailleur was bad… ordered a nwe one, different mode.l. some issue! the sprock is too close to the cogs, and in the biggest ring it cannot even go there. I cannot see anything wrong with the hanger, but maybe it the issue?
thanks in advance!!!!
Maybe add a link in your chain. If it’s too floppy after that, you may need to add a tensioner/guide.