Derailleur Hanger Alignment Tools & Techniques

Jim’s Tech Talk
By Jim Langley
In the comments on last week’s Tech Talk, which was about fixing the recalcitrant derailleur hanger on my friend’s Pinarello – was a good observation from Don Macrae. Today, I’m going to reply to Don and to some of the other interesting tips and points from you. To read the first article and all the comments go here.
Since a lot of this follow-up is about tools to use, I’m replying to the comments mostly with photos, which I’ll describe so you know what to focus on.
Use an Allen Wrench
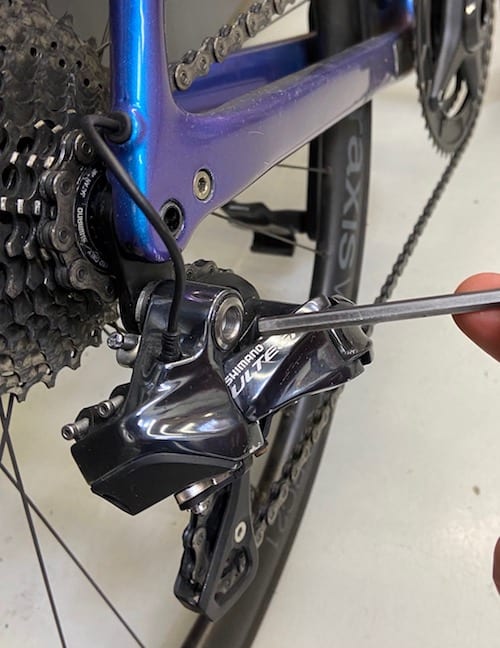
Don said he was surprised I didn’t mention the tool used to straighten bent hangers. Actually, I did mention at least one – an allen wrench that fits into the derailleur attaching bolt.
I mentioned that simple tool because 1) it’s something roadies likely have in their kit already; 2) it works for minor hanger straightening on rides and at home; and 3) it’s not a special and pricey tool like true hanger alignment tools.
Here are two photos. The first shows the correct type of allen wrench (also called a hex wrench). As reader Philip Apruzzese cautioned in his comment, notice that the wrench should be one with a standard end, rather than a ball end hex. Phil explained that the standard hex “bottoms out deeper in the derailleur securing bolt,” which is what you want for optimum leverage (a ball end can slip).
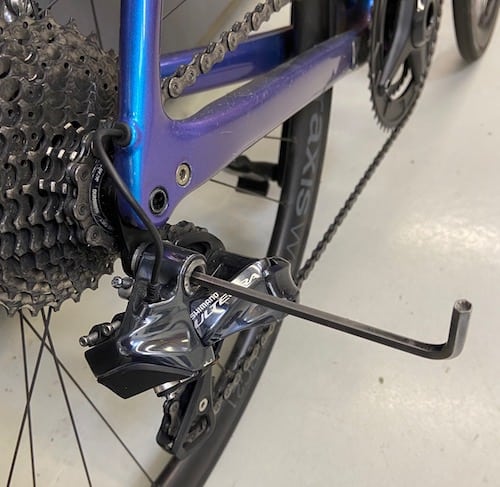
Notice in the second photo with the allen in place that it provides a good long lever. Before doing any bending, be sure to sight from behind the bike to gauge the amount the hanger is bent. Then, use the allen to gradually lift and straighten the hanger. Pay attention to how far it has moved with visual checks. Or have a helper watch as you straighten. Go easy! It doesn’t take much to bend an aluminum hanger too far. You want to remove the bend, not introduce another one.
Crescent wrench or Vise-Grips
Reader “WLE” added that “another crude tool is just a Crescent wrench or Vise-Grips.” The Crescent, also known as an adjustable wrench, has flat, smooth jaws and a long handle. Adjust the jaws wide enough apart to just slip over the hanger with the handle at 6-o’clock and you’ll have ample leverage to straighten the hanger.
I would be careful with Vise-Grip pliers (also called locking pliers). Most have toothed jaws that can chew up aluminum, even steel. You could put some aluminum or brass shims between the jaws and hanger to prevent that if Vise-Grips are your only option.
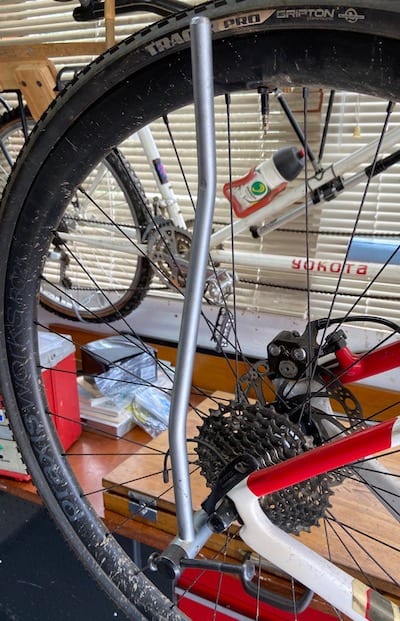
Use an axle or wheel!
Roadie Hogan Lee and Philip Apruzzese correctly pointed out that threaded quick-release-style hollow rear axles are usually the same thread as derailleur hangers (10mm) so they’ll thread right in making a nice long lever. (An axle will easily fit in a seat bag to take along, too.)
Phillip said, “use the axle to bend the hanger until the axle views parallel to the rear wheel from all angles. This is a home grown version of the Wolf Tooth tool.”
I reviewed Wolf Tooth’s amazing new take on hanger alignment tools a few newsletters back and included a video. Here’s a link: https://www.roadbikerider.com/wolf-tooth-pack-hanger-tool-review/.
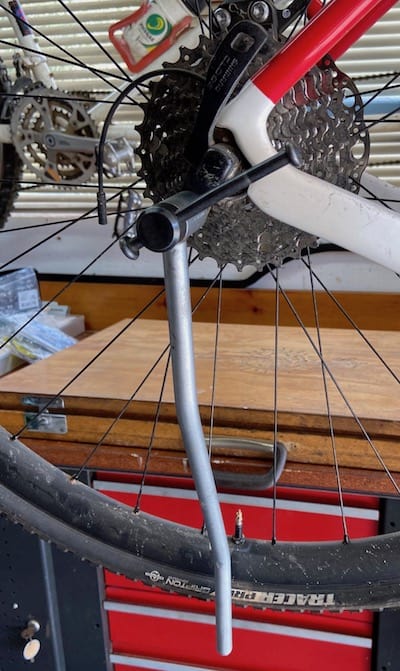
The tip to use an axle reminded me of a cool old trick that former pro Dave McLaughlin shared with me. It’ll still work as long as you’re riding with someone with quick-release wheels with threaded axles.
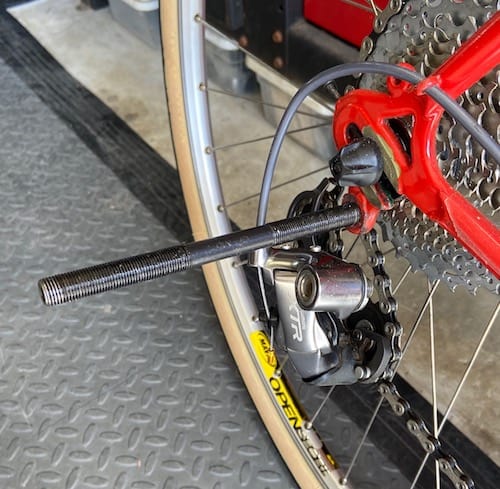
Look closely at the photo and you should see what’s taking place. I removed the quick release from the second wheel and I screwed the end of the axle into the derailleur hanger. With the second wheel in this position, I can use the wheel to straighten the hanger and sight along the second wheel comparing it to the other wheel to get the hanger straight.
If you use this trick be sure that the second wheel’s axle is fully screwed into the hanger. The best way to do this is to tighten the axle with a wrench placed on the outside axle locknut. That way you can bottom out the other locknut against the hanger and know that the wheel is held fast.
If you don’t do this, it’s easy to not catch enough threads and end up stripping them when you try to straighten the hanger. Don’t make that mistake.
Park’s DAG 2.2 tool
In response to Don’s comment asking for a tool for the job, RBR coach Rick Schultz recommended Park Tool’s Derailleur Hanger Alignment Gauge, a nice choice. A reader named Dave also gave it a thumbs up. He wrote, “Not only will it quickly determine what is needed for alignment, it also lets you do it very accurately which is essential for snappy, right-now shifting.” Here’s a photo of one in use.
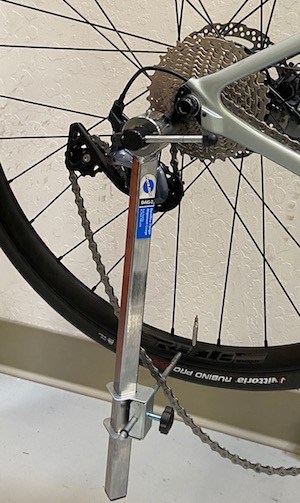
Notice that the derailleur has been removed from the hanger. Then the tool has been screwed in. Since the hanger is aluminum and most alignment tools are steel, be careful getting the tool started – you don’t want to strip the hanger threads.
The basic alignment procedure with a proper tool
The next two photos show the basic steps for checking and fixing a bent derailleur hanger with the most common type of tools for the job.
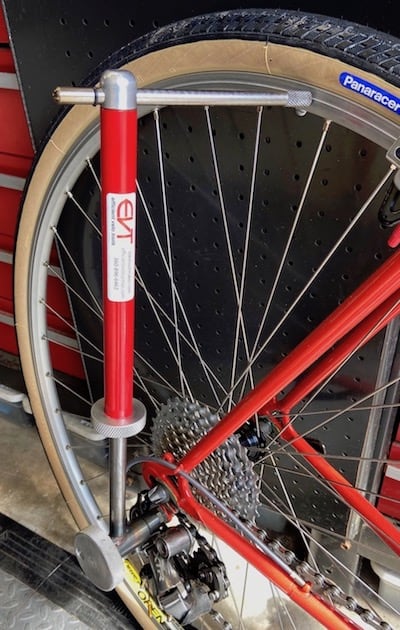
In these photos I’m using perhaps the oldest and elegantly simple aligner ever made, Campagnolo’s R tool. Comparing it to the others shown in the photos here, you’ll see that Campy’s does not have a pointer at the rim.
That’s because instead of a pointer, you simply rest a thumb against the tool. With your thumb there you see the gap between the rim and end of the tool. And with certain bends you can feel to gauge the gap, too.
Check at 6 and then 12 o’clock
Otherwise, all of the tools are used the same basic way. Once they’re threaded into the dropout, you let the tool hang by its weight at 6 o’clock. In this position, you look at the gap between the tool’s indicator or your thumb and the rim.
Since a wheel might have been bent, you want to be sure to use the same spot on the wheel for your alignment checks. So, move the valve so that it’s right at the alignment gauge pointer. That’s where to check the gap.
With tools that have an adjustable indicator, like Park’s, you can move the pointer so that it almost touches the rim.
Now, for the second check, rotate the alignment gauge clockwise (and the wheel with it so that the valve stays next to the indicator) until it’s at 12 o’clock. In this position, the gap would be the same as it is at 6 o’clock IF the hanger was perfectly aligned.
With a bent hanger, what you usually find is that there is a larger gap at the top than at the bottom because hangers usually get bent inward rather than outward.
To fix the hanger you gently use the tool to bend the hanger so that the gap is the same at both measurement points, 6 and 12 o’clock. You can try to get it perfect but in my experience, even the best tools aren’t accurate enough to account for every variable.
So, my advice is to go both by what the tool shows you and what your eyes tell you when you reattach the derailleur and check its alignment from behind visually. If it looks good and you know you got the hanger as straight as you could with the tool, you probably put the hanger back where it was before and your bike’s going to shift properly now.
Fancy tools
We’ve covered a lot of ordinary and two nice tools so far. Hogan Lee and another reader going by “Bryan,” raved about the Abbey Tools HAG, $185. You can learn more about it here: https://www.abbeybiketools.com/collections/tools/products/hag.
I don’t own the HAG. But, I do prize my Efficient Velo Tools Tru-Arc. I bought mine a number of years ago and greatly appreciate how easy it is to use and how well it’s machined. Checking their site, it looks like they’ve upgraded it in recent years. It’s now called the Ultra Tru-Arc, is currently custom ordered only and sells for a whopping $500 (I believe I paid $250 for my version).
Thanks for your great comments and here’s hoping your hangers hang in there nice and straight – and you can now fix them with ease if not.
Ride total: 9,590
Do you know about this resource? https://derailleurhanger.com/ ?
Hi Bob, yes, that was in part 1 of the article.
Thanks,
Jim
Thanks for the columns on this important issue.
You’re welcome, George! Thanks for your comment.
Jim
Are there any concerns about using these procedures on a carbon frame bike?
I would guess as long as it’s the derailleur hanger that’s bent it would work. But it’s probably easier and safer to just replace the hanger. They’re pretty cheap – https://derailleurhanger.com/. I recently read an article (may have been here or Velo News) about how that can be tricky too. Make sure you get the exact hangar and fasteners that you need.
Hi Frank,
Carbon doesn’t bend, it breaks. That’s why carbon bikes have aluminum or rarely – titanium hangers. Those materials can be bent and straightened though sometimes replacement is the best option if the hanger is badly damaged.
Thanks for the question,
Jim
Thanks for your follow up article Jim. I actually have the Park Tool implement, often borrowed by friends. The theory is good and it works well enough – but if I was replacing it I’d consider the Wolf Tooth version, which operates differently from all the others. The theory is maybe not so good, but I think in practice it might be perfect. It’s It’s covered in CT here: https://cyclingtips.com/2019/06/novel-wolf-tooth-components-hat-flips-the-script-on-derailleur-hanger-tools/
Agree! I bought one of these, and it is very easy to use, and also compact.
Looks a little more complex and expensive than the Park version, especially if you have both quick release and thru-axle bikes.
Hi Don,
In today’s column I linked to my review of the Wolf Tooth including a video. Sounds like you missed reading that, so here’s a link: https://www.roadbikerider.com/wolf-tooth-pack-hanger-tool-review/
I also did a follow-up story on the tool here: https://www.roadbikerider.com/follow-up-on-wolf-tooth-new-tool/
Thanks!
Jim
Bought a Park DAG-2 years ago. Paid for itself many times over. Super easy to use and does the job right.
In 1965 I bought a Schwinn Collegiate 5 speed bike with paper route money. It came with an arm that protected the derailleur in crashes or at that age (13) being reckless with the bike. It worked!
Yes, I remember well the derailleur protectors on Schwinn bicycles, Doug as I worked in a Schwinn cyclery way back when. Thanks for reminding me!
Jim
Jim;
Align at both 6 and 12 positions and also 3 and 9 o’clock positions. The hanger can bend it two planes and this is more accurate.
I find I need to go over these positions a couple of times to get the hanger properly hung.
Cheers
Thanks, Bryan. You’re right for badly bent hangers. I didn’t get into it because taking out the twist in the hangers is not so easy.
Thanks for the comment,
Jim
I bent a hanger enough to put a small crack it. The hanger straightened enough for the RD to shift properly, but it was just a matter of time before the hanger failed.
The hanger and bike were 10 years old. I used the following sites to find a replacement.
https://wheelsmfg.com/derailleur-hangers.html
https://www.paragonmachineworks.com/replaceable-parts/hangers-10-mm-skewer.html
I discovered that there are more than 350 different RD hangers. I narrowed it down to two hangers that differed slightly in length. I ended up emailing the frame builder to find out which was the right hanger for my frame. I should have done that from the start ?
Thanks for the tips, Johan,
Jim
I’m surprised you didn’t mention the Wolf – Pack Hanger Alignment Tool, a $20 tool that works great, and I had thought it was referenced in your newsletter last year. https://www.wolftoothcomponents.com/collections/tools/products/pack-hanger-alignment-tool
I did mention it, Rick.