Fixing a Difficult Replaceable Derailleur Hanger

Jim’s Tech Talk
By Jim Langley
When my friend texted for help with the balky shifting on his beautiful Pinarello Dogma, I had a pretty good idea what the problem was. He babys his road rockets, so I was sure it wouldn’t be worn or abused components.
I told him to bring his rig over to my home bike shop and with a little luck, I’d be able to fix it in about 10 minutes and get him back on the road. Boy, was I wrong. My supposed quick fix turned into a tricky repair that tested my skills and patience.
Replaceable Derailleur Hangers Are The Norm Now
I’m sharing how this job went down because it had to do with the Pinarello’s replaceable derailleur hanger. If you own an aluminum or carbon bicycle, it probably has one of these. It’s the little piece that hangs below the drive-side rear dropout. It’s the piece of the frame that the rear derailleur is threaded into.
You might not be able to see that it’s a separate piece without removing the rear wheel. Or, you might see the bolts holding it on simply by looking closely.
The reason most non-ferrous bicycles have replaceable derailleur hangers is because hangers can get bent or even broken simply from the bike falling over. If the hanger was built into the frame and it was badly bent or broken, it could mean having to replace the entire frame. So replaceable hangers are a very good thing.
Initial Diagnosis
On my buddy’s Pinarello I first put it in the repair stand, ran it through the gears and checked the cable tension, since when loose, they can cause shifting issues. If that had been the case, I would have simply turned the cable adjustment barrel to tighten the cable and he’d have been good to go.
That wasn’t the issue so I moved on to my second guess, which was a bent derailleur hanger. I know he carries his bike in the back of his station wagon and I’ve seen plenty of hangers bent this way. They’re only made of soft aluminum and the derailleur acts as a long lever that can bend hangers without excessive force. This is why cyclists should only lay down bikes on their non-drive side.
Seeing a Bent Hanger
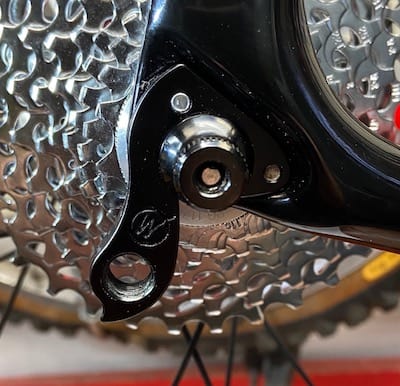
Sure enough, by standing behind the bike and looking, I could see that the hanger was bent. To do this, you look at the chain. Be sure the chain is on the small chainring and one of the cogs toward the middle of the cassette first. Looking from behind the bike, you’ll see that the chain forms a vertical line from the cassette down to the bottom derailleur pulley.
If the hanger is bent, the line that the chain forms will no longer be a straight vertical line. Instead it will start straight at the cassette but then bend inward toward the wheel. If you see this and also have shifting problems, your hanger is likely bent. (The photo is NOT the Pinarello, it’s of a straight hanger.)
Straightening Hangers
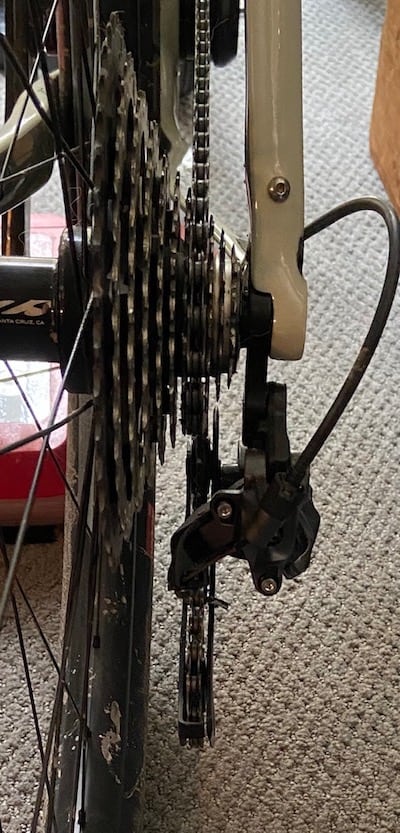
Most replaceable derailleur hangers are made of aluminum. Sometimes, it’s possible to straighten them easily. So, still confident I’d have my friend out the door in a jiffy, I picked up a long 5mm allen wrench and commenced an easy straightening procedure that can work nicely.
All I needed to do is put the allen in the derailleur attaching bolt. Once in place, the allen wrench can be used as a lever. You do want to make certain the allen is fully and firmly attached inside the derailleur bolt. Also, leave the rear wheel in the frame as it ensures that all bending force is applied to the hanger and none to the dropout itself.
You can then gently apply upward pressure and try to straighten the derailleur hanger. Easy does it, though. Bends are usually slight, so you probably won’t need to pull very far to get the hanger back where it was before – or close enough to it to restore the shifting.
No Such Luck
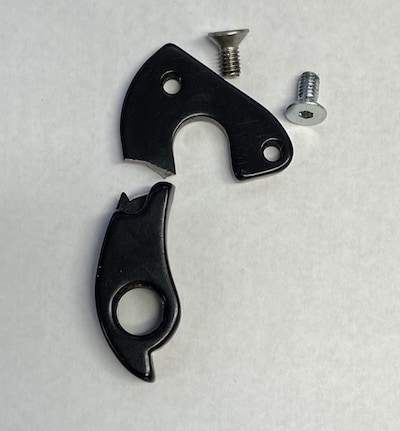
Or, if you’re unlucky like I was, instead of the hanger straightening, it might break. You can’t see it in my photo, but it was clear to my eyes that the Pinarello’s hanger broke because the aluminum it was made of was full of air pockets – some flaw in the forming process probably.
When it got bent, it withstood the impact and did not break. But, when I tried to force it back, it had become brittle from the first bend and failed right where the aluminum was weakened.
Getting the Right Replacement
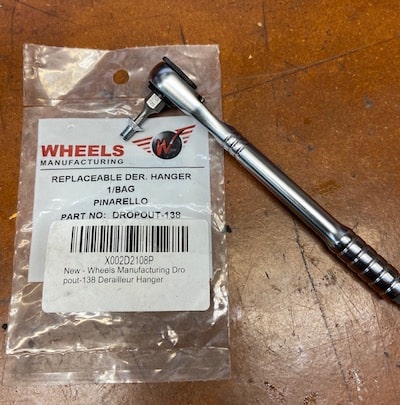
My go-to for replacement derailleur hangers is Wheels Manufacturing. Here’s their hanger page. Note that their hangers are sold on Amazon, too.
Their tools and search functions make it easy to find the right hanger. Be sure to read any and all fine print. I would have bought the wrong hanger save for Wheels’ fine print telling me that many people confuse two hangers for Pinarellos.
The only way to tell the difference is to measure the bolt hole spacing. Which I did and realized I needed the “other” Pinarello hanger. Thank you Wheels Manufacturing!
Removing and Replacing Hangers
Replaceable hangers are held on in many different ways but it should be obvious once the rear wheel is removed. All my non-ferrous road bikes have hangers bolted on with 2 tiny countersunk hex-drive flat-head metric screws. The Pinarello was the same with two 4mm screws.
Wheels Manufacturing hangers come with the screws that should work for the bike. The photo shows one of these small screws on the end of one of my favorite tools, Prestacycle’s Ratchet.
Notice I said “the screws should work.” That’s because until this Pinarello, Wheels’ screws have worked fine. But, I found on this Italian stallion, that one end of the hanger needed a longer screw. Which was strange because on the hanger that broke the screws were the same length.
Had I used the same length screws, though, one would have only been holding the hanger by 3 threads! When the wheel is in the dropout, that does the lion’s share of holding the hanger in place. But, there shouldn’t be any chance of the hanger loosening when taking the wheels on and off.
So, to fix the issue, I placed another order with Wheels Manufacturing for longer screws, which they also sell. I first looked for them on my favorite online hardware store McMaster-Carr but would have had to buy way more than I would ever use. Still, that’s an awesome resource for hardware should you need it for your bike projects.
Finally Fixed!
With one short and one long screw in hand I was finally able to install the new hanger. I put a trace of grease on the frame dropout where the hanger fits to prevent any possible noises. I also put a drop of temporary Loctite on the bolt threads so they’ll stay tight.
The final check was to sight from behind the bike to make sure the derailleur was now straight and to check the shifting. Everything looked and worked fine, so only a week later, my friend’s 10-minute repair was finished. While it took way too long, at least I can say with confidence that the hanger is now better than new!
Ride total: 9,583


A great article and very helpful advice. I would add two things – firstly every time you buy a new bike or frame buy a spare hangar at the same time. Then practise taking it on and off. I did this before the 2019 Paris Brest Paris – and broke my mech hangar at 450km but because I had a spare and the right size allen key with me I replaced and finished the 1200km ride.
I’m surprised you didn’t mention the tool used to straighten bent hangers.
Don, here is the right tool – https://www.parktool.com/product/derailleur-hanger-alignment-gauge-dag-2-2
A very good article which I’m sure well help a lot of your readers, and hopefully they booked marked that hanger site!
Once received an aluminum bike from a major on-line company. The hanger was attached from inside the drop-out. On the hanger, one of the screw holes was stripped. I could not find (at that time) a replacement.
I found the QR skewer could help hold the hanger in place. Also, a short piece or two of cable strands where the threads “are” also makes things a bit more secure.
Excellent overview of the process.
Suggestions:
1) Make sure to use a NON-Bondhus style Allen wrench as it will bottom out deeper in the derailleur securing bolt
2) Alternatively remove derailleur from frame; clean & inspect the hanger closely for presence of crack
Full stop if you see a crack; get hanger replaced.
3) Use an old style 10mm. threaded axle (which is the same thread form) as a lever as you suggest with the Allen key and bend the hanger until the axle views parallel to the rear wheel from all angles. (This is a home grown version of the Wolf Products hanger alignment tool)
You can make a cheap, light, emergency hanger straightening tool from a hollow rear wheel axle and some tape. Make sure the threaded end of the hollow axle are the same thread pitch as your hanger (where the derailleur screws into the hanger). Remove the derailleur from the hanger, thread the axle into the hole as far as possible and you now have a nice little “handle” to gently bend the hanger straight again. As mentioned in the article, have a spare hanger in case this trick doesn’t work!
Hanger alignment is part of my preventive maintenance program. I check it on each of my bikes annually. Given time, normal use will cause the hangers to become unaligned. Especially if they are aluminum, but even if they are metal, Nuts to the Allen wrench method. The Park Tool DAG-2 is what you want. Not only will it quickly determine what is needed for alignment. It will also be used as a very specific and accurate alignment tool. Accurate derailleur alignment is essential to that snappy, right now shifting that I’ve learned to expect and love!
Dave, if you have some dough and want an even better tool, check out the Abbey Tools hanger alignment tool!
another crude tool is just a crescent wrench or vise grips.
This is the perfect “bicycle” example of the old saw that “no home project is complete without at least three trips to the hardware store.”
Ha, ha, thanks for the laugh, Kerry – you are exactly right!
Jim
Thanks for the great tips and feedback everyone. I’ll do a follow-up piece next week looking more at hanger fixes and tools and sharing your helpful tips. Appreciate it!
Jim Langley
The Pinarello experience is what I call a “just” job. Buddy comes over and says you “just” have to do this!
Abbey Tools HAG gauge is light years ahead of the Park! I have both. Park is relegated to the travel bag now.
I’m sure I found an old article on what to do with a hanger that is part of the frame?? I can’t find it anymore, so any tips on what to do if you break a non replaceable hanger??
Thanks for the hanger link!!
A “just job” is a good name for it, Bryan – kind of like JRA as in I was just riding along when…
I don’t remember writing an article about fixing a broken hanger that’s not replaceable. In steel frames we would send it to a framebuilder to put in a new dropout back at the shops. With glued together aluminum and carbon frames, it might be possible to glue in a new dropout. So, I would contact the company that made the bike and ask them. I imagine any carbon bike could be fixed by one of the carbon repair companies. They would install a new dropout I believe.
Hope this helps,
Jim
I may be far out of line here, but, if the derailleur hanger was bent, and its two locating screws WERE the same length on the Pinarello originally, and the new set that came with the new hanger were the same length as the original Pinarello’s, and would no longer reach the rear most anchoring position with adequate thread “bite”, there has to be one of two issues. First, the replacement hanger must have a slope or ramp in the casting, thickening to the rear set; or, your friend managed to also tweak the rear most part of the Pinarello’s replacement-hanger mounting plate, no?
You’re not out of line at all, Bruce. My theory is that the original was made wrong and that’s one of the reasons it bent and broke. As best I could tell with my caliper the difference in the lengths of the screws has to do with a difference in the countersink for the screws. On the Wheel’s hanger one is deeper than the other.
The good news is that the new hanger is nice and straight. So they at least got the most important part right!
Appreciate your comment,
Jim
Jim;
I didn’t mean to infer that you wrote an article on broken hangers.
I’m sure I read something about a company making a fix or temporary fix for a broken hanger.
I can’t find the article any more, just thought you might have seen something regarding this.
Cheers
Wheels Mfg makes an emergency universal hanger for about $20; Origin8 has one for about $11.
Thanks Hogan, I’m pretty sure that’s what I saw.
Cheers
Thanks Hogan!
Best,
Jim
Found a great universal emergency hanger that will work with braze on drop out hangers…..
https://derailleurhanger.com/product/derailleur-hanger-199/
Along with an instructional video……
https://youtu.be/67nTBGDiAFo
Cheers