Dealing with a “Loose” Wheel, Part 3

Last week in Part 2 of this series, we covered the basic tools and setup for working on a wheel on which the spokes have lost their tension. This week, we’ll finally commence retensioning and truing the wheel. Let’s get going!
Tightening the spokes
Luckily, when wheels lose spoke tension uniformly, the wheels usually stay relatively round and true. So, while the spokes need tightening, you shouldn’t have to worry about fixing major imperfections in the wheel’s trueness. Instead, your focus will be on tightening the spokes. As long as you tighten them uniformly, the wheel will remain relatively round and true.
Tips: It can be a little scary for a newbie to start learning truing – especially on a wheel you need to ride on. If that’s you, another way to learn truing and develop your skills is on another wheel, like an inexpensive used one bought at a flea market, etc. Be sure it fits into your frame if you’re truing the wheel in your bike.
The way to uniformly retension wheels is to start at the valve hole on the wheel and turn each nipple a half a turn all the way around the wheel. Note that for rear wheels, you tighten the drive side nipples more than the non-drive side. So, for rears, tighten the drive-side nipples 1/2 turn and the non-drive side ones 1/4 turn.
Depending on how loose your spokes have gotten, you may have to go around the wheel like this tightening every spoke another 1/2 or 1/4 turn several times or more to get the spoke tension back to where you’ve got a reliable wheel that won’t loosen while riding.
Keeping the wheel round and true as you tension
As you bring up the spoke tension, keep checking how true and round the wheel is. Inevitably, with so many turns of the nipples, you will end up with a wobble or hop in the wheel.
Tip: Don’t worry that you’re ruining the wheel. As long as you make small turns of the nipples, you are gradually increasing the wheel’s tension and improving, not harming, it.
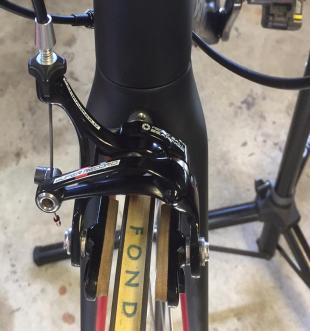
Each time you’ve gone around the wheel tightening all the nipples, stop and check the wheels for trueness. Spin the wheel and watch for any wobbles (side-to-side movement) and hops (high spots) as it passes the brake pad (and your thumb) on your in-frame truing setup, or as it passes the indicators on your truing stand. (To true a wheel in your bike, just put the bike in your repair stand, as in the photo.) Look closely while truing and you’ll be able to see those wobbles and hops.
Because your wheel’s spokes were too loose to begin with, you only need to tighten the correct nipples to fix these minor imperfections. The tricky part – especially if you’re new to truing – is ensuring you can identify the right nipples.
Be sure to turn the correct nipples the correct direction
The biggest mistakes that get novice wheel truers in trouble and make wheel truing more challenging is turning the nipples the wrong way (resulting in loosening when tightening was intended or vice versa) and adjusting a nipple on the wrong side of the wheel.
To avoid these mistakes, I recommend always rotating the nipple you want to tighten so that it’s at the top of the wheel (12 o’clock). In this position, when looking from above, clockwise turns tighten the nipple and increase tension on the spoke. And, before tightening any nipple, look at the spoke it’s on and make sure the spoke is on the side of the wheel that you meant to tighten (rules follow).
Tip: If you turn the wrong nipple the wrong way, you don’t ruin the wheel. You just end up having to spend a little more time truing and tensioning.
Rules for removing wobbles and hops
For wobbles to the right (where the rim gets closer to the right brake pad or truing stand indicator), tighten the spokes on the left side at the spot of the wobble. For wobbles to the left, tighten the spokes on the right.
Easy does it! Never turn a nipple multiple turns. Instead, turn no more than a half turn and then spin the wheel and check how it changed. Be patient and take your time and learn from each nipple turn and it won’t take you long to learn wheel truing.
To fix out-of-round issues, don’t worry about the dips (low spots). Instead concentrate on the high spots and bring them back down to the roundness of the rest of the rim by tightening the spokes at the high spot. It takes trial and error and time to get wheels true and round (for pro wheelsmiths, too!), but it’s a logical process, and it’s very satisfying when you fix a wobble or hop and finally end up with a nice round wheel.
Tip: A trick that can help you keep track of your truing adjustments is to locate the wobbles or hops you need to fix and mark them on the wheel with colored tape. That way you know the exact parts of the wheel where you need to tighten the spokes. You can also mark the spokes you’re tightening with tape so that you can find them again easily and tighten them more until the wobble/hop is taken care of.
How tight is right
The hardest part of retensioning a wheel is knowing if you’ve got it tight enough. If so, the wheel will remain tight and true for a long time, possibly for the rest of its life. If not, the wheel will likely lose tension again in the not too distant future. But this time, you’ll have the experience to tighten it a little more and that may do the trick.
A sign that a wheel is reaching optimum tension is that the nipples become a lot harder to turn. You won’t feel it as much on the left side rear wheel nipples because those have the least tension. But on all front wheel nipples and right side rears, you will feel it.
If the other wheel on your bike is similar to the one that loosened – or better yet, the same brand and model – a good way to check your final spoke tension is comparing your wheel to it (or you could compare to a friend’s wheel that’s like yours).
You can feel the tension by squeezing the spokes on both wheels. Another way to check is by plucking the spokes on the two wheels and listening to the tone they make. You’ll be able to feel and/or hear if you got your wheel tight or need to add more rounds of tension.
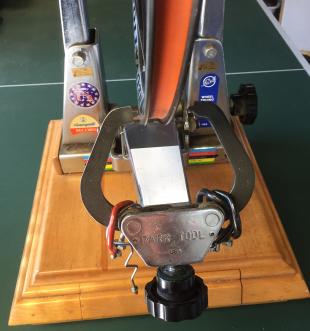
Or, if you find you enjoy wheel work, consider purchasing and using a spoke tension meter, like Park Tool’s Tension Meter (about $76). These tools allow measuring the tension of each spoke and converting the measurement into kilograms of force. A good rule of thumb for most road wheels is to reach at least 90 kgf and not exceed 110 (but remember that left side rear-wheel spokes will always be much lower tension).
A tension meter makes it easy to learn what proper tension feels like and also lets you check wheels and catch ones that are loosening so that you can tighten them up before they become problematic.
In an upcoming Tech Talk, I’ll review two pro-level wheel truing tools that make truing and tensioning much, much easier to learn. While you might not build enough wheels to justify their cost, I think you’ll appreciate seeing the tools that produce some of the best wheels you can buy today.

it can also be loose cones (wheel bearings) as i said last week..
the wheel will flop easily from side to side without necessarily causing the wheel itself or spokes to flex, as the force required to flop the wheel is not very much..
wle
Thanks “wle.” Loose hub bearings or loose cones in a wheel is a different problem than a wheel with loose spokes and it’s a different feeling to the rider. too. A loose-spoke wheel feels soft, vague even unstable. Loose hub bearings need to be pretty loose for most riders to feel anything at all. And, when the bearings get loose enough to feel it, what you usually feel is a clunk or rattle – and sometimes only when moving the bike, not usually when riding it. Now, if you were to let a loose hub get super loose and the cones loosened so far that the bearing fell out – something drastic like that – then yes, you are right that loose bearings can make the wheel very loose – but it’s still a different looseness than spoke detensioning. Hope that helps explain.
Jim Langley is right about the difference in feel between loose spokes versus loose bearings.
I suggest that a spoke tension gauge is a luxury tool. I’ve been building wheels for over 20 years as a home bike mechanic without one. I find plucked tone is a pretty accurate gauge of spoke tension, especially when there is a known good wheel for comparison. There’s even an app that uses tone to determine tension. Not all that accurate, but a decent approximation that could be especially useful for those that are “tone deaf”.