
By Stan Purdum
Ebikes are a booming growth field in the bicycling industry, and many companies, including both established bike brands and new startups, are now churning out an impressive array of these electric two-wheelers, some as low priced as $500, with some quite good ones starting around $1,500.
But the commonly available ebikes in that price range generally do not include road bikes, which typically cost $5,000 or more in the e-version. But even some of the most dedicated road bike riders reach a point where, for any number of reasons, they may want to consider an ebike.
Looking for options other than buying a new bike, some riders have purchased a wheel — either front or rear — with a motor in the hub and converted a road bike they already own. Most of these conversions work pretty well.
But suppose you want to convert an existing road bike using a mid-drive motor — one that assists you in turning the cranks and transferring the power to the rear wheel by means of the chain. Advocates of mid-drive motors say that they provide higher performance and torque than hub-drive motors, offer a lower center of gravity on the bike and work more synergistically with the bike’s gears. The latter means the mid-drive motor is more efficient, making a longer mileage range possible. What’s more, with a mid-drive, changing a flat tire is no more difficult than on any non-electric bike, whereas it’s more of a project with a wheel that has a hub motor, and can range from complicated to impossible to do on the road.
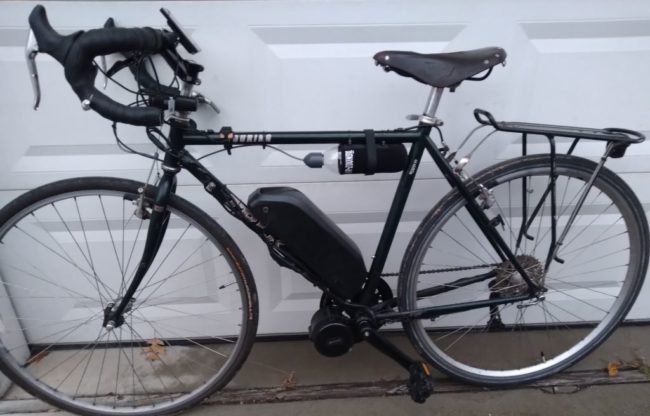
So this is my account of installing a mid-drive motor on my 1995 Trek 520 touring bike. Though the 520 has some age and plenty of miles on it, it’s been maintained and is in decent condition. What’s more, I like the steady and stable ride it provides. It’s a chromoly steel steed, making it a good candidate. People experienced with mid-drive installations say both steel and aluminum frames are generally okay for such conversions, but carbon-fiber frames need to be individually evaluated. See “Carbon Fiber bikes and Bafang mid drive conversion.”
There are mid-drive kits available, and I choose a 750-watt motor from the Chinese motor maker Bafang (model BBS02) along with the kit and a 48V 14.5Ah battery, all sold in the United States by Ebike Essentials. Actually, I would have purchased a more powerful battery, but with the current worldwide supply chain problems, the one I wanted was not available, and the company wasn’t taking back orders. Nonetheless, the battery I got performs well and offers a range of up-to-93 miles per charge.
I got all of that, including shipping, for under $1,150. And I was helped in deciding what to order by my friend Don, from the “ebike underground.” That’s not an organization. It’s my collective term for people who are not part of the ebike industry, but who have figured out how make these conversions work as they should and have shared that knowledge in YouTube videos, discussion boards, blogs and other websites, and in some cases, directly from person to person with hands-on assistance. “Directly from person to person” describes Don, and his advice and guidance proved valuable throughout the installation process. Before helping me with my bike, Don had completed successful conversions of three tandem road bikes, including his own.
Other undergrounders were to help me later.
The package from Ebike Essentials arrived in a few days, but in checking the parts over, I noticed that they had sent me the wrong display and the wrong charger. When I contacted the company, they immediately sent out the correct items and included a postage paid label for me to mail back the incorrect ones.
Since the drive shaft of the motor has to be installed in the bottom bracket, replacing the crank axle, I first removed the entire crank and chainrings assembly from the 520, including the front derailleur and the bottom bracket cartridge. (The kit contains a new chainring and crank arms, made to work with the motor.)
Ebike Essentials has a helpful video on its site showing the steps of the installation.
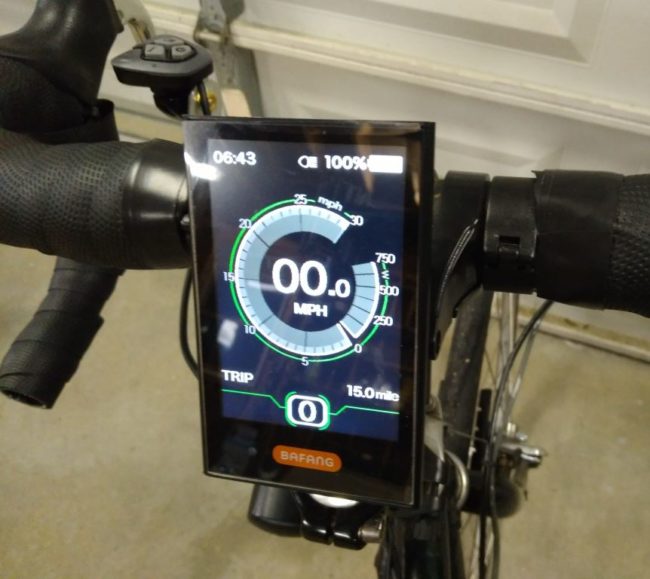
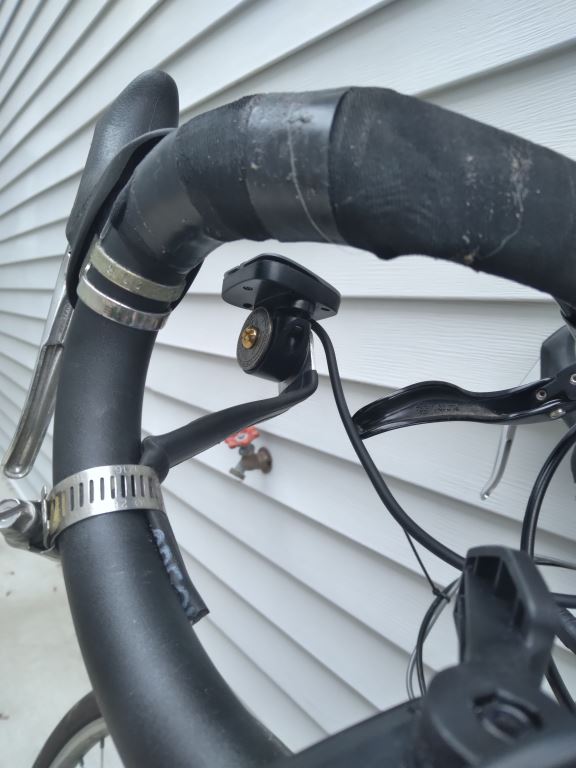
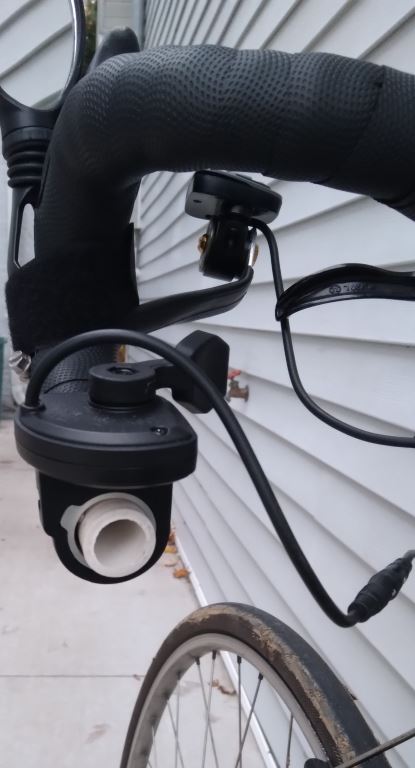
When it came to the actual installation, Don recommended adding some waterproofing to the point on the motor where the wires come out. He dabbed on a product called “Liquid Electrical Tape,” and we let that dry overnight. The first problem in doing a road bike conversion is that the kits are intended for use on bikes with flat handlebars. My 520 has drop bars, which I like and had no wish to change. But using the drop bars required some ingenuity. For one thing, the mounting bracket on both the control unit and the throttle are a fixed size, set to match the diameter of typical flat bars. My drop bars were larger and thus neither of those devices would have mounted on them even if there were an available location. Fortunately, the display fit on my bars fine, with its two brackets straddling the stem.
From his previous experience electrifying his own bike, Don had a solution for the control unit mounting: From a piece of scrap aluminum and a short section of flat-bar-sized tubing, Don fashioned an arm that he attached to the down-curve of my handlebar, below the brake lever, using a radiator clamp (shown in the photo before I wrapped the handlebars with new tape). The “sleeve” on the arm is a length of inner tube.
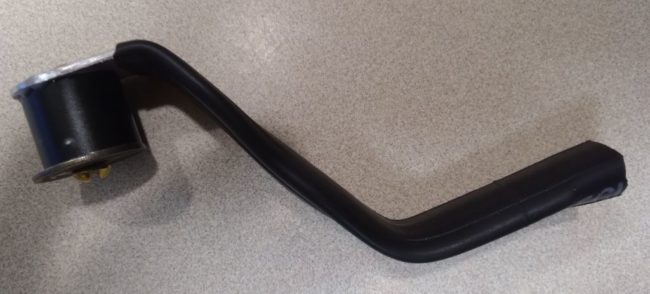
I didn’t intend to use the throttle, and didn’t install it initially, but later I needed to set it up temporarily to diagnose a problem with the assist levels of the motor (more on that in a moment), so I used a piece of plastic plumbing pipe in the correct diameter. I tapered one end using a sander, until it slipped into the left end of my handlebar. I secured it into the bar end with a thick adhesive, and mounted the throttle to that. It was as easy to use the throttle in that location as was the bar-end shifter that had been there before I removed the front derailleur.
The other issue with using the kit on drop bar bikes is that the kit’s brake levers are for flat-bar bikes and don’t fit my setup. They have wires that connect to the motor to stop it when the brakes are applied. Don advised me that I didn’t need to stop the brakes electrically as long as I simply stopped pedaling when braking with my existing road-bike levers. The electric braking could be more important if I were keeping the throttle, since there is a small possibility that it could stick in the “on” position. But since I wasn’t intending to use the throttle, I could simply not use the kit’s brake levers. See here for more on the matter of ebrakes on ebikes.
When the assembly was complete, both Don and I test rode the bike, and it seemed to us that no electric assist could be felt or discerned in PAS (Pedal Assist System) levels 1 and 2 (out of nine assist levels total). From 3-9, the assist was ample, evident and increased with each successive level.
I contacted the support team at Ebike Essentials — they deal only by email, but they responded within a few hours. They requested that I install the throttle, even if only temporarily, to determine if the motor was driving the chain in levels 1 and 2. To make the test, I set the bike up in a trainer, hooked up the throttle and ran it in both levels. The throttle caused motor to move the chain, turning the back wheel in both settings, without turning the pedals (which is what it is supposed to do). That convinced the support team that the motor was operating properly.
One support tech wrote “PAS levels 1 and 2 on our most current & up to date motors have been detuned so that the motor would not be as fast in lower PAS levels and so our customers would have more incremental power resolution as PAS levels are increased from 0 through 9.”
I was unpersuaded, however, and wrote back, asking, “Did your ‘detuning’ of the motor go too low? If technically the motor is assisting at levels 1 and 2 but I as the rider feel no assist, then in reality, there is no effective assist at those levels.”
The reply came from a different tech, who contradicted the first one and said, “Our motors are not detuned and are programmed to operate at full power.” He also said, “Believe it or not, you are the only and first customer to ever have this critique as our customers seem to enjoy having access to more incremental levels of power.”
He did go on to say, however, that if I sent the motor back at my expense, they would reprogram it so that levels 1-3 all ran at 40% power. That made no sense to me. What was the value of having three settings that performed exactly the same?
And I’d already been looking around the internet and found several YouTube videos from Bafang motor purchasers who weren’t satisfied with the PAS settings (so I may have been the “only and first customer” to complain about the settings to the Ebike Essentials team, but I wasn’t the only and first to be dissatisfied with the settings.)
The people making these videos were part of the ebike underground, showing how they hacked the motor settings themselves and got things operating as they wished. Here’s a good video on YouTube. As I continued to search, I found where undergrounders had recommended what was needed to do the job oneself. So I thanked the Ebike Essential team for their offer and moved on.
The first thing needed to reprogram the motor is ebike conversion software, available as a free download from Penoff’s Hobby Page. Apparently, at some previous time, there was a configuration app from Bafang, which was laden with bugs and didn’t work very well. But Stefan Penov (his name is spelled differently from the page title) started with that and made it better, and then released it as an open-source app.
On his hobby page, Penov says, “Basically I took the original software which also included all required source files and made it look better, fixed many bugs, improved its operation and added a small help file. Now you don’t need administrative rights under windows 8 and 10 to be able to see the available COM ports. The interface looks more tidy and well aligned and also uses better English. Numerous bugs were fixed, regarding error messages and error checking, communication, parameter limits and so on. I found this program as an open source (including all source files). I am providing it the same way.”
Armed with Penov’s app, I then ordered a programming cable that connects the USB on one’s computer to the BBS02 controller cable. I found this on Amazon, where there are several on offer. (Search on “bafang motor programming cable.”) Look for one that includes the driver. I didn’t think of that and then had to search the web for the driver separately. I found the driver free here.
The step-by-step help file that Penov included with his app guided me in looking at every setting.
I also found some good advice here, including info about a setting when not using the ebrakes.
As the motor came from Ebike Essentials, every PAS level, 1 through 9, supposedly provides 10% more motor power from the previous PAS level, as follows, though I can’t verify that levels 1 and 2 were actually performing as marked:
PAS 0 – 0 % Speed & Current
PAS 1 – 20 % Speed & Current
PAS 2 – 30 % Speed & Current
PAS 3 – 40 % Speed & Current
PAS 4 – 50 % Speed & Current
PAS 5 – 60 % Speed & Current
PAS 6 – 70 % Speed & Current
PAS 7 – 80 % Speed & Current
PAS 8 – 90 % Speed & Current
PAS 9 – 100 % Speed & Current
In any case, once in the app, I tried a few different changes, and I found that it didn’t require major increases to feel the assist in levels 1 and 2 — just a few percentage points in both speed and current, but it was enough to make each assist level useful.
So far, the only other thing I reprogrammed via the app was the wheel size, which had a default of 26 inches. With the 520 being a road bike, I reset it for 700c, which was an option on the pulldown list.
I’m by no means an expert in all of this, but the help from Don and others from the ebike underground, plus a computer-savvy cycling friend, enabled me to complete the conversion so that I’m on the road again on my surefooted Trek 520 — or maybe I should say E520 — and loving it.
I’m not happy with that the handlebar connections look homemade and inelegant (though they work fine), but I’m hoping that as the ebike world continues to grow, better options for adapting to drop bars will become available.
It’s not the only road bike I own, just the only e-road-bike. I expect to still be riding the others for some time to come. But there are some monster hills in my area where a bit of e-push will be welcome as I age.
Stan Purdum has ridden several long-distance bike trips, including an across-America ride recounted in his book Roll Around Heaven All Day, and a trek on U.S. 62, from Niagara Falls, New York, to El Paso, Texas, the subject of his book Playing in Traffic. Stan, a freelance writer and editor, lives in Ohio. See more at www.StanPurdum.com.
I converted my titanium frame road bike with a bafang mid-drive motor. All levels of assist work as expected. No “reprograming” necessary. For a solution to the cockpit clutter, I installed a bar on the front stem (about $12.00). I found it on Amazon. It provides enough length for the display, throttle, and PAS controller. This leaves the handlebars for what you normally put on them.
Thanks for the good info. Glad your install went smoothly.
Arthur,
Did you use the brake levers?
I did not add the brake sensors
Guday from Aus. Gone down the ebike track. I’m 78 and getting left behind by the group i ride with so with this machine i should be able to keep up. Was going to convert my custom build scandium frame bike but on advise from my LBM had to get another bike as my frame was to lightly built to handle the stresses of conversion. and my wheels were not strong enough either. Bother.
Picked it up a couple of days ago so haven’t had a chance to ride it yet. The bike is a Merlin double butted alloy framed gravel bike. I have installed a 350w TongSheng TDSZ2. The reason I decided to go this way was that this setup commences assisting the moment pedaling commences.
There are groups who assist in tweaking the software if and when necessary but I will wait to check out the stock system, before I go down that track. So we shall see what we shall see:-)))
Well been riding riding my ebike conversion for four months now with about 1300km. Absolutely loving it. Something I didn’t mention in my last post was that I chose to use the 350w Tongsheng mid drive unit. Gave the supplier what I was doing on my rides and he set the program up prior to sending the unit top me. Very satisfied with what has been done. On windy days I tend to be in the front leading the peleton and providing the windbreak for the rest of the riders. No longer am I a long way back and have no problems climbing.
I tend to ride in the lowest poer setting most of the time then use the higher levels when needed on a climb. So far have not used the top level of power. I use the power settings as if they were a front derailleur.
Hi, John here from Aus. I also have a Trek 520 that I want to convert using a Bafang kit. A couple of questions:
– Did you get a 750 W system because you feel that much power is needed because tourers normally carry a lot of weight when touring. That seems like a lot of power, I had thought a 500 W mid drive would be enough?
– Trek 520s come with V brake systems, Did you change wheels to disk brakes?
– Since you installed those work-arounds for control unit and throttle, have you found a more elegant solution?
Thanks in advance
John
John,
I purchased the 750 W system because it is the smallest Bafang offers. I knew in advance that it would be overkill, but friends who have converted their bikes told me it would work fine. I’m not using the 520 now for touring, but it would easily handle that task with the 750 system.
My 520 has traditional cantilever brakes. I did not change them. They work fine with the ebike setup.
I have not found a more elegant solution for the control workaround, but the longer I have used it, the more satisfied I am with it. The have removed the throttle altogether because I don’t want that crutch.
Best wishes with your conversion
Stan
Thanks Stan. Sorry, don’t understand when you say 750W is the smallest Bafang offers because they have 250W and 500W systems and I had thought the 500W, 48V system would be suitable.
John
John,
Are you talking mid-drive motors? I think Bafang has smaller watt systems in hub drive motors, But I wanted mid-drive, and I see only 750 W and 1000 W systems for that from Bafang..
Stan
Since writing the reply above, it occurs to me that since you are in Australia, you are probably looking at a different seller of Bafang motors. Here in the USA, I have gotten my Bafang motor from Ebike Essentials, and the 1000 W and the 750 W are the only two sizes they offer in mid-drive motors.
OK thanks, yes it appears to be different here, there are 250, 350, 500, 750 and 1000 Watt mid-drive systems.
Thanks for your help
John
I enjoyed the article as I am converting a Dawes Super Galaxy touring bike with drop bars using a Yose Power rear wheel 250W kit.
The hiccups I have dealt with so far:
Hollowtech bottom bracket – used an alternative PAS sensor and magnet ring on the right side rather than the kit’s left side sensor. Luckily, I already had a tool to remove the bottom bracket.
Display and throttle mounting – as Arthur B, I have added a short bar of the right diameter in front of the dropped bars – no effect on connecting cables!
Cable management – rather than zip ties, I made maximum use of various size electrical P clips bolted to the available frame mounts – very neat with up to 3 clips per mount!
Water bottle mount positions – bottom one too low to fit battery, I used a rivnut in a drilled hole (with added epoxy because of the small radius of the top of the pear shaped downtube). A no drill alternative: to this would be a water bottle mount position adjuster..
Battery support. – I plan to add a third fixing point using a rivnut higher up the downtube and also ‘bent’ 40 x 40 angle brackets fixed to rivnut mounting positions on the sides of the downtube to avoid sideways rocking of the ‘huge,’ wide battery!
Rear brake sensor – I plan to use an alternative rear brake sensor fixed to top tube, with a magnet glued to a bent electrical terminal crimped onto the exposed rear brake wire.
Front brake sensor – sensor will be glued to a short upstand metal L upstand fixed to a metal front light bracket bolted to the top of the forks, with the magnet fixed to the brake cable as for the rear brake sensor.
Alernative brake sensors – consider In-line brake sensors (two types depending on orientation) as a neater option but these require the brake wires to be threaded through them, which may lead to needing new wires if the existing are frayed.
Hiccup yet to be sorted:
The level of assistance power seems minimal and not affected by the throttle or the PAS setting. I think it is the setup settings that are incorrect (possibly due to the PAS sensor being mounted on the right side rather than the left). I have emailed Yose Power and await enlightenment.
I hope the notes above are useful and would be happy for any thought on the power issue.
Right side pas sensor doesn’t work. I tried and it wouldn’t respond. Went back to left side and it was fine.
Glad you found a solution.