
By Arnie Baker
Bicycle accidents and injuries are a source of concern for all of us. Most accidents are preventable. Five main topics govern safety. Most can be attended to and most risks minimized.
- Keep bicycle equipment safe—well maintained in mechanically sound working order.
- Acquire the riding skills and techniques to operate a bicycle safely.
- Know how bicycle–car accidents commonly occur.
- Ride in a safe and defensive manner.
- Use specialized safety equipment.
What Causes Bicycle Accidents?
Most people, when asked: “What is the number one safety issue for bicyclists?” say that they are most concerned about dangerous, unpredictable cars. Perhaps that is because an unpredictable motorist is an area of vulnerability over which most cyclists have little control. Perhaps it is because bicycle–car accidents have the potential to be the most serious. For many of us, cars are our biggest cycling fear.
But bicycle–car collisions account for only 10-20% of accidents. Falls account for about 50% of accidents, bicycle–bicycle collisions 10-20%. Bike–dog and other causes split the remainder.
Making Your Bicycle Equipment Safe
Just like cars get tune-ups and oil changes, have a bicycle mechanic check out your bike at least every six months for safety and performance. The proper fit, installation, reliability and maintenance of equipment are essential for rider safety and performance. Equipment must be clean, adjusted and lubricated. Lightweight or aerodynamic equipment should not be used when safety is the penalty. All riders should familiarize themselves with basic maintenance. No matter who works on your bike, you must check it and be confident of its safety.
The basic principles of bicycle equipment safety are that the wheels and other parts should be tightly fastened to the frame, that the wheels should be sound, that the brakes and gears work, and that the drive train moves freely.
Frame:
The frame must be straight or aligned. It must have no cracks.
Wheels :
The wheels should be true, with no loose spokes. If bolts fasten the wheels to the frame, they must be tight. Quick-release skewers are adjusted with a nut on the end opposite the lever; but they are levered closed, not screwed. When fastened to the frame, the wheels should turn freely, without play. If using through-axles, they should be screwed in all the way, using the correct torque settings.
Tires:
Tires should be properly inflated. Replace the tire if casing or sidewall cuts are present. Check for hidden glass in the tread. There should be no bulges or tire cords showing. Tires get old and cracked with time, even when not ridden.
Headset:
Must be adjusted so that it is free to move without play. It must not be pitted, with “click steering.”
Bottom Bracket:
Should be adjusted to move freely without play.
Crank Set:
Crank bolts must be tight.
Brakes:
The brake levers must be secure and immovable with moderate side pressure. The levers should not depress as far as the handlebar and should return freely when released. Rim brake pads must be adjusted correctly, simultaneously hitting the rim surfaces, not the tires. Disc brakes should be adjusted correctly. The brake pads need replacing when worn beyond their wear lines.
Cables:
The cables should not be frayed or torn, and their housing not kinked. Broken cable strands mean the whole cable must be replaced. If using hydraulic brakes, check ca
Seatpost:
The post must be aligned and the seatpost bolt must be tight, but no tighter than the recommended torque settings for your bicycle.
Saddle:
The seat must be aligned straight ahead, and the seat bolts tight, to the proper torque settings.
Drive Train:
All gears must be working.
The chain must not derail from either the chainrings or the rear sprockets. Test on up hill grades or with pressure to assure cog/chain compatibility.
Derailleurs must be fastened securely to the frame and be adjusted so as not to shift into spokes or into the chain stay.
There should be no stiff links in the chain.
Handlebars:
These should be securely fastened. Full body weight on the hoods, or aerobars if used, should not result in any slippage. Handlebar plugs should be present.
Stem:
Fastened securely.
Pedals:
These must be fastened securely to the cranks. They should rotate freely. Clipless pedals need slight lubrication. Check that the shoe engages and disengages as desired. Adjust pedal tension if needed.
Water Bottle Cages:
Securely fastened. No cracks in welds or bends.
Accessories:
Securely fastened. No cracks in welds or bends.
Shoes:
Cleats securely fastened and not overly worn. Velcro, laces, or other closures strong and functioning well.
Essential Riding Skills for Cycling Safety
Riding in a Straight Line
This is an important and basic skill. Although many racers think they can perform this skill easily, most are surprised at the skill required to ride the black (inside) line of a velodrome at 30 miles per hour.
Riding “Aero-Bars”
Riding aero-bars—forearm-supported bars, especially with crosswinds, requires special skills and relearning how to ride straight for many riders.
- Relax the body, especially your arms, bending at the elbow. Freezing up and overreacting causes most problems.
- Look ahead, at where you want to go; not right down at the road, at potholes, or other places you wish to avoid.
- Control is a matter of learning the response that leaning your body, your bike, or steering makes.
- Steer forearm-supported with the body, not with the hands.
- In an area without traffic, ride in S-curves, purposefully weaving back and forth around a real or imagined line. This helps one learn the effects of lean and steering, making it easier to ride straight.
Looking Back While Riding
Looking back is important when riding in traffic to check on cars and when racing to check on other racers. Beginning riders may have difficulty riding in a straight line, maintaining pace and looking back at the same time.
Looking Over the Shoulder
Beginners tend to veer to the left when they look over their left shoulder. When looking back over the shoulder, the tendency is to redistribute weight to the turned side or turn the upper body and consequently the handlebars.
- When looking over the left shoulder relax the handlebar grip with the left arm, or drop the left shoulder.
- Sliding your rear end slightly to the right side helps keep the weight centered over the bicycle.
- Riding with another partner one or two bike lengths behind and slightly to the left gives a focus target.
- At first, just glance back.
- Build up to looking back for several seconds.
- Repeat looking back over the right shoulder.
- Maintain speed.
- The following rider can give feedback about maintaining a straight line and speed.
Looking Back Holding On
This is not only a drill for looking back; it is a riding straight and proximity drill.
- Practice looking back using a hand placed on a rider beside you. This helps riding in a straight line.
Looking Under the Arm
Looking back under the shoulder when riding allows a rider to maintain an aerodynamic position riding in the drops.
- Practice looking under a shoulder alone or with a partner behind to provide a focus target.
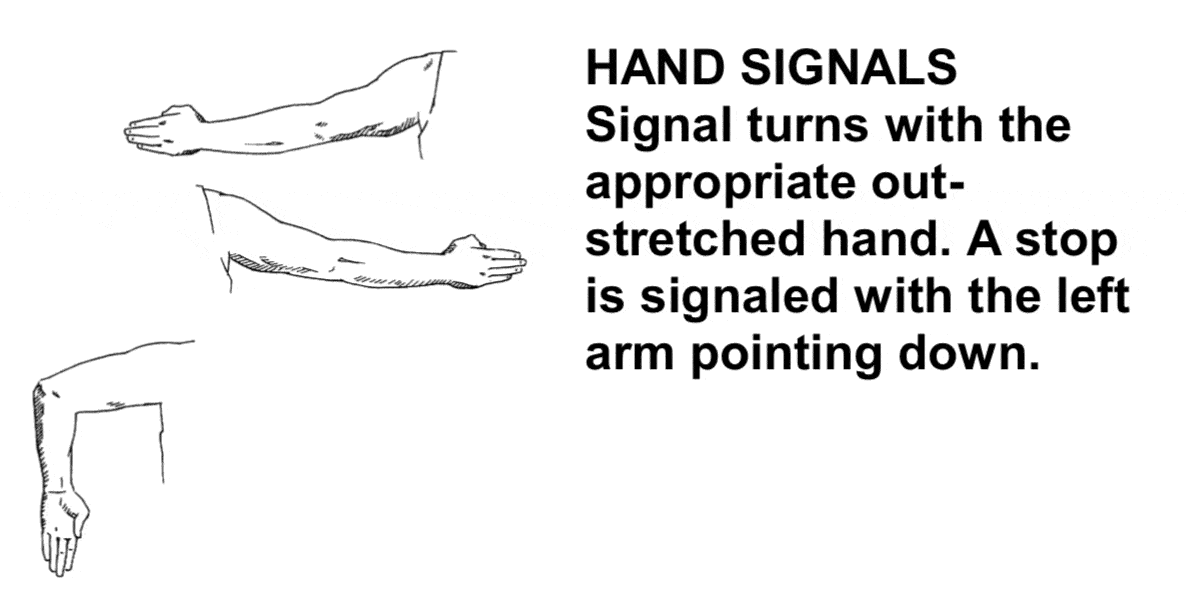
Signaling to Motorists
Signal a left turn with an outstretched left arm. Signal a right turn with an outstretched right arm. A stop can be signaled with a palm backward downward left arm, although it is often safer to have both hands on the handlebar when stopping.
Braking
The front brake has more stopping power than the rear. But the rear contributes to slowing the bike and should be used.
Position helps maintain control, especially in emergency situations such as when a car pulls out in front of you. Slide back in the saddle to weight the rear wheel. The cranks should be horizontal, or the lead foot slightly up. The hands should be in the drops and the arms braced.
Both brakes should be applied at the same time. In emergency braking you brake harder with the front brake, you continue to brake as usual with the rear. Learn the consequences of overbraking with either brake. When the rear wheel skids, for example, it can be because it is locked up and you need to let up on the rear brake. But normally the rear wheel skids because there is too much weight being transferred forward—the rear wheel is being unweighted—and you need to let up on the front brake.
Dogs
- Do not take your feet out of the pedals. This gives dogs an attractive target.
- Not pedaling may lessen the legs as a target. Alternatively, sprinting may remove you as a target!
- Riding in a straight line usually works best. This is especially important when traffic is present.
- Barking and biting dogs are usually territorial. They will leave you alone as soon as you are past their owners’ property line.
- Many of the most vicious dogs are trained. A firm, sharp command like “Sit!” may get them to do just that.
Obstacles
Avoiding obstacles by riding safely around them is your preferred course of action.
Small obstacles can be ridden over. With your cranks horizontal, hands in the drops if you have them, unweight your rear end off the saddle. Much less force will be transmitted to damage the bicycle or jar you.
Try to avoid ridges and slots that are aligned with your direction of travel. If you can’t avoid them, try to ride perpendicularly across them as traffic allows.
Crossing railroad tracks
Tracks perpendicular to the roadway can often be safely crossed. If traffic allows, try to cross diagonal tracks by riding perpendicularly across them.
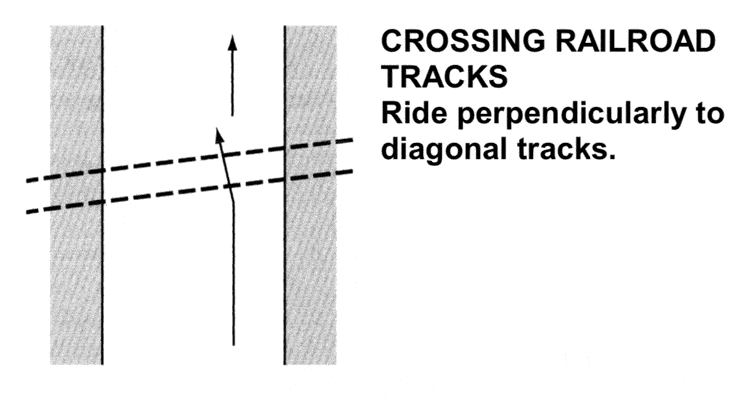
Some tracks are too dangerous to be crossed without dismounting and walking across.
Jumping obstacles
This is an advanced riding skill that may be necessary if it is not possible to go around a dangerous obstacle.
The easiest position in which to jump an obstacle is with your cranks horizontal, hands in the drops if you have them, the rear end unweighted off the saddle.
Lower your profile by crouching down, then jump up, pulling the bike up to you.
You can raise the front wheel without cleats or toeclips. But they are necessary to raise the rear wheel.
In order to learn this skill:
- Practice at first off the bicycle, pretending to be in a riding position, feet horizontal. Crouch down and jump up.
- Practice raising the front wheel, then the rear wheel, and then both together.
- To raise the front wheel, pull up on the handlebars.
- To raise the rear of the saddle, have your rear end off the saddle while crouched, jump up, pull up with the feet.
- Practice both wheels together.
- Pick lines in the road and practice jumping them, then practice jumping small objects like broom sticks.
Bicycle accidents are a source of concern for all of us.
We’ve already discussed keeping bicycle equipment safe and riding skills and technique in Safety Part A. Now, in Safety Part B, we’ll look at these last three topics:
- How bicycle–car accidents commonly occur.
- Riding in a safe and defensive manner.
- Specialized safety equipment.
How Bicycle-Car Accidents Occur
Here are some of the common reasons cars hit bicycles, or vice versa. By examining these common situations, defensive lessons can be learned. Riding safely can prevent most injuries.
- A bicyclist enters a road from a driveway, lane or other road without looking. A motorist hits the cyclist.
- A bicyclist turns left into an intersection without first checking for a following vehicle and is hit.
- A bicyclist riding on the sidewalk exits at a driveway without first checking for a following vehicle and is hit.
- A bicyclist rides on a narrow road without a shoulder. The bicyclist is to the extreme right of the road. A vehicle passes, and either hits the bicyclist or pushes the bicyclist off the road into the curb or a ditch.
- A bicyclist swerves to avoid an obstruction without checking for a following vehicle and is hit.
- Riding at night with insufficient illumination, a bicyclist is hit by a vehicle entering the road from a driveway, lane, or other road.
- A bicyclist rides close to a parked car and is hit by an opening car door.
- A bicyclist runs into the back of a vehicle that suddenly stops.
- A bicyclist stops at an intersection where the left lane of traffic may proceed left or straight. The bicyclist is on the right side of this lane. The bicyclist turns left. A stopped vehicle goes straight and hits the bicyclist.
- A bicyclist stops at an intersection where the left lane of traffic may proceed left or straight. The bicyclist is on the left side of this lane. The bicyclist turns left. The stopped vehicles also turn left. The bicyclist is rapped, unable to move to the right side of the road, and is hit.
- A vehicle, pedestrian, or animal, hidden by a parked vehicle, moves out into the road and a bicyclist’s path.
- A bicyclist rides up to a red light on the inside of a line of stopped vehicles. The first vehicle in line is a bus or truck. The bicyclist is in a blind spot of the driver. The driver turns right into the bicyclist.
- A bicyclist is hit at night by a following vehicle.
- An oncoming vehicle turns right into a bicyclist after a break in traffic. The oncoming traffic has hidden the bicyclist from the view of the turning vehicle; the bicyclist is hit.
- A vehicle passes a bicyclist to make a turn. The bicyclist is moving faster than the vehicle anticipates, and the vehicle turns into cyclist.
- At a crossroads, a vehicle sees break in traffic, but not the bicyclist. The vehicle runs into the bicyclist.
A Safe and Defensive Riding Style
- Obey the traffic code. The bicycle is treated as a vehicle in most states.
- Ride only one person on a bicycle unless there is more than one seat—a tandem or other special bicycle.
- Ride on the right side of the road, not on the left, not on the sidewalk.
- Do not ride against traffic on one-way streets. • Keep your hands on the handlebars. Do not ride no-hands.
- Use lights when riding at night.
- Do not ride through stop signs or red lights.
- Signal turns.
- Ride predictably in a straight line at a steady pace.
- Yield to larger roads.
- Look left, right, and left again before entering roads or intersections.
- Make eye contact with drivers.
- When riding alongside parked cars, look through rear windows to see drivers and anticipate opening car doors.
- Even though you have the right of way, do not insist upon it. Cars have much better protection against accidents than you do; you are more likely to be hurt than the motorist.
- Anticipate that a motorist will do something imprudent—for example pull out in front of you.
Just because you make eye contact with a motorist, it does not mean that they “see” you. In some circumstances, it is not safe to cross an intersection even with the right-of-way green light. If you cannot make eye contact and the motorist is edging forward looking the other way, proceed very slowly, if at all, across the intersection in front of this car.
Traffic-light sensors do not always respond to bicycles. The light may not change unless a vehicle behind approaches close enough to the intersection to trip it or you press a pedestrian cross button. In some situations it is impossible to make a legal left turn because pedestrian “walk’ signals may allow only straight ahead crossing.
Riding along the road
- The width of the road determines the safest place to ride. In general, ride at least one foot from the curb: This helps prevent being squeezed to the curb or a ditch, avoids significant road debris, gives you room to maneuver in case of a gust of wind from the side and improves visibility to motorists.
- When parked cars are present, if the width of the overall road permits, ride about one foot away from them, to avoid opening doors, cars, pedestrians and others entering the road.
- When parked cars form an interrupted line, avoid riding inside of the imaginary lane they create. To do so makes you less visible to traffic.

- Perhaps counterintuitively, when the width of the road narrows, it may be safer to ride more out in the lane, to force vehicles to cross the centerline. To hug the edge of the road may invite motorists to try and slip by you when there is insufficient room to do so safely.
- Leave room for motorists to brake.
- Although you may be physically able to ride faster, some traffic situations demand that you ride the speed of traffic or slower for safety. Some riders get impatient. But after all, it is the same for drivers of other vehicles who travel slowly in 25 mph zones when they can easily cruise at 65 mph on the highway.
- Sometimes, even to continue to ride straight ahead, you may have to wait for proper traffic timing. Consider a road that changes from two lanes plus a shoulder to two lanes without a shoulder going down into a canyon and back up. It may simply not be safe to ride down the hill and be passed by traffic. You may have to wait until a suitable break in traffic allows you to pedal this section of road.
- Sometimes you must avoid certain roads that are just too dangerous to ride, even with proper skills and defensive riding.
Intersections
Avoid overtaking vehicles on the inside of the lane, especially buses and trucks at intersections where they may be turning right.
Single-lane intersections
To proceed straight ahead: If you are the first to arrive at a red light intersection, where you stop depends upon the width of the road and what most cars are doing. If most cars will be turning right, for example, stopping in the center of the lane may help visibility to the not only the car immediately behind you but to following cars as well. It may also allow vehicles turning right to do so unimpeded and with less chance to hit you when they do so.
To make a right turn: Keep to the right, but away from the very edge of the road. Signal before turning, watch out for other vehicles and pedestrians.
To make a left turn into a minor road: Choose a break in traffic, signal, move to the middle of the road, If there is no oncoming traffic, make a 90-degree turn into minor road right lane. With lots of traffic it is sometimes safer to pull over to the right side of the road and wait for a clear break in traffic or turn right, make a U-turn, and wait for a break in traffic or green traffic light to cross the road.
To make left turn into a major road: Cross over the major road lanes before turning left. This prevents being trapped in the center of the road turned into by following vehicles.
Multiple-lane intersections
To proceed straight ahead: If there is a dedicated right hand turn lane, move over to the right of the next (straight-ahead) lane before reaching the intersection.
To make a right turn: Keep to the right, but away from the very edge of the road. Signal before turning, watch out for other vehicles and pedestrians.
To make a left turn: If there is a single dedicated left turn lane, be on the right side of this lane before turning. If there is a combined turn and straight ahead lane it may be impossible to safely cross this intersection from this roadway.
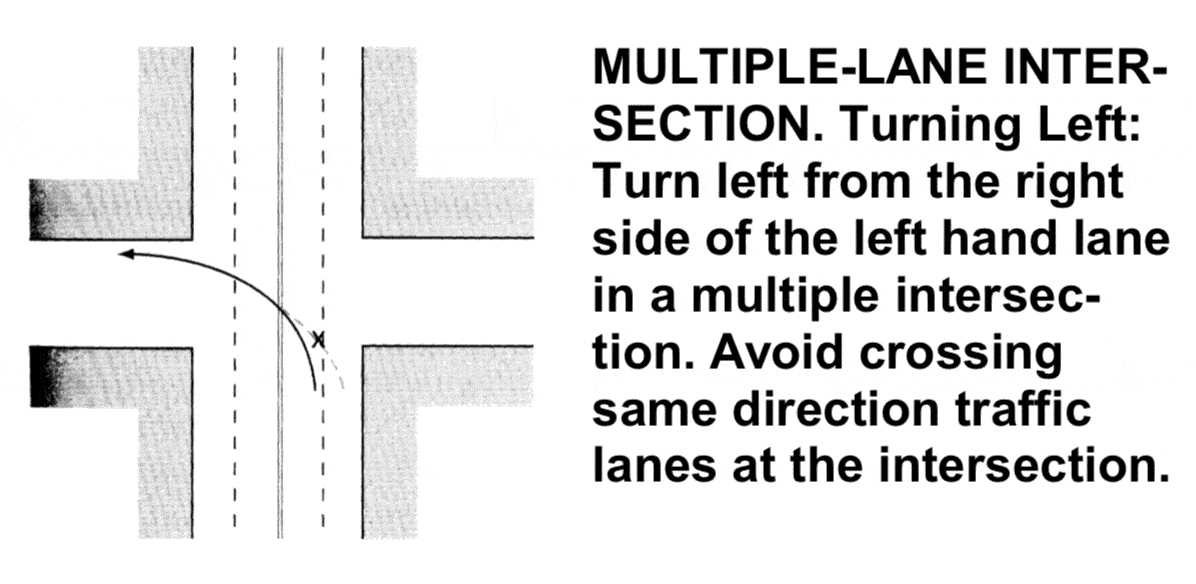
If you are on the left side of the turn lane you may be trapped into the center of the road onto which you are turning by following traffic. If you are on the right of the turn lane you may be prevented from turning by straight ahead moving traffic.
A stop at the intersection may give you a chance to make eye contact with drivers and choose the correct place to ride, possibly the center of the turn lane. Or you may need to make a right turn into a minor or other road, make a U-turn and wait for a break in traffic or a turn signal to allow you to cross safely.
Safety Equipment
Protection Equipment
Helmets can reduce cycling head injuries and death by more than 85%. Always wear a helmet when on a bicycle. Approved helmets are lightweight, strong, ventilated, fit snugly and have reflective tape. Helmets actually improve aerodynamics and make riders faster.
Lightweight helmets weigh barely half a pound. Helmet straps must be in good condition, not frayed and adjusted for a snug fit. Once crashed on, a helmet should be replaced.
Gloves help protect the hands from injury in case of a fall. Falling often occurs on a outstretched hand. Padded gloves also make riding more comfortable and prevent hand nerve injuries.
Visibility Equipment
Lights are a must at night. Modern LED cycling headlights and taillights are extremely bright, with batteries that last for hours. Moveable headlights can be shone in the direction of cross traffic to get the attention of drivers. Rear flashing lights may be more visible than steady ones, and wheel reflectors help cars at intersections see you. The movement of pedal reflectors helps many vehicles see you from behind.
Bright clothing is more visible than dark clothing. Reflective belts or vests improve visibility, especially at night. There is also a lot of new standard cycling apparel like jerseys, shorts, vests, shoes and socks with reflectivity designed in. Look for these features when you buy new cycling clothing.
Vertical or horizontal flags help draw attention to the bicycle and warn motorists.
Other Equipment
Mirrors help riders see behind them. Just as on cars, mirrors do have blind spots, and looking back is necessary before changing lanes or making abrupt movements. If you are on the left side of the turn lane you may be trapped into the center of the road onto which you are turning by following traffic. If you are on the right of the turn lane you may be prevented from turning by straight ahead moving traffic.
Bells help warning pedestrians, but a friendly warning shout can be as effective.
By learning good cycling skills, keeping your equipment maintained, understanding how accidents commonly happen and wearing high visibility clothing, you can reduce the chances that you will be involved in a bicycle accident. Nothing is foolproof, but you can put the odds in your favor.
I’m an avid cyclist and consider myself a traffic ninja! I often know what the cars are going to do before they know it. I want to give warning to my fellow cyclists… I was in another country cycling on an easy quite safe road at Geneva. I may have been looking down at my GPS to see a map. Keep in mind, I am trained to look around to make sure I have a moment to check my computer. I somehow ended up face-planting the back of a car at a traffic light. I think she stopped too soon but it’s my fault. I usually don’t follow too closely but I have no idea what happened. I am concerned that I was looking down at my computer. If anybody is tempted to look at a computer while moving please don’t. I am partially quadriplegic and I have been in pain with a shattered face repairing for the past 8 months. Again my traffic school skills are quite impressive. I’m pretty sure I was looking down at my computer to check the map. Turn off the computer or get rid of it and wait to check the map to pull over to the side of the road. Sounds obvious but I guess I got too cocky. Learn from my mistake 🙂 enjoy the ride.
There is a difference between using a computer and burying one’s face in it to the exclusion of the rest of the world… don’t toss out a tool just because it can be used incorrectly, rather, learn to use it correctly.
One thing you don’t discuss is safety when riding in a group — the importance of riding in a straight line, communicating upcoming road hazards and your intentions (“stopping!” or “right turn”) with other members of your riding group. Being predictable. And the importance of paying attention to what you are doing. Long ago when I was a USCF official, I took a course about riding on the local velodrome. It wasn’t that I was going to race, but I wanted to understand what the riders were experiencing. An unexpected benefit was a refresher course in riding with any group — not just racers. I believe a lot of club riders would benefit from such a course even thought they have no intention of racing.
A good article, but I disagree with the advice about riding one foot away from parked cars. Car doors can be quite wide and I don’t believe that one foot lets you avoid suddenly opened doors. I prefer at least one meter between myself and parked cars.
yep ….. one metre to be safe feom car doors and kerbs. Here in Australia vehicles and bikes are required to separate by one metre on sunurban raods and 1.5 metres on fast roads.
Over the years I have become a much more assertive rider on roads and as such have three suggestions/differences of opinion with this article.
First, one foot from parked cars is exceedingly dangerous given how quickly doors are flung open. When approaching parked cars I leave three feet not one. Which means I take the center of the lane (see below) and hold it as necessary.
Second, always ride with a mirror when on shared roads. Looking behind to check traffic is an invitation to visit pot holes, rocks, glass and the rear end of cars and trucks. Yes, helmet and glasses mirrors can look dorky but they work. Personally I use a Cateye that replaces the bar wrap cap on my drop bars.
Third, I watch for cars behind with the mirror and those approaching. If it appears all three of us will overlap, I will signal and seize the center of the lane forcing the car behind to slow and realize the potential danger of the situation.
I strongly agree with Bruce’s comments. I use a mirror embedded in my sunglasses called TriEye. I used helmet mirrors and mirrors that attached to the arms of my glasses for many years, and the embedded TriEye mirror is just as good, and even better due to its ease of use.
Agreed!
Fourth: Do not trust (at all!) so called “professional drivers” (e.g. “police” and “school bus drivers”), they are some of the worse on the roads, thinking they own the roads and have the right to run you over (I’ve seen too many police running red lights and school buses giving ZERO side room when they pass you, even when they have an empty lane to their left). And yes, the same applies to truck drivers too.
I’m surprised the author didn’t mention the Garmin Varia or similar radar taillights that both visually and audibly alert rider to cars coming from behind. Yes more $ but worth every penny compared to an emergency/hospital bill!
For you riders out there who don’t use a mirror while riding, try this: duct tape over the three mirrors in and on your car. Then drive around for three or four hours on busy streets (and maybe don’t even wear your seatbelt to be more like a cyclist). Then let me know if you missed your mirrors! Remember, bikes are vehicles too. (just ask any police officer)
Also, if you use a mirror, you’ll no longer have to look under your arm or over your shoulder (as you don’t do while driving a car, unless backing up).