Basic Concepts, Part 2: Spoke Twist, Stress Relief
In Part 1 of this “basics” series, I touched on the topics of wheel concentricity, thread lubrication, nipple seat lubrication and spoke length calculators. Today, I’ll cover spoke twist and stress relief.
Spoke Twist, or Wind-Up
The phenomenon that we have to be very aware of when tensioning and truing wheels is “spoke twist” or “spoke wind-up.” As we tension the spokes tighter and tighter, the pressure and friction within the threads increases greatly, and it eventually overcomes the spoke’s ability to resist twisting. So, instead of the nipple turning on the spoke threads, the spoke itself twists until the torsional resistance of the spoke overcomes the friction, and the nipple itself turns on the threads. This can be about a 1/4 twist of the spoke.
Of course, the thinner the spoke, the lower the spoke’s resistance to twisting, which is why it’s much harder to build wheels with skinny center-section spokes like Sapim Laser and DT Revolution. The resistance to twist of the 1.5mm centers is far less than the robust 2.0mm thickness of plain gauge spokes or the 1.8mm centers of normal butted spokes.
With Lasers, the spoke can twist up to about a 1/4 of a turn without the nipple moving on its threads. So you think you tightened a spoke a 1/4 turn and when it stress-relieves itself on the first ride (if you don’t remove the twist while building the wheel!) the spoke unwinds, and your once-true wheel isn’t true anymore.
Multiply this by (potentially) all the spokes in the wheel, and you have an incredibly bad wheel build and a possible wheel building disaster.
So, first we have to be aware of spoke twist (which you now are!), then we have to identify it (see it or feel it — more on this later), and then we have to remove it.
Identifying Spoke Twist with Tape Flags
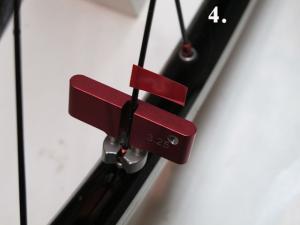
Place a masking-tape “flag” on a spoke, just above the wrench. Place it at 90 degrees to the rim plane. When the nipple is turned, we can see the spoke twisting by the movement of the flag. All of a sudden the flag will stop moving (and spoke will stop twisting). It’s from this point that the nipple actually moves on the threads. Now turn the wrench the amount that you wanted it to turn (1/2 a turn, maybe? 1/4 turn?). We have now tightened the spoke by that amount.
Next, we have to remove the unwanted spoke twist. Unscrew the nipple until the flag returns to its original position of 90 degrees to the rim plane.
Here are photos showing flags and spoke twist:
Photo 1 – The starting point. Flag at 90 degrees to the rim axis. Photo 2 – Flag stops turning. This is a 1/5th twist in the spoke.

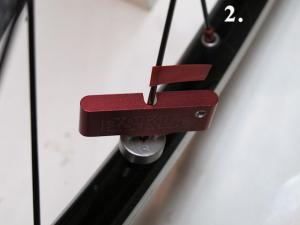 Photo 3 – A 1/2 turn of the wrench and nipple past this twist. Photo 4 – The 1/5th twist is removed.

 Identifying Spoke Twist by Feel
The other way to gauge twist is to feel it. Grab the spoke, just above the wrench (with 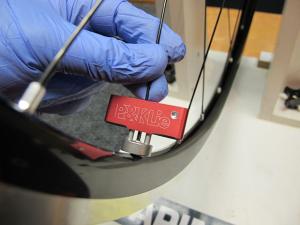 the wrench at 6 o’clock on the wheel), with finger and thumb. When the nipple is turned, we can feel the spoke twisting. All of a sudden the spoke will stop twisting and it’s from this point on that the nipple actually moves on the threads.
But this twist has to be removed. So let’s assume you want to tighten the nipple a 1/2 turn. Grip the spoke and turn the nipple. Observe and feel when the spoke stops twisting. Is it a 1/4 turn? About a 1/5th of a turn? Remember this approximate number.
(These photos show how much my Sapim Laser spokes twist – it’s about a 1/5th of a turn.)
Let’s assume the twist was a 1/4 turn. After the spoke stops twisting, keep turning the nipple until it’s gone 1/2 a turn after the spoke stopped. But you turned the nipple 3/4 of a turn, didn’t you?
Now back the nipple off to remove the 1/4 turn of twist. The net result is that you tightened the nipple 1/2 a turn. This has to be repeated EVERY time you move a nipple, whether tightening or loosening! Skinny spokes like Sapim Laser and DT Revolution are not for the faint-of-heart or the careless wheel builder.
Probably the easiest spokes to build with are the flattened aero Sapim CX-Ray — you can easily see any twist due to the spokes’ flattened mid-sections. You prevent the spokes from twisting by holding them with the special spoke holder from Sapim, or a holder that you can make yourself. (See the photo of both the Sapim and homemade holders on a CX-Ray spoke.)
Stress Relief, or ‘Spoke Optimization’
During the wheel building process, we subject the spokes, rims and hubs to many high stresses. The main contact areas between all these parts need to be correctly seated and bedded in the workshop during the building process. If we’re careless and don’t perform these crucial steps, they will happen naturally during the first few rides on a new wheel. This leaves the wheel’s integrity compromised and its life-span can be reduced.
We need to remove any spoke twist, bed spoke heads into flanges, straighten the spoke path from hub to rim and bed the nipple seats while building the wheel in the workshop.
All wheel building books contain steps to accomplish this; some more or less than others. I list ALL the ones I’ve ever found on my wheel building webpage, under “Stress Relief” (http://miketechinfo.com/new-tech-wheels-tires.htm). I perform them all, as skimping and time-saving has no place in my home wheel building; and it shouldn’t in yours, either.
In Part 3 of this “basics” series, I’ll talk about the need for equalized spoke tensions and which way to turn nipples – with a big tip that you won’t forget!
Q&A: Can I Fix a Spoke Twisted a Full Turn?
Question:
I have a wheel with CX-Ray spokes and one of the spokes is twisted a full turn. Can I fix this, and if so, how? – Anonymous
The Wheel Builder Replies:
As we know, CX-Rays are flattened aero spokes, so any twist is easy to see. But what bothers me is that it’s a full twist. Normally, if not held, spokes twist about a 1/4 turn before the nipple moves on the threads. I’m suspecting the spoke is too long and the nipple bottomed-out on the threads which would make the spoke twist further if the person doing the job wasn’t knowledgeable.
Remove the tire and rim-tape and see if the end of the spoke sticks up above the nipple. If it does, even by 1mm, then the spoke is too long. Check the ends of all the spokes and report back. This spoke has been twisted past its plastic yield limit and will be permanently twisted. Get rid of it!
Mike Tierney writes The Wheel Builder column for RBR. Read his full bio. He is a life-long cyclist from the UK who has spent most of his adult life in Canada. Mike has been a passionate home wheel builder for the past 52 years and specializes in taking the mystery out of wheels and wheel building for Newbies. Hundreds of cyclists have built their first wheels with online help from his wheel building website, MikeTechInfo.com. Send your questions about wheel building and wheel maintenance to Mike at [email protected].