
Jim’s Tech Talk
By Jim Langley

For anyone who doesn’t know what it means to “seat” a tire, let’s start with an explanation. To “seat” or “seating” a tire is one of the final steps taken when installing most tires on bicycles and motor vehicles, too.
Seating is important because it ensures that the inflated tire is fully and properly installed. If tires are not properly seated they can have low and/or high spots, twists in the tread and with the worst seating mistakes (high spots), they can blow off the rim.
Is a Bicycle Tire Seated?
To tell if a tire is seated properly (even old tires might not be fully seated), you look at the seat line that’s molded into every tire (photo). When a tire is properly seated, that line sits right on top of the rim, equidistant from the rim for 360 degrees around the wheel and on both sides.
The most common seating issue is having the seat line get stuck below the top of the rim (shown in the photo), what’s called a low spot. This can occur at only one spot or in several different spots.
When this happens, if you ride on the wheel, you’ll probably feel the low spot(s) in the tire each time you roll over it. And, because the tire is too low in one spot, it’s possible to damage the rim if you hit something at that spot.
To help, here are seven tricks for seating tires that refuse to. We’re talking about low spots, not high spots (see Tip). And for both standard tubed tires and tubeless.
Tip: High spot seating issues usually only occur with tubed tires and result from getting the tube stuck beneath the tire’s edge. To greatly reduce the chance of this happening, be sure to inflate the tube just enough to let it take shape before installing it in the tire. It’s easy to inflate Presta valve tubes up to the right amount for this by blowing into them like you do with balloons. Just remember, you need to make sure the valve is open first..
7 Bike Tire Seating Tricks
Roll the tire out with your hands
CAUTION: Do not put massive lateral force on the wheel when doing this “move” – or you could warp your wheel. Only put force on the tire.
This is the quickest and safest way to seat a tire and it works most of the time once you’re good at it. But, you have to do it a few times to learn how to do it and if you’ve never done it before, to even believe you can do it. Because it can take a few seconds of work before the bead slowly pops out or it might come right out, too.
You do it by holding the wheel between your legs and gripping the tire right at the low section. You want to use your hands however works for you to put maximum pulling force on the tire to try to roll the stuck seat line up and out from under the rim. I use the heels of my hands and rock them in an up-and-over action.
Air pressure
This is the way car guys and gals seat tires and a lot of bike mechanics do it, too. It’s kind of fun because as the tire seats it makes loud snapping or popping noises. But, there’s always a risk of blowing tires off the rim, which can be dangerous and expensive. I wrote about such an incident a while back: https://www.roadbikerider.com/overinflation-explosion-a-cautionary-tale-about-very-wide-tires/.
So, if you want to use this approach, use only your hand pump (air compressors put too much air in too fast) and very gradually increase the pressure. Give the tire a minute or so to see if it seats before adding more air. And, don’t ever inflate a tire way past the maximum pressure (it should be written on the tire sidewall).
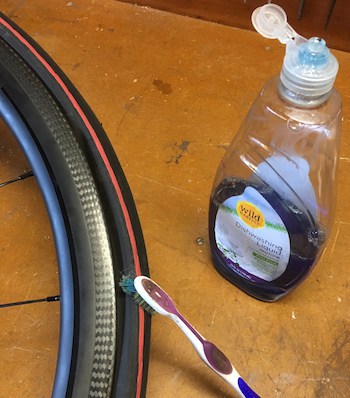
Soap
Speaking of motorheads, they typically have a big tub of tire soap next to their tire mounting machines so that they can slather the slippery stuff on before inflating the new rubber. While there are tire soaps made for bikes, like BullSnot https://amzn.to/2nSud9T , common dishsoap works just fine.
To apply it, find the low spot(s) on the tire and keep track of it – because you’re going to deflate the tire next. You could mark the spot(s) with chalk if needed.
Deflate the tire. Then put a little soap on a brush and push the tire out of the way at the low spots enough so that you can get the soap between the tire and rim. Or you could drip it on the tire if you don’t mind risking making a mess and having a lot of clean-up.
When you pump up the tire, the low spots should pop out. If not, clean and dry the tire so that you can grip it and try to pull any remaining low spots by hand. The soap should still be between the tire and rim and with luck, the low spots will come out. If not, repeat the process one more time.
Use the ground
CAUTION: Do not put massive lateral force on the wheel when doing this “move” – or you could warp your wheel. Only put force on the tire.
If you’re on a ride and you have a low spot after fixing a flat (common problem with tubeless tires), hold the wheel in both hands so that the low spot is facing the ground and at 6 o’clock with 12 o’clock at your stomach.
Holding the wheel like this you can tap the tire’s low spot on the ground to put a pulling force (more like a jolt or blow) on the tire. This will sometimes get the tire seat line to come out from under and seat the tire. Just go easy.
Riding and waiting
Sometimes it just takes more time than you expect for the low spot to rise up to make its way to where it belongs. If a tire won’t seat, if you give it a chance, it might be seated the next time you check it. This can happen out on a ride. You just have to be willing to put up with a “funny” feeling of a low tire spot for awhile and baby the wheel and not risk hitting anything.
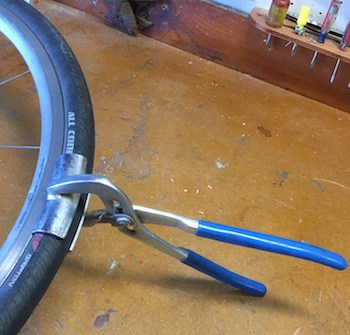
Tire seating pliers
The photo shows my Park Tool Tire Seating Pliers, which I have made great use of for decades: https://amzn.to/2mpy5Pp . The only thing is that you need to be careful to grip only the tire with this type of tire pliers. But they work well for many seating issues.
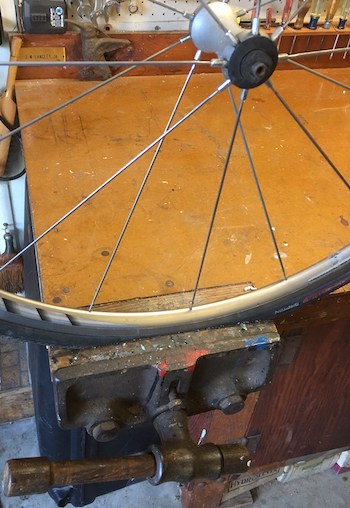
Vise
People are always surprised when I use this seating trick so I saved it for last. Don’t use it if you have any concerns.
The trick is to use a vise to grip the tire (tire only!) low spot and rock the wheel to pull the low spot out. Woodworking vises like mine have soft wood jaws that won’t harm tires. You can also use a metalworking vise by putting blocks of wood in place of the jaws.
You tighten the vise just enough to hold onto the tire (never allow the rim to get between the jaws!) and you then gently rock the wheel so that the vice can tug on the tire and get the low spots to pop out.
There you have it. I hope these tricks cure all your tire seating issues.
Jim Langley is RBR’s Technical Editor. A pro mechanic & cycling writer for more than 40 years, he’s the author of Your Home Bicycle Workshop in the RBR eBookstore. Tune in to Jim’s popular YouTube channel for wheel building & bike repair how-to’s. Jim’s also known for his cycling streak that ended in February 2022 with a total of 10,269 consecutive daily rides (28 years, 1 month and 11 days of never missing a ride). Click to read Jim’s full bio.
Don’t use the “air pressure” method if a bit of the tube is caught..
You don’t need straight detergent.. Just a little soapy solution in a spray bottle. After you are done, rinse the tire with plain water and you have washed the rim,too.
Kool Stop tire mounting tool..
Thanks, Mark. That Kool Stop tool is not for seating tires. It’s actually for putting tires on the rim. When I teach people how to put tires on I always emphasize to only use your hands to put tires on. Because when tools are used it often results in puncturing the tube. But, there are super tight tires – and tubeless tires are often tight (with no tubes) – Kool Stop’s Tire Jack is for helping with those situations – but you still use it carefully. Here’s a link: https://amzn.to/2OjpDwn where you can see a photo and learn more.
Thanks!
Jim
Any tool or techniques for those of us with arthritis in thumbs and hands,?
Linda, using the soap technique and gradually adding more air should get the tire to seat without you needing to use your thumbs and hands too strenuously. Depending on how bad the tire is stuck down inside the rim, you might have to try it a couple of times to get enough soap down and in the right place – or even need to try different soaps – something really slippery is what you want. But, it should do the trick.
The tire seating tools might work for you, but you have to have the hand strength to squeeze the tool to keep the jaws “biting” the tire, and also tug on the tire with the tool. That might be harder to do with your arthritis.
The vise technique would work for you since you rock the whole wheel which only takes pushing on it. But you need a vise and soft jaws.
One more idea: I only saw this once but I did see a cyclist do this one time and it worked. They used their feet to get a tire on. I’m not making this up. So maybe, you could rest the low spot on the ground, stand on the tire and roll the wheel down to get the clamping action of your foot against the tire against the ground to grip the tire and pull it out and seat it?! If it works, please let us know 😉
Good luck!
Jim
I carry a small, snack size, zip lock with talc, or cornstarch. If I need to change a flat on the road, I apply the talc to the tube, and to the bead area of the tire. On the tube, the powder will form a layer that minimizes the tube “bonding” with the inner surface of the tire. On the tire, the talc makes the bead slip over the rim easy, like the soap mentioned in the article, bt it easily transportable. It is also great to have handy of body chafing problems that may arise!
Thanks, Dragonman – that’s a great tip I forgot. Good one! Thank you,
Jim
I put my spare tubes into a snack Ziploc bag and add a couple of tablespoons of talc, then seal the bag. The vibrating of riding distributes the talc all over the tube, and it will slip right over the rim and into the tire. Sometimes it’s not the tire that makes seating difficult; sometimes it’s the rim. I have a set of Shimano wheels that are really, really hard to install and seat tires, and the same tires simply pop onto Mavic rims.
Several times I have not been able to get a tire to seat when fixing a flat on the road. The first time I had this happen, I just decided to suck it up and ride home with a lumpy tire. But as the article notes, you can just ride it out and that is exactly what happened. After a couple of miles, the forces of riding helped the tire seat and it was smooth as glass.
I’m happy to hear that the “wait for it technique” worked for you, too, Kerry! Thanks for the comment!
Jim
I too use talc on installing new tires/tubes. Old roadie, riding since the 80’s and just stumbled on an almost unbelievable solution for installing my continental grand prix. I’ve tried heating the tire with heat lamp, using tire Jack type tool and some times it jturned into an hour project. Even sometimes get one on 99% on and come back the next day to fight with it.. Then one day I put on some cheapy work gloves (rubberized fronts, cloth backs). They grip the tires so well ya think your hands are 5x stronger! I’m 76 and I do suffer from arthritis in my hands but now I can usually install a couple tires in 15-20min. A pair compresses down pretty small and I carry a pair in a baggie in my bike bag.
Thanks for sharing that great tip, John. I’m sure that’ll help people out. Appreciate it!
Jim
I am a bit surprised at the problems. I just let air out, play with the tire a bit, and reinflate, a little bit at a time. It is not hard to “pop” the bead at low pressures. If you wait to check it at riding pressure, you may have a problem, at 1/2 or 1/3 or even 1/4 or riding pressure, it is usually pretty easy
Some tires are much harder to install and seat than others. If you find yours difficult you might try a different tire. I bet your shop mechanic can tell you which ones go on easily.
How can you tell if it’s a bad tire or a bad rim, not because you are doing it wrong, because , when is it time to try a new tire, or different type,
I find seating brand new tires a bit more difficult. Putting corn starch or a non-talc powder on the tube is a good practice, and blowing the tube up a bit by mouth is as well, but do remember to close the valve before inserting it. At some point in the process, you’ll likely touch the valve stem and lose the air. The important point regarding seating the bead is once the new tire and tube are on the rim not to inflate fully immediately. First, inflate to perhaps 1/4 of one’s usual PSI and check both sides for any tube sticking out under the bead. Assuming none, then continue to inflate to 1/2 usual PSI. Remove the pump chuck and use the rolling technique suggested by Jim over all 360 degrees of both sides, observing carefully that the bead line is visible. Then inflate to 3/4 of usual PSI. Then deflate back down not to empty but nearly so. You should see that the bead has remained seated although there is very little air in the tire. Then, if I do not intend to ride immediately, I pump to about 110% of my preferred PSI. and let it be overnight to theoretically stretch the rubber out a bit. (I say “theoretically” because I have no scientific proof that it stretches out, but I know it can’t hurt.) Just before I do ride the tires, I’ll deflate a little and then bring them to my preferred 100% PSI.
I find this entire ordeal is only needed the first time a tire is mounted. After that, just taking care that the tube is not protruding and eyeballing the rim bead is enough.
Thanks a lot for sharing your tips, Fixieguy, appreciate it!
Jim
Just used the dish detergent trick yesterday. Works like a charm every time.
Thanks for sharing, Katharine!
Jim
I have found that leaving the tire under the hot sun, if available, makes a difference in either seating new tight tires or removing them. To avoid using levers.
I don’t understand the low spot on the tire concept: “find the low spot(s) on the tire.”
Could you clarify please? Thanks.
It’s all there in the first picture, Will.
I think maybe that first photo is too small, William, sorry about that. But, to explain, a low spot is when one portion of the tire is actually sitting too low on the rim. What’s happening is that the sidewalls of the tire are down inside the rim instead of up high on the seating area of the rim. If you were to spin the wheel with the tire with the low spot in it and hold your finger just above the tire as it spun round and round, you’d see a gap at the low spot(s) on every revolution.
And, if you look carefully at tires right where they rest on top of the very edge of the rim you will see a molded-in seat line on them. This is the indicator of whether a tire is fully seated or not. When you have a low spot that seat line will disappear at the low spot because it’s trapped down inside the rim creating the low spot.
I know this is a little tricky to understand. I will try to get a better photo and if I can, I will run it next week in my column. Sorry you couldn’t see this week’s.
Jim
I used several tricks to get on the worst tires I ever had to mount on a bike in the last 60 years of riding! No, I’m not 120 years old, I learned how to fix tubes when I was just 7 years old, and I’ve been on a bike all those years and fixed too many flats either at home or on the road, not to mention replacing tires and tubes to count.
After breaking 3 tire irons, including two Soma Steel core levers, and a Pedro lever, (one of my Pedros snapped in cold weather this last winter) and being unable to get the tire to slide in using liquid soap, I had to wait and order some tools since I had no more tire irons. I ordered two pairs of Lezyne Power Lever XL, as well as a Kool Stop Tire Bead Jack, this thing puts a lot less pressure on the rim edge than any tire lever would, so it would be fine for CF rims. These tires were so tough that even my VAR tire lever I was afraid of breaking, so I stopped before it broke.
Keep in mind, I’ve been putting on tires for over 60 years! So I know all the tricks, including applying soap to the bead, and tying the tire that is on the bead tightly against the rim (I used large reusable zip ties, and then used a pair of pliers to pull them tight so the bead doesn’t come off the rim as I work on the other side trying to get the bead on) all those methods I employed on my tubeless tires I knew about for years, but NEVER had to resort to those methods until I put on tubeless tires for the first time. Even then I had issues with a single zip tie not holding, so I went from using one zip tie to two about a 1/2 an inch from each other, pulled those with pliers as tight as I could get them, and that did the trick. I then used the soap, then got as much of the tire on as I could with the Lezyne Power XL levers, and then finished with the Kool Stop Tire Bead Jack. I had to do that method for each tire! My hands were tired after that.
I was putting on a pair of Schwalbe Amotion 700x38c tubeless tires, but even though my rims are made for tubeless I was using tubes, which I had coated with baby powder; plus, I had a pair of RhinoDillo tire liners, which the combine perhaps the both of those might have made it more difficult? Those tires were going on my touring bike, so because of that I put the Lezyne Power XL levers and the Kool Stop Tire Bead Jack in my saddle bag on the touring bike, just in case I get a flat. Also, on my touring bike I have liquid soap for washing myself as well as my cookware and clothes, I would use that soap mixed with water to put the tires on if they’re still tough after being mounted for months, and I carry 3 of those reusable zip ties, along with a small pair of pliers I always carry anyways.
Thanks for sharing your tubeless tire installation story, Fred. I don’t know whether to call it amazing, entertaining or hilarious 😉 To answer your question, yes, absolutely, when you put tubes inside tubeless tires it makes them harder to put on. And if you stuff tubes AND tire liners inside tubeless tires – that’s going to make it all that much more difficult.
So, it begs the question, why aren’t you just using standard tires made to accept tubes and liners? Why are you paying extra for tubeless tires that you aren’t even using as tubeless tires? And, as far as Schwalbe tires go they actually have a decent reputation for normal installation, not difficult.
Overall, from what you wrote, I would say that you should just get standard tires and test them to make sure they go on by hand even with the tire liners in there. Companies that make tire liners should be able to tell you what brand and model tires work well with their liners. With the right tires, you should really be able to pop the tires on and off by hand.
Thanks again for sharing,
Jim
I had problems installing my new Bontrager RW3 tires on my Bontrager Aeolus 3 rims, when I bought them I was able to install the front one with some problems but I managed it, for the rear I had to go to the workshop, there was no way to insert it into the rim . When I explained the problem to the mechanic, he smiled and told me that I had to find the deepest hole in the rim in its center to insert the sides of the tire, I think I did that but there is no way, there is a space of about 20 cm without inserting that I can not insert with the levers, I broke one of them forcing the introduction of the cover, so I went to ask for help. The mechanic took the tube, inflated it a little and began to insert it into the cover until it reached the point where I couldn’t take it anymore, I want to see you there, I told him, and with just his hands he began to move the cover forward and back along the sides until it was inserted into the rim. Fascinating, I can’t do it with the tool and he just put it in place with his hands. He told me that you have to find the lowest point of the rim in its center to insert the sides of the tire, move it back and forth until it takes its position. I have another Bontrager AW3 tire that is still in good condition and I can fit it in, so I carry it in my bag in case an untimely puncture leaves me stranded without being able to mount my tire again.
Sorry for my bad English.
I had a hell of a time getting a tire -which had been perfectly mounted tubeless on the same rim- to seat with a tube inside. Whenever one dipping spot was fixed, another popped up.
After a lot of cursing and mental images of me cutting the rubber bastard to shreds it finally worked, using a combination of soaping the bead and then adding pressure beyond what you’d usually do. But don’t overdo it, especially not on carbon rims, You might end up with a perfectly seated tire on a split rim.
Never exceed the max pressure listed on the rim and on the tire (whichever is lowest). And wear eye and ear protection, you never know. My ears rang for a day after a 40 mm tire rated for 4.5 bar blew off the rim (rated for the same pressure) at 4.2.
I always use my garage compressor. I just turn the line pressure down to like 35-40 psi. I think the quick inflation just pops the bead out. You don’t have to use high pressure. I’ve never had a problem seating a bead but I’ve cussed quite a bit trying to get tires off. Changing a set of tires right now. Front tire was just usual bitch. The rear tire? I had to step on the bead to break it loose from one side. The other side would not budge. So, I carefully cut through the tire and tossed it. Dirt bikes have plastic bead breakers you can carry along. Haven’t seen anything for bicycles that compare.
Just wanted to add that the WTB venture tires I was removing had very very very supple sidewalls. Hard to pull on the bead when removing a tire.