
Jim’s Tech Talk
By Jim Langley
We’ve said it before and we’ll probably say it again, we always appreciate hearing about your cycling hacks (a “hack” is a different way of doing something or a modification, usually to improve function or ease of use).
So for this Tech Talk, RBR reader and frequent commenter Will Haltiwanger is spinning the Tech Talk pedals to share his hack for getting out of clipless pedals easier. In his own words,
“I have another hack that might be of interest to RoadBikeRider readers who use Shimano SPD clipless pedals. This is a common choice for riders who like shoes with recessed cleats and plenty of tread for walking. I am a bit surprised that Shimano hasn’t marketed it.
I am sure you know people who have had a bad experience with clipless pedals and refuse to use them; or who were intimidated by the learning curve. This inspired me to examine options that would reduce the possibility of not having a cleat release while preserving the many pluses of clipless pedals.
For Beginners and Those Who Spin and Don’t Pull Up with Their Feet
What I am going to describe is not for racers, mountain bikers and other aggressive riders who might forcibly pull up with their feet, but it seems to work well for those who spin and stand without pulling up. And it seems like it would be a good first step for beginners.
Some of the Advantages of Clipless Pedals Include:
- Being able to use cycling shoes with stiff soles
- Positioning the shoe fore and aft on the pedal
- Positioning the shoe right and left
- Positioning the shoe rotationally
- Being able to push forward and pull backward to spin as you pedal.
- Feeling confident that your shoe won’t slip off the pedal if you hit a bump.
The main negative of clipless pedals (other than the extra expense of cycling shoes and pedals) is not being able to release easily when caught by surprise.
Will’s Cleat Modification for Making it Easier to Get Out of SPD Pedals
The simplest solution I found for this negative is to modify Shimano SPD cleats. They are relatively cheap and widely used. The cleats are designed to slide into the front of the pedal and then, when pushed down against a spring, to engage the back.
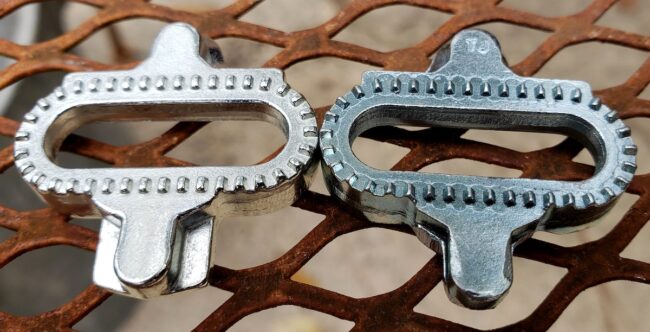
The two flat sections on each side at the back (bottom left of first photo) snap into the pedal and hold the cleat in until the cleat is rotated to push the pedal mechanism back so the cleat can come out. The rounded sections at the back and front of the cleat position the shoe right and left, fore and back and rotationally; and they do this exactly the same with the modified cleats.
All I did was hold the cleat with a pair of pliers and use a grinding wheel to remove the flat sections from the back of the cleat. (Wear safety glasses.)
I have experimented by riding with a modified cleat on my left pedal, the foot I normally put down first and a standard cleat on the right. I can do a normal spin, including lifting the foot on the upstroke and I can stand and pedal normally. I have not had my left foot accidentally come off the pedal a single time. To exit, a simple lift of the shoe will release the cleat, no twisting required (but you can twist if you wish and the pedal will release as normal).

One unexpected result of this experiment was that I realized I like having the right pedal locked in to be able to pull up on the pedal to position it when getting ready to start from a stop. Much of our riding is urban and I plan to continue using the modified cleat on my left shoe for this with the standard cleat on the right. When riding on trails I will switch shoes and use a standard cleat on both shoes. The second photo shows the cleat I have been using. (I wasn’t as aggressive in removing material on that one as only the back portion of the flats engage the pedal.)”
My Take
Will kindly sent me a new pair of Shimano cleats with his modification. I mounted them to my Specialized Comp MTB shoes and gave them a try. Just as he described, they make getting out much easier because all you have to do is lift and pull your foot back slightly and it’s off the pedal, no twisting required.
The cleats engage more easily too. Only the tips have to fit into the pedal because the wings have been filed off. It feels a little strange but once you’re in the pedals you can spin as usual.
As Will mentioned, this hack isn’t for experienced Shimano SPD clipless pedal users. With years of twisting your feet to get out, and pulling up without releasing, you might release when you don’t want to. And, if you ride aggressively, sprinting or bunny hopping or throwing your bike around, you’ll come out of the pedals more easily and it could cause a crash.
But I can appreciate how someone brand new to clipless pedals could learn to use them more easily with Will’s modification. And with less risk of falling over as they learn, which is a good thing.
Thanks a lot Will!
Jim Langley is RBR’s Technical Editor. A pro mechanic & cycling writer for more than 40 years, he’s the author of Your Home Bicycle Workshop in the RBR eBookstore. Tune in to Jim’s popular YouTube channel for wheel building & bike repair how-to’s. Jim’s also known for his cycling streak that ended in February 2022 with a total of 10,269 consecutive daily rides (28 years, 1 month and 11 days of never missing a ride). Click to read Jim’s full bio.
Sorry, but I don’t get what this back doors that is different than just using the multi release SPD cleat. I really disliked the multi release cleat when I tried it cause my foot came out too easily and unexpectedly. It’s not good when your foot spontaneously disengages when jumping…almost caused me to crash a few times.
That’s why we specifically said in the article that this hack is NOT for experienced SPD clipless pedals user who jump, etc… hey! We just said it again 😉
Interesting hack, and it gives me a better understanding of SPD cleats, but this system has been around for 30 years, and riders have been able to comfortably adapt to its use after a very short time. Is there a middle path that allows fast release while conditioning a proper rotational motion? Why yes! Just unscrew the tension bolt with a 3mm hex wrench. No dangerous cleat modification required. And while I’m at it, it just boggles my mind that most cyclists are conned by the pedal and shoe manufacturers to default to 3-bolt cleats for the road when 2-bolt cleats are far more useful and convenient. And just because years ago, some pro cyclist said that they didn’t think 2-bolt pedals didn’t give them enough “support.” We need more choice in 2-bolt pedals and shoes for the road (no lugged soles). Right now, it’s just Shimano’s indoor cycling shoes, and I’m not seeing the IC5 with BOA tensioner any more. And you can’t even get them in white!
Thanks for the comment Luis – I’ll write more about your comments in my next Tech Talk.
I use Shimano Ultegra road bike pedals and having backed off the release tension as far as possible still wanted it looser to avoid aggravating my damaged knee.. The tension is provided by a coil spring with one of the end tags resting on a plastic ridge under the pedal. So I took a Drexel tool with a fine blade and removed some plastic from under the end tag thus loosening the spring tension. The cleats still work correctly, I can sprint without pulling my foot off the pedal but the twisting force to release is now reduced
Thanks so much for sharing your hack to make it easier to get out of your Shimano Ultegra pedals, Roger, appreciate it very much!
Jim
A cautionary tale. I was standing on my pedals and looking back over my shoulder before making a lane change. I twisted enough that my cleat (unmodified) disengaged. A titanium plate and eight screws put my collarbone back together. I’m just saying you really don’t want to come out of your cleat too easily.