Wahoo Kickr, Headwind and Climb Smart Trainer System Review
 by Lars Hundley
![]()
HOT!
- Kickr smart trainer, Headwind fan and Climb device seamlessly work together for a more realistic trainer experience
- Kickr Includes an 11 speed cassette, so you don’t wear out your bike’s cassette or rear tire
- Control and monitor your workouts on your smartphone, tablet with a large number of apps to choose from
- Folds down for easier portability and storage, with a well designed carrying handle
- Headwind fan provides superior airflow, usable as a standard fan or “smart” fan
- Climb unit works with Zwift and other apps to match the incline in real life, making the trainer more interactive
NOT!
- Very expensive as a complete system
If you spend any time using Strava, perhaps you’ve noticed over the past couple of years that more and more smart trainer rides are showing up in your feed.
Until early December, I had not used a trainer in more than 20 years. In the late 80s, I had a set of rollers that I barely used. And in the 90s, I owned a fan type of trainer that I similarly barely used, because it was so incredibly boring. Ten minutes on a trainer felt like an hour of torture to me. I either rode outside, or not at all.
But after a cold and rainy November and December in Dallas, my fitness level was starting to show the effects of my lack of mileage. A local cyclocross race I entered for fun made this quite clear, when I finished in the bottom half.
I was thinking of trying a smart trainer to see if Zwift made riding indoors tolerable, and was looking at the various models and brands that were available. I ended up talking to the folks at Wahoo, who were convinced that a smart trainer would make all the difference in the world for someone like me — a guy who hates riding a regular trainer.
Wahoo wanted me to experience the advantages of using an entire indoor training system instead of just a smart trainer by itself to demonstrate how compelling it could really be when used in combination. So they sent me the three major parts of the system: the Wahoo Kickr, which is their top level smart trainer, the Wahoo Headwind, a “smart fan” designed specifically for bike trainers, and the Wahoo Climb, a device that you hook up to your fork that raises your bike up and down to match any incline changes on the major trainer apps like Zwift.
Instead of just watching the screen on Zwift and pedaling, like you can do with almost any standard trainer if you buy a few extra sensors and place them on your bike, this Wahoo smart trainer system lets you actually feel it get harder to pedal as you see your speed increase or hit an incline, feel the fan blow harder to match your speed on the screen (or according your heart rate, if you choose that instead) and feel your handlebars move up and down to match the incline on the screen.
It’s a much more immersive experience than your standard “dumb” trainer. For me, this system was a true game changer. I found the smart trainer system not only compelling enough to ride, but actually fun to use. I’ve gone full circle from an indoor trainer hater to an indoor trainer fan.
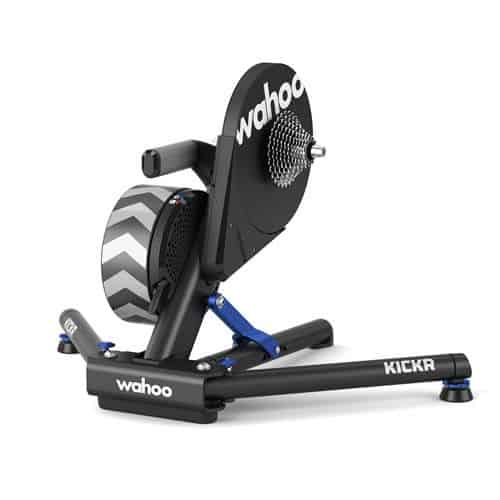
Wahoo Kickr Smart Trainer
Jim Langley wrote a detailed review of the original version of the Kickr a few years back.
The new 2018 edition is very similar, with some upgrades. It delivers a quieter experience and an improved, heavier flywheel to provide cyclists with inertia to create a more accurate feeling of riding outdoors. The Kickr includes an 11 speed cassette for easy setup and an RPM cadence sensor. Got a 10 speed road bike? No problem. You’ll just need to provide your own 10 speed cassette and use their included adapter so that it fits. Also works with 8 and 9 speed with the proper adapters.
The trainer is also set up so that you can use it with various wheel sizes, so you can put almost any bike on it, including 24”, 650c, 700c, 26″, 27.5″, 29”. If you have a spare bike sitting around the house that you want to permanently install on the trainer, there’s a pretty good chance it will work.
Setting up the Kickr, Headwind and Climb
The fan, trainer and Climb unit came in three separate boxes. It took me about 30 or 40 minutes to get everything out of the boxes and get it all turned on and figure out how to mount my bike on it.
The Kickr (and other Wahoo smart trainer model, the Snap) work with the Wahoo Fitness app that you can download to your iOS or Android phone or tablet. You’ll use this app to initially set up the trainer and get all the various pieces of it working together, via a bluetooth connection. (The trainer also works with ANT+.)
When I fired up the app the first time, it immediately recognized all the pieces and just worked. It pushed through a firmware update for the Kickr, which also downloaded right away and installed without a hitch. With so many separate parts like the Climb, Kickr, Headwind, my Polar bluetooth compatible heart rate monitor and the included cadence sensor, I was expecting to have to go through electronics hell to get it all working, so it was very impressive to me that Wahoo was able to make the setup so easy.
If you do need help, they have a very extensive online support site, with answers to just about every question and lots of YouTube videos demonstrating the various aspects of set up and use. The videos are short and to the point if you’re trying to figure out a feature.
The Wahoo Fitness app gives you several different ways to use the smart trainer. The four modes are called Level, Resistance, ERG and SIM.
Level mode is designed so that you can use your smart trainer like a traditional dumb trainer. You can set the workout time and start pedaling, and it will have a power curve like a regular trainer where the harder you pedal, the harder it gets. You can control your efforts by working harder or going easier. This is a good option if you just want to turn on the TV and pedal while you’re watching.
Resistance mode is like a spin bike at the gym. You can pedal on the trainer, and then increase or decrease the resistance just like you do when you go to a spin class. So if you wanted to use your trainer like a spin bike, you can.
ERG mode is where the real action is. This is what separates a smart trainer from a dumb trainer. The Kickr can measure your wattage output as you pedal. So let’s say that you wanted to do a 60 second interval at 350 watts. In ERG mode, you can just set the Kickr to 350 watts, watch the time and pedal. The trainer will adjust the resistance so that you can’t pedal harder — or easier — than 350 watts. If you spin like crazy, it will become easier to pedal. And if you start to slow down your cadence, each pedal stroke will become harder so that you are still hitting that 350 watts.
SIM mode is also a smart trainer specific mode. When you’re in SIM mode, you can change variables like the slope and wind speed and simulate an outdoor ride. So if you wanted to pretend to ride a 9 degree uphill with a 10 mph headwind, that’s what it will feel like.
Smart Trainers: It’s All About the Apps
The Wahoo Fitness app lets you use most of the features of the smart trainer, but it’s frankly pretty boring and utilitarian to limit yourself to using it that way. What really makes smart trainers interesting is how they work with other apps, like Zwift, TrainerRoad or the Sufferfest. Wahoo has worked to integrate with just about every major app out there, so you have a lot of different options for how you use the Kickr.
All of these individual apps have their own pros and cons, and they generally aim at different types of riders. Some are designed primarily to program in a specific workout and help you complete it. Some are designed to show you video of real life scenic rides so you can pretend you are riding them. And some are designed so that you can ride with or race against other riders in real time over the Internet, or some combination of those features.
It’s important to note that the Kickr will only connect to one app at a time. So if you’ve launched the Sufferfest and connected it to your Kickr and left the app running on your tablet, then it will grab the bluetooth connection and hold it and prevent any of the other apps from controlling the smart trainer.
I found this a little confusing at first as I was rapidly switching between apps to see which ones I liked best, and I couldn’t figure out why I couldn’t get some of them to connect. But as soon as you realize what’s happening, you’ll know that you need to quit one app so that you can start the next one.
Over time, I found myself using Zwift the most, because there are so many different ways to use it with a smart trainer and because so many other riders are using it too. You can “free ride” different courses and try to keep up with other riders on the screen who are pedaling from their trainers all over the world. You can ride with friends who are online at the same time. You can enter regularly scheduled races, where you are riding against dozens or more other riders who are in a similar category of power output abilities. Or you can use one of the many Zwift workouts. You can even create your own workout, or upload one that your coach gives you into Zwift. There are even regularly scheduled group workouts, where it’s almost like a spin class. The options go on and on.
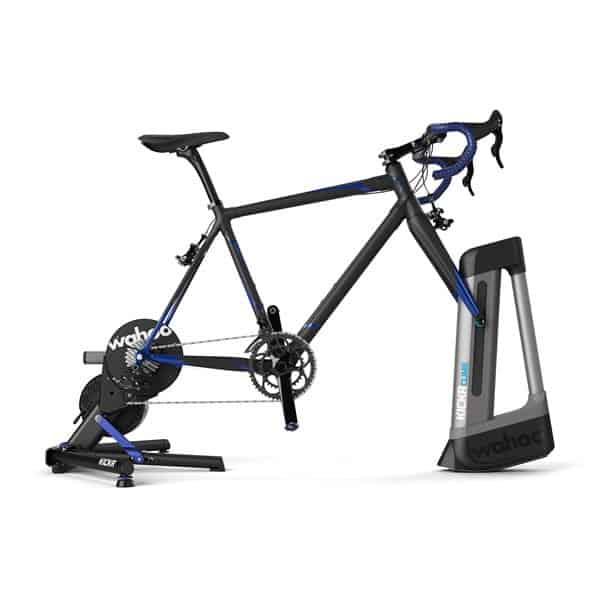
Kickr Climb
When you’re riding on a Kickr trainer using Zwift or Rouvy or one of the other apps that simulates terrain, the smart trainer features will make it harder to pedal on the uphills, and easier to pedal on the downhills. But your bike still stays level, unlike riding outside.
With the Climb, Wahoo has attempted to make trainer riding more like riding in real life. You connect your front fork to the Climb, and it reads the terrain info from all of the major apps like Zwift. If Zwift says that you’re riding up an 11 degree incline, not only will it become harder to pedal, but your handlebars will also move upwards to match the incline level, putting your bike in the same position it would be in if you were outside riding on the road.
The Climb has two different modes. You can put it in locked mode where it will remain at whatever level that you set it. You can use the remote to raise or lower the incline manually, and it will stay wherever you put it. You can move it up or down while you’re riding in locked mode. The remote is connected with a cable that extends, so you can pull it out from the Climb and install it on your handlebars. I generally just reached down to use it.
Unlocked mode is where you can allow any apps you are using to raise and lower the incline as you’re riding. It gives you more of a physical cue when you are going uphill in Zwift than just the pedals becoming harder to push. You know when the road is going uphill, and you know when it goes back down, because your bike’s position will match the incline.
What about thru-axle bikes? No problem. The Climb comes with just about every adapter you can think of. If you have a regular road bike with a quick release, you’re ready to go. For my thru-axle bike, I just had to figure out which size axle my bike had on the front fork. Then I grabbed the correct adapter and it connected the bike perfectly.
Is it worth the money to have a separate device that you hook up to your bike, just to make your bike handlebars raise up and go down?
I think it depends on how you use your smart trainer. If you want the most realistic experience and money is no object, then it’s a no brainer. It’s fun, and it adds to the experience. Similarly, if you are spending most of your trainer time riding on Zwift or one of the other apps that simulates real terrain, then it improves the experience.
If, on the other hand, you are primarily using your trainer to ride specific workouts, then you probably shouldn’t bother. As an example, if you are riding a specific workout even while using Zwift, the Climb does not go up and down as you go over terrain. This is because the Kickr is sending out the wattage required to complete the workout, which doesn’t necessarily match up with the terrain. You might be in the middle of a 5 minute rest period where you are riding at 100 watts to recover, or you might be doing a 600 watt 20 second effort. Having the Climb go up and down during a workout wouldn’t really add to your experience and might be confusing, so it just stays level in the Zwift workout mode.
The Climb only works within the Wahoo ecosystem of smart trainer devices. You can’t use the Climb in combination with a Tacx smart trainer, for example. It’s Wahoo only. But it will work with all three of their smart trainer models, the Kickr, the Kickr Core and the Kickr Snap.
The Wahoo Headwind smart fan, on the other hand, will work with other brands of smart trainers.
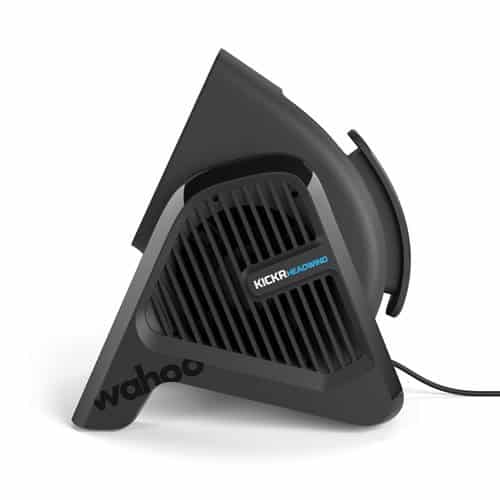 Wahoo Headwind Smart Fan
If you use a trainer, you definitely want some kind of fan. Riding in one spot while you’re indoors quickly generates a lot of body heat, and that means a lot of sweat. A fan helps cool you off and prevents the sweat from dripping so much all over your bike.
Obviously, the most important feature in a good fan to use while riding on a trainer is airflow. The Headwind scores extremely well in this department. Unlike with a regular fan that you have to figure out how to tilt and place at the correct height to get the air where it’s hitting you correctly, the Headwind is designed specifically for riding on a trainer.
The airflow from the Headwind is pointed right where it needs to go to cool you off, with nothing wasted blowing anywhere else. You can move it forward or backward on the floor if you want it to blow a little higher or a little lower, so it works for taller and shorter riders.
The fan is not too loud. I was able to easily hear my music playing, or hear the sounds from the Zwift app. Much better than an old fashioned box fan in that respect.
As a regular fan, it hits all the right checkpoints. It’s a smart fan though, so there’s even more to it.
You have three different ways of using the fan. You can put it in manual mode if you want, and choose one of four fan speeds. In this mode, it’s just a very good fan that blows correctly.
The second mode works according to your heart rate, if you are using a heart rate monitor. So as you are working harder and your heart rate goes up, the fan blows harder to cool you off. And when you’re resting between efforts or warming up at a low heart rate, it blows at a lower speed.
The third mode works where it blows according to the estimated speed you are riding. So if you’re riding on Zwift, it simulates real life riding. When you go downhill and your speed increases, the fan blows harder. This gives you a much more realistic experience. But it can also bite you when you hit a steep Zwift uphill your speed is low but your effort is high, so the fan isn’t blowing as hard. Sort of like a real life climb!
What I Learned By Doing Smart Trainer Workouts
After you use Zwift for a while, it generates an estimated FTP (Functional Threshold Power) number for you. You can also take an FTP test within the app, or you can enter your FTP if you already know it. Zwift estimated my FTP within 3 watts of one of their tests. Since the app knows your FTP, the workouts they offer will adjust to match the level of your current abilities. (Other apps like the Sufferfest or TrainerRoad have similar features that measure and work around your current fitness level.)
I was surprised and embarrassed to realize that when the Kickr was controlling my workout, I was pushing myself much harder than when I go out and do intervals based on perceived effort. It became obvious that I have been fading at the end of my intervals in on the road, and not putting as much effort in as I thought.
When I had to complete, for example, three minutes at the prescribed wattage that the Kickr set, the smart trainer wouldn’t let me slack off the last 30 seconds. I either had to pedal the prescribed wattage for the prescribed time or I’d have to quit pedaling. Since it knows your abilities, it is not going to give you something you can’t handle unless you are riding already exhausted or overtrained. I have started to get a feel for how hard I should really push myself when I complete an interval on the road.
The other advantage I found with doing a workout inside on a smart trainer is that traffic, turns and hills don’t get in your way or prevent you from completing the whole workout as intended. Riding outside in general is much more fun than riding inside, of course. But workouts aren’t exactly about “having fun.” So it wasn’t really any worse doing a workout on the trainer than doing it outside. In fact, I found that completing a workout on the trainer and knowing that I hit all my numbers exactly as prescribed gave me a real feeling of satisfaction. My legs could tell the difference too — I was often quite tired after completing them.
Want to Spend Less? You’ve Got Options
The top of the line Kickr model that I tested costs $1199. But you could bring the price down to $899 if you choose the Kickr Core instead. The Core has a similar design and almost all the same features as the high end Kickr. The flywheel weight on the Core is 12 pounds instead of 16 pounds for the Kickr, and it simulates up to a 16 percent grade instead of a 20 percent grade like the Kickr. The Core also doesn’t include a cassette, so you’ll need to provide your own. If you want to spend even less than that, there’s the $699 Kickr Snap model. The Snap has a 10 1/2 pound flywheel and simulates grades up to 12 percent. With the Snap, you leave your rear wheel on your bike and the rear tire powers the flywheel as you pedal.
Summary
I love the combined system, and how it all works seamlessly together. I now understand why so many people rave about smart trainers.
Is it worth the money to get the whole setup? I think it depends. If you’re the kind of cyclist who rides Dura Ace and would never settle for Ultegra or spend thousands of dollars on high end wheels, then you’ll also probably want the whole setup here, because it’s the best experience that Wahoo offers. Both the Headwind and the Climb do add to the experience.
Now that I’ve been using the whole system together, I’d be hesitant to give any of the individual pieces up. If forced to choose, I’d probably keep the fan and give up the Climb, since I like to do workouts on Zwift. Workouts don’t make the bike go up and down anyway. If I were doing more Zwift racing or free riding instead of specific workouts, I might do the opposite and keep the Climb and give up the fan. Either way, I’m now convinced that smart trainers in general are worth the money. After using one for myself, I finally understand the appeal.


I bought the original Kickr a few years ago and it performed very poorly in Erg mode. I tried the version 2 of the Kickr and it wasn’t much better. So for those of you trying to use this trainer in Erg mode beware as it can’t keep the desired level. I compared it with my Stages power meter and it would oscillate +/- 20 to 30 watts around the target. To make things worse, I found the variations get worse as your workout progresses. I replaced it with a Tacx NEO. I know it costs more, but it does what it’s supposed to do when operating in Erg mode. Suggestion: Save up a little more money and get the Tacx NEO instead.
Regards,
The comment about only being able to connect to one app at a time is true if you are connecting via Bluetooth but it’s not the case with ANT+. I occasionally use two ANT+ dongles to connect to Zwift and TrainerRoad simultaneously.
Zwift allows you to specify separate devices to receive power data and to control the trainer. I leave the controlling device unpaired so Zwift doesn’t attempt to change the resistance on my Kickr. I can do a TrainerRoad workout that controls the Kickr while still having my avatar move in Zwift. You can do basically the same thing with a Zwift workout but I prefer the TrainerRoad plans.
That’s an interesting way to use it!
I guess technically, each ANT+ dongle still only works with one app at a time, but you are beating the system by using two of them simultaneously.
Correct. Each ANT+ dongle is used by one app. But, while Bluetooth is always one-to-one, the Kickr (and any other ANT+ sensor) is sending ANT+ to as many devices as you want to connect to. So, you can talk to TR and Zwift and a GPS/computer, etc. In my case, the only reason I even consider this is because Zwift allows me to control the trainer separately from controlling the avatar in-game.
For riders interested in using the trainer to simulate riding on the road, I highly recommend the FulGaz app. It has a huge selection of videos of rides from all around the world and works with Wahoo trainers as well as STAC Zero and other trainers. For me, riding the trainer is an alternative to riding outside, not to do specific workouts but because I’m not able to get outside for the ride (weather, work, etc.). FulGaz is much more engaging for me than video game-style rides.
Sometimes I use my Kickr with my Garmin 1000. I select one of my outdoor rides that convert it to a course. The Kickr will simulate the grades and I visualize where I am on my outdoor ride. It’s great for training for a race as you can use the race route as a course. Only down side is no visual, so I watch a movie or crank music.
I’ve been testing the fan and like it a lot too. But no way would I want to have it set to my speed. If I’m going slow, that means I’m putting out a lot of effort and want more wind, not less.
Last year I upgraded from the Kickr Snap to the Kickr. I like not having to calibrate prior to every ride. Just hop on and go.