
Jim’s Tech Talk
By Jim Langley
Thanks everyone for all the excellent comments about hookless tubeless rims, our Tech Talk subject last week. The consensus was that cycling doesn’t need hookless rims and everyone would be better off with rims with bead hooks. Bead hooks help hold tires on.
The other takeaway from the comments was that a lot of readers either were never interested in trying road tubeless or tried it and weren’t impressed, or found it more problematic and decided to go back to standard tires with inner tubes.
You Might End Up with Tubeless Tires Without Even Knowing It
The thing is that new bikes today can come set up with tubeless, especially gravel bikes. So even though I know from the comments that many readers don’t want them, I would like to offer some tips to help anyone who has them.
And also because some of the complaints I’ve heard about tubeless tires over the years suggest that the rider didn’t fully understand how to use tubeless tires.
If you’re not interested in tubeless tires, that’s okay, please turn the virtual page and come back next week. If you ride tubeless and have some tips to share for newbies, please share them in a comment, thanks!
The Advantages of Tubeless Tires (at least what proponents believe)
There are a few reasons why some road and many gravel riders favor tubeless tires. First, they feel that the ride quality improves with the more supple tires (no tube inside) and the lower pressures used. Lower pressures work because pinch flats can’t happen since there’s nothing to pinch.
Then there’s the flat-proofing of having sealant inside the tires to seal any small holes. In most cases, as long as there’s liquid sealant inside a tubeless tire (in other words, enough was put in and it hasn’t dried up), the sealant should seal small punctures up to ¼ inch. It works so well that you don’t have any idea you even put a hole in your tire.
Sealant may also seal larger holes if you give it time to do the job. I’ve had a tire seal up after waiting over a minute. I did have to wipe some sealant spray off the frame. But I was able to ride home.
And, should you get a flat that the sealant doesn’t fix, as long as you carry a tire plug kit and know how to use it (very similar to car tire plugs), you can repair a tubeless puncture very quickly, even in seconds if the plugger is handy and you’ve mastered using it. It’s the fastest flat fix ever because you don’t have to remove the wheel or tire. If you’re lucky you might not even have to add any air. Some pluggers are built into CO2 cartridge pumps to be able to add air as needed too – and right through the hole you plugged.
My Good Luck So Far (he knocks on wood)
I’m going to jinx myself but I haven’t had a single flat on my Pirelli Centurato 700 x 45c tubeless gravel tires since I put them on my Trek Checkpoint SL-5 a year ago.
But it’s only fair to point out that I have ruined a relatively new tubeless road tire with a single large glass cut that the plug couldn’t seal. I somehow didn’t see that broken bottle on the road.
For that repair I had to dump the sealant, install a spare tube and limp home with the tire barely inflated so that the spare tube wouldn’t explode out the hole (I put a piece of a FedEx envelope I had as a tire patch inside the tire to help). It hurt throwing out such a new and expensive tire – nice tubeless tires are some of the most expensive – that tire cost me $85!
11 Tubeless Tips
Tubeless Tip #1
As we went over last week, you want to know and stick with the proper set up (recommended replacement tires and pressures) for your wheel/rim and tire combination. On a new bike you should receive instructions with the bike. If you didn’t, the bike shop should be happy to explain.
Tubeless Tip #2
a) Know that tubeless sealant doesn’t last forever. And if it dries out inside the tire it can’t seal punctures to protect you from flatting. Sealant also helps keep tires on the rim by sealing any tiny gaps between the tire and rim and also pores in the tires. That’s why some tires seem to sweat – it’s the sealant doing its job.
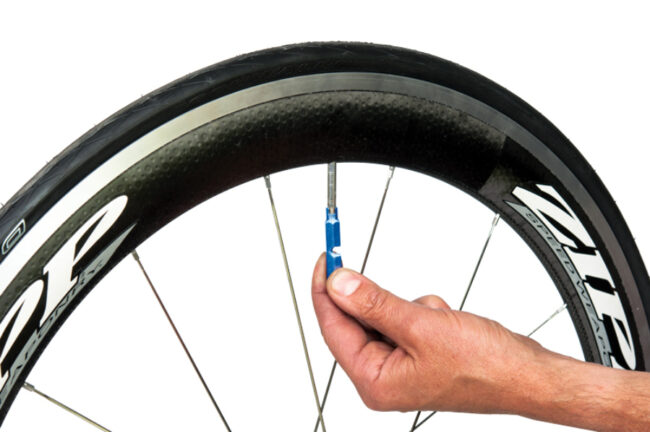
b) According to one of the oldest and leading tubeless authorities, Stan’s No Tubes, sealant should last from 2 to 6 months. To check your sealant level, you let the air out of the tire (put the valve at 9 o’clock), unscrew and remove the valve core with a valve core tool like Park Tool’s Valve Core Remover tool: https://amzn.to/49O9p5k. Then you can stick something into the tire to use as a dipstick to “read” how much sealant is in the tire. It has to be small enough to fit inside the valve and long enough to reach the bottom of the tire (rotate the tire so that the valve is at 6 o’clock first for this.
Tubeless Tip #3
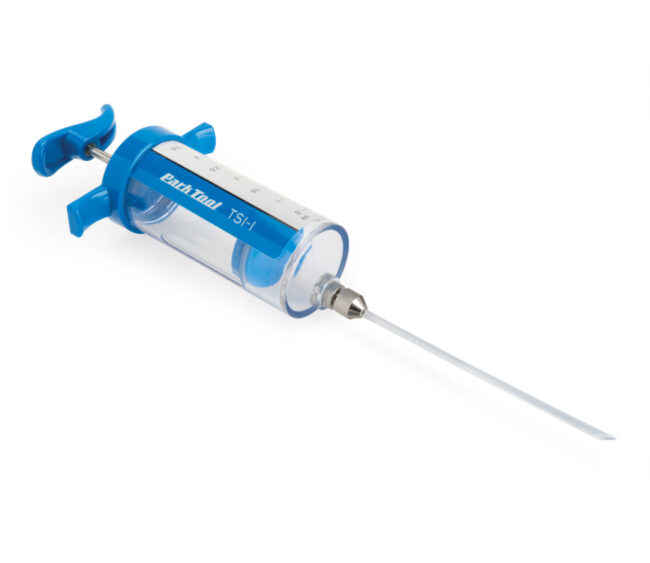
To add sealant to your tires, get an injector tool, such as the Park Tool one that I wrote up a while back. You can learn more here: https://www.roadbikerider.com/park-tool-tsi-1-tubeless-sealant-injector/. This tool makes it easy to pump in fresh sealant. And you can use it to check sealant levels too.
Tubeless Tip #4
For a plug kit, I use and have reviewed the one from Dynaplug. In my review https://www.roadbikerider.com/dynaplug-tubeless-tire-repair-kit-review/, there’s a video showing how to use it. If you get one be sure to try it on an old tire you have. It doesn’t have to be a tubeless tire. You just want to get a feel for what it takes to plug a tire. It takes more force than you expect to break through the tire tread and casing and if you don’t experience it you might be afraid to keep pushing when you really need it out on a ride.
Tubeless Tip #5
One thing to know about tubeless tires is that the sealant may form a skin over the hole in the end of the valve inside the tire. If you try to let air out to reduce the pressure, for example, and no air comes out – even after unscrewing and pushing down the Presta valve tip, then it’s probably because the sealant is blocking the hole and not letting any air out. For this, you use your valve core remover, take out the valve core and push something long enough in to break the sealant skin. Then put in the valve core and the tire will accept and release air again.
Tubeless Tip #6
If you get tubeless tires with a new bike, they should have been set up properly by the shop. But if you have problems with them going flat, there are a couple of simple things you can try. The first is to air them up again and ride around in little circles in different directions. If the air is leaking out through the tire, this ride massages the tire and because you’re riding, the sealant gets dispersed around the tire and can find the leaks and seal them. The other thing you can try is removing the wheel, airing up the tire and shaking the wheel up and down and all around to try to get the sealant to find and seal all the holes.
Tubeless Tip #7
Another common tubeless sealing issue is the result of a bad rim taping job. Most tubeless rims are taped to seal all the holes in the rim. If it was done poorly with bubbles under the tape and the tape not covering from wall to wall, the air can travel beneath the tape and escape through the rim’s spoke holes. Here’s the thing though: when this happens it will sound like and you might even see air bubbles and sealant leaking out at the valve. But it’s not the valve leaking, it’s the rim tape and the sealant is finding its way through the rim and escaping at the valve. You can try waiting to see if the sealant fixes the leak under the tape. It might if you’re really lucky. If not, you’ll (or have the shop do it) want to re tape the rim properly with new tape. It’s kind of a big job because you’ll need to clean all the sealant off of the rim and install new rim tape.
Tubeless Tip #8
Speaking of air traveling inside the rim, the component maker Enve has identified a potential hazardous issue where air gets inside a carbon rim and if it happens it can over pressurize the rim and cause a delamination. I have not been able to determine how common this issue is. But if you ride carbon tubeless rims, they’ve designed a special valve nut that prevents the issue and it’s only $5: https://enve.com/products/pressure-relief-valve-stem-nut.
Tubeless Tip #9
Even with a plug kit, you may want to ride with a spare tube just in case all goes wrong and it’s the only way to fix a bad flat. The thing to know is that tubeless tires can fit more tightly on rims than non-tubeless tires. So you want to be prepared with quality tire levers that you’ve used and know work for you (keep reading for another tool). And, you should carry a spare tube that’s at least one size smaller than the tire you’re running. So, for a 32c tire, a 28c tube. The smaller tube will help when you to put that tubeless tire on with a tube inside, which makes it even tighter.
Tubeless Tip #10
Speaking of tight tires, if all goes well, you may rarely if ever have to remove a tubeless tire on a ride. However, if you do and you find that the tire is a bear to get on and off, be sure to replace it with one that’s properly sized and easier to get on and off. I said “properly sized” because tires shouldn’t ever be miserable to install and remove. If yours are, I recommend finding tires that aren’t and giving that company your hard earned $ – the other company doesn’t deserve it if their tires don’t go on and off without a battle.
Tubeless Tip #11
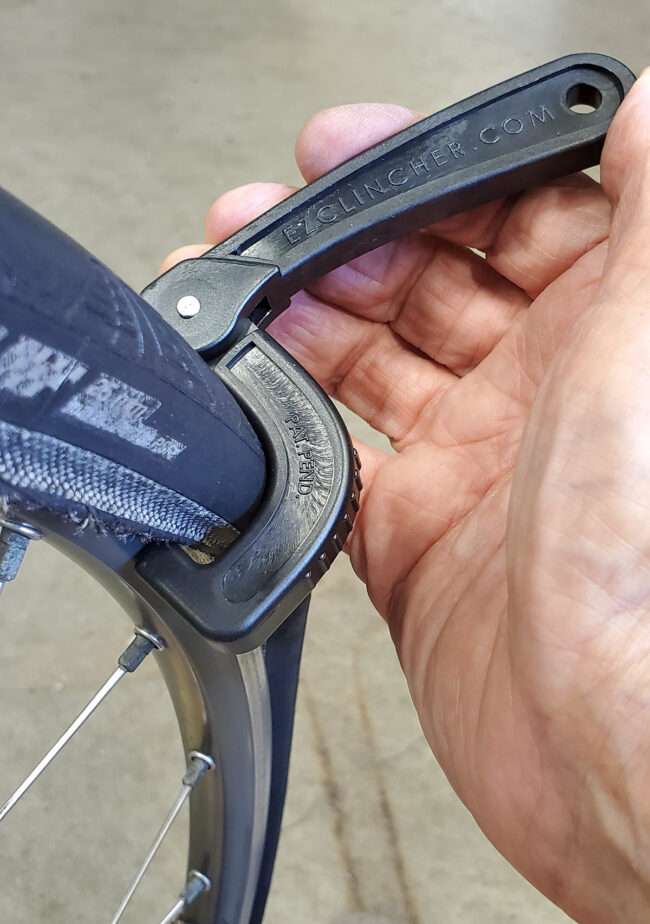
One more tip. There’s a relatively new “tire jack” tool that’s small enough to easily carry that gives the leverage to put on tight tires and it’s only $12.95. It’s the Ez-Clincher tool.
Jim Langley is RBR’s Technical Editor. A pro mechanic & cycling writer for more than 40 years, he’s the author of Your Home Bicycle Workshop in the RBR eBookstore. Tune in to Jim’s popular YouTube channel for wheel building & bike repair how-to’s. Jim’s also known for his cycling streak that ended in February 2022 with a total of 10,269 consecutive daily rides (28 years, 1 month and 11 days of never missing a ride). Click to read Jim’s full bio.
Eleven reasons why I will stay with good ol’ fashioned tubes. Even at 12,000 miles per year I only have to deal with a flat or two. The tubeless tires and associated processes, in my opinion, aren’t worth the trouble for road riding.
Peter, I was thinking the exact same thing as I read this. I have seen so many stories of challenges in getting tubeless to work on road bikes, I can’t see the attraction. And I have also seen tests where the reality of tubeless tires is that their casings are less supple and so they don’t actually deliver on the “better ride, roll better” claim. I see the value on mountain bikes, and maybe gravel bikes, but not for road bikes. I just hope we are not heading down a marketing driven rabbit hole where manufacturers essentially eliminate tubed tires.
I resonate with these two posts. I haven’t had a flat on my road and mountain bikes for years (disclosure: I’m not riding 12,000 miles a year!).
On my commuter bike, Schwalbe Marathon Plus tires with Mr. Tuffy tire liners (probably overkill) have pretty much eliminated flats.
The thing that I really don’t miss about tubeless is the maintenance of the sealer every few months.
I went tubeless with my new bike in 2018. For the first few months I had about 4 flats and got frustrated, but my local shop didn’t understand tubeless. Then I got a new mechanic and new shop ‐‐ 5 years after and I’ve not had a flat since. Although I do travel with a spare tube just-in-case, I no longer have rides interrupted with roadside flat repairs. I don’t plan to ever go back to tubes.
I had tubeless tires on my road bike 10 years ago. I hated them; it was impossible to get them seated when installing. My shop had to go directly from their compressor (couldn’t use the remote hoses at their workbenches) to get enough pressure to get the tire seated. Not sure if that’s still an issue or was just particular to my set up back then. I have tubeless on my mountain bike and have zero issues seating the tire. Anyone using road tubeless have seating issues?
Hi Tony, sometimes I get a new tire that refuses to take a seal.. Sometimes if I am mounting a pair of tyres, same size brand rim, one will seat first try. The other won’t. Not even close.
What I noticed was that nearly every tire seats easily the second time.
So my trick is, for those that refuse to seat within 30seconds of swearing, I put a tube in them, mount them, walk away for 15mins, take one side of the tire off, remove the tube, put the tubeless valve in. Then 99% of the time the tire will seat fully straight away.. a problem halved etc,
Bontrager makes a plastic “rim strip” for their tubeless wheels in lieu of tape. I used it on my now retired trek MTB for years, It’s a solid, somewhat flexible ring that is mounted on the rim, basically the same way you would mount a tire. It fits tightly and works great. I never had any issues with leaks and I was able to remove and reuse it on two occasions when I had to replace a broken spoke. I think other manufacturers make something similar, but I haven’t really looked into it. There might be a slight weight penalty, but I can’t imagine it’s anything significant.
I have been riding tubeless road tires for the last four years. Approximately 25,000 miles. Early on I had issues, mainly because I tried to ride at pressures over 70 psi. You will have difficulty getting punctures to stay sealed at those pressures. When I lowered my pressure, switched to 28 mm tires, my reliability issues were eliminated and I experience a much more compliant ride. I am just under 200 lbs. I have both hooked and hookless rims. I have never experienced a problem other than blowing a tire off the rim when I over inflated to 120 psi. Was on the back patio and found sealant on the house gutters two stories up and 25 feet away. My ears were ringing for a day.. It was a hooked rim.
I went to tubeless when the arthritis in my hands made it impossible to remove some tires myself.
The tire jack above is very helpful.
I also have arthritis in my wrist, and have had trouble removing and (especially) mounting tires. I got one of these “Tyre Glider” tools (https://tyreglider.co.uk/) and have had good results with it. My tightest tires are on a folding commuter bike; I find it necessary to use one “regular” tire lever to create enough space to get the Tyre Glider on. Otherwise, it works as advertised. My wrist is happy!
Thanks for the Tyre Glider recommendation Steve! I looked it up and you can buy it on Amazon too and for only $14.99 https://amzn.to/3VmrKSL
Jim
I looked into this tool a couple years ago but read that the groove part that fits on the rim was too narrow to fit my hooked Bontrager carbon wheel rims. According to a recent review, however, they have updated the tool to handle wider rims. Looks to be worth a try now for me!
Re tubeless — have put about 12k mi during ~4 yrs on tubeless Conti GP 5000, 5000s, 5000 AS on rough and smooth tarmac, splintery wooden bridges, and small amount of gravel. Only one flat! But that was due to a larger sidewall slice from an acorn cap that I likely could have plugged had I known about the Dynaplug fat plugs. Plenty of smaller punctures that have been a pleasure to watch self-seal. Sealant is Stans, which in my climate I refresh about every 5 months. Super plush ride at the lower pressures afforded by these setups (I’m 168 lb and run 50/53 PSI). The people who are not feeling the better tubeless ride likely have too much pressure or poor quality tires. (Try using the SRAM tire pressure calculator.) When the sealant leaks or sprays is it messy, nasty sticky? Not in my experience with Stans. It’s like spilt milk and is neither sticky nor toxic. I just cary a light rag in my kit to clean up such events, but have never had to use it. Will never go back to tubes, except the light weight one I carry just in case!
I also joined The Better World Club https://www.betterworldclub.net/nationwide-bike-roadside-assistance which gives me a ride home if I’m out alone and can’t change the tire myself.
I bought a Giant Advanced Revolt 0 gravel bike last year, and it came tubeless with carbon hookless rims. The sealant was Stans No Tubes. During a group ride, the rear tire flatted – I hit a piece of glass that caused a 1/8″ puncture, and the Stans went everywhere. I had similar results with Stans on my mountain bike. It seems prone to drying out in the tire relatively quickly. After a lot of research, I found that Muc-Off and Silca sealants both seal larger punctures and don’t dry out as quickly. I bought a bottle of Muc-Off and have been very happy with it. The formulation seems to stay viscous much longer than Stans, and it also does a great job of sealing the porous gum sidewalls of my Specialized Pathfinder Pro tires.
Been riding Road Tubeless since they were first introduced 6-7 years ago. I have the benefit of having wheels that don’t require rim strips (Campy 2-Way). While I agree the benefit of tubeless is a more compliant ride and most of the time the sealant will do its job, road repairs can become complicated with sealant all over you and your bike. The plugging process in my opinion is not something most can master while most road repairs will require a 2nd step once back home. Every 3 months I do sealant maintenance. The tire/rim specs are getting better. I think road tubeless remains too much to deal with for most comparing to using tubes.
Have tried many sealants. Currently prefer Muckoff because it seems to do a better job with the added benefit of being water soluble, thus it washes off you, your bike and tires if you are trying to patch them.
When filling tubeless tires with CO2 canisters (after a puncture where it self sealed but let a significant amount of air out) go slow and keep the valve at the 12 o’clock position so that the cold air doesn’t instantly bead up the sealant.
I’ve used Dynaplug but found that Stan’s Dart to be better because of its ability to fill up a cut that has an amorphous shape and, because it chemically combines with the sealant to form what appears to be tire material thus staying put even at high pressure. Dynaplug is good though and I carry both anyway.
For road bikes with skinny tires there are now available sealants that work and work instantly but they’re a bit of a hassle to setup and refill in that you MUST pop off the tire to refill as they will easily clog the valve otherwise.
I own 11 bicycles and 2 off them are tubeless, one a gravel bicycle and the other a converted gravel bike with 32×700 road tires (the Apollo, the one that uses a belt drive system marketed by Priority in NYC). I’ve had 5 punctures, all but one fixed themselves in less than 3 seconds (the other one was a 1/2 inch rip that required lots of work before I was able to limp home and replace the new gravel 38×700 tire).
I recently replaced my Mavic clinchers (inner width 17mm) running 28mm Conti GP 5000 clinchers at 75/80 psi F/R with Zipp Firecrest 303s (hookless, 25mm inner width) running 32mm Conti 5000 S TR tubeless at 50/52 psi F/R. I thought I was on a new bike since the ride was so much different. Both tires seated with the first of four pings after about six quick, strong strokes using a regular floor pump. Road tubeless tech has advanced in recent years with better fitment and larger tires at lower air pressures. I also went with wider, lower pressure tubeless tires for more air volume to seal small punctures. For more data on various tires and certain comparisons, you can find exhaustive reading on bicyclerollingresistance.com. Each rider should use the wheel/tire setup he’s comfortable with. It’s similar to arguments with disc vs. rim brakes, electronic vs. mechanical shifting. Enjoy what gets you down the road with the wind in your face.
I have weak lady hands. I found “tubeless ready” rims made it nearly impossible for me to get tires off and on even when using tubes. I sold the rims and had some old school rims built. Was expensive but being able to change your own flats is priceless !
I tried a tubeless setup on Zipp 303S hookless wheels with 28 mm tires for a year or so and it was a disaster. Nobody talks about the fact that if you are using them in summer, even when inflated to 60 lbs, and you leave the bike in your car for any length of time, the heat will cause the tires to blow off the rims. This happened to me and the sealant went all over the car. Some of the sealants are also lethal to carpet and vinyl so parts of the interior were irreparably scarred. At another point, I had the bike in my apartment, heard a loud noise in the middle of the night, and woke up to find that one of the tires had blown off the rim again, sending sealant all over the room. Again the tires were only inflated to 60 lbs and I have no idea what caused this to happen. I gave up and sold the wheels. However, I am now running tubeless Vittoria Corsa N.E.X.T. tires on 7 year old Bontrager Aeolus 3 hooked wheels without any problems whatsoever. And I would highly recommend the new Silca sealant system, which consists of carbon fiber pieces suspended in liquid and is supposed to seal bigger holes than other sealants. After the initial setup, you buy the liquid separately and refill the tires every 3 months through the valve stem.
Thanks for all the great comments everyone!
Jim
Following up on my post of March 14 mentioning the Tyreglider tool. I bought it on Amazon and used it to mount 4 tubeless tires last week — 2 Conti 5000 AS and 2 Bontrager hard case. Previously the tool would not work on hooked rims with hooks of a certain width. The upgraded version of the tool purports to fix this, and I can confirm that it works very well! Mounting and unmounting the tires was a snap, dramatically easier than using any of the other available tools out there!