
By Jim Langley
Here at RBR, we often get emails from roadies and even mountain bikers who are frustrated over “tight” or “impossible to get tire on or off the rim” or “stubborn” tires almost never let up. I want to give you a gift that’ll keep on giving. My present to you is the seemingly little-known secret that makes it much easier to put on and take off bicycle tires.
We enjoy answering email. But wouldn’t it be better not to have to ask, and instead to have the know-how and skill to laugh at those annoying too-tight tires and simply pop them on/off with ease? Yes? I thought as much.
I’m sharing the most important tough-bicycle tire installation and removal tip. That way, you should be able to more easily fix and replace your tires, and also show your riding buddies how to do it.
How to put on standard and tubeless clincher tires
This tip works for all clincher road wheels and tires (mountain, too) whether they include tubes or not. Those without tubes are called tubeless or tubeless-ready or tubeless-compatible.
You might hear that having tubeless tires is the reason you can’t get your tires on/off. While it’s true that tubeless are stiffer than standard clinchers (they need to be to remain airtight), the installation and removal tip here works the same on them.
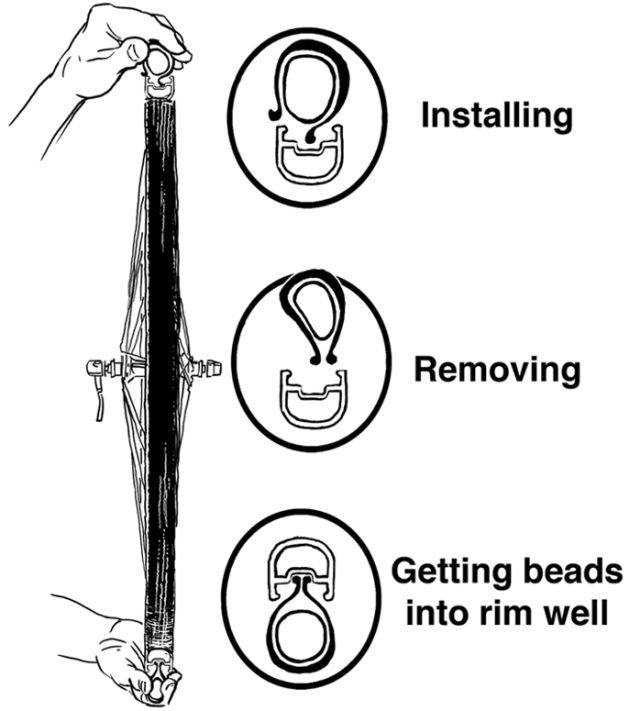
To help you visualize my explanation, I asked my cycling illustrator friend Karl Edwards http://karledwards.com/ for a sketch, which he kindly provided gratis (thanks, Karl!).
Outsmart that stubborn tire
Before I discuss the secret, I need to give you a little pep talk. Fixing flats and even replacing tires can be high-stress situations. Frustration, even anger, is understandable. But to master those tough tires, you’ve got to keep it together – or as my head mechanic at The Bicycle Center in Santa Cruz, California, Jeff Jolin, used to say, “You’ve got to be smarter than that tire.”
Jeff was spot-on with that advice. Tight, stubborn tires require thinking about what you’re doing and solving the issue that’s causing the tires to be stuck and refusing to go on or come off. It won’t do any good to get into a wrestling match with the tire.
The secret to putting bicycle tires on the rim easily
If you adopt Jeff’s philosophy and always put your thinking cap on when installing and removing tires, you may never struggle again. All you need to keep in mind is two key factors to ensure that tires behave.
1. The center and deepest portion of the rim (called the rim “well”) has to have nothing in it besides the rim strip or tubeless tape/tubeless valve. Otherwise, whatever is in there will get in the way, preventing the second key factor below.
2. You must get the beads (see Karl’s illustration) down and into the rim well all the way around the rim, or as much as possible, and keep them there to ensure easy on/off.
If you can manage these two things, the beads will sit down inside the rim, in the area that is the rim’s smallest diameter. With the beads down inside the rim, you create slack between the tire and rim; it’s that slack that makes taking tires on and off easier. Actually, most tires and wheels work this way, motorized vehicles included.
If you have trouble getting bike tires on or off the rim
If you still struggle during your next tire change, remember what I said about outsmarting the tire. Carefully inspect around the whole tire and rim on both sides.
For tube-type tires, the most likely thing to get in the way is the tube. Take your time and make sure it’s fully up inside the tire and not in-between the tire bead(s) and rim.
For tubeless tires, the most likely thing is that the tire beads are not down in the rim well all the way around the tire. Inspect carefully and make sure they’re not sitting high on the rim’s bead shelves. Sometimes you have to push them off and down into the rim well a few times to get them to stay down there.
Tip: Since tubeless wheels have a tubeless valve taking up space in the rim well, mount the tire around the rest of the wheel first and pop the beads on last at the stem.
Once you find and fix whatever is preventing the beads going down and sitting in the rim well, that tire will go on and/or come off. You can do it!
The Kool Stop Tire Bead Jack is a hard to find but extrememly useful tool for installing tough tires. Costs about $13.50. It’s small enough to carry in my handlebar bag. Once I saw how easy it is to use I’ve never been without it, and many times on the road I’ve stopped to help other cyclists who were panicing because they couldn’t get their tires back on. It works so well. I don’t understand why it’s not better known.
The Kool Stop Tire Bead Jack is available on Amazon and works flawlessly. I recommend it to all my friends with hard-to-install tires.
The Kool Stop Tire Bead Jack is a cool tool for sure and only about $12. Here’s a link http://amzn.to/2BMuuOH If you follow my tips in the article on getting the beads down into the rim well first before trying to put the tire fully onto the wheel, you shouldn’t need any tools to put tires on. But that’s a cool tool for forcing on tires no matter what. Just be a little careful because it has so much leverage you could actually bend an aluminum rim in some circumstances. Thanks for the tip!
[quote=Richard Wilks]The Kool Stop Tire Bead Jack is available on Amazon and works flawlessly. I recommend it to all my friends with hard-to-install tires.[/quote]
After I started using one of these, I noticed I never really grabbed the long part of the handle. I cut the handle down as much as possible which made it fit in my pocket or bag much better with no loss of functionality.
I previously used a Var Tyre Lever which worked on the same principle but they are hard to find AND they will break if you aren’t careful.
I usually don’t have too much of a problem, but the one thing I do after getting one side of the tire on, is to slightly inflate the tube and put it fully on the rim, leaving only the second bead. Once you do that, you are way less likely to pinch the tube and I can often use just my hands to work the second bead on. If you do need to use a lever, then the tube is out of the way.
If you are replacing a tire at home, try to leave the new tire out in the sun or in a warm room. A warm tire is much more pliable and goes on/off all the easier.
Not all rims have wells.
Absolutely useless ‘advice’. My bead is stuck on the rim, no play whatsoever and no amount of strength or intelligence will shift it.
Yes, i agree–stupid article. I have to use the Park Tool Tire Seater as a lever to grab the tire and pull it off the rim bead.
I agree too—dumbass article. I use the Vittoria Air-Liner Road Tubeless Tool to pull the tire off of the bead shelf.
Article seems to focus on getting them on, Its amazing how with such a common problem noone has come up with a tool to help remove the tires of tubeless readys in the first place. I had to take my triban wheels to a bike shop, when they got the wheels off they found the rim tape used on these for tubeless tyres blocks the rim well. I still think it will be next to impossible for me to remove the tyres at a roadside tbh but apparently they reckoned replacing the rim tape used would make it slightly easier.
There is a new tool on the market that works just as well as the Kool Stop but is small enough to fit in your saddle bag or jersey pocket. It was just released on the market in Jan 2021 and can be purchased on line at http://WWW.EZCLINCHER.COM. The EZ-CLINCHER is so new that your local bike dealer probably does not carry it yet. Being able to carry this tool on my solo rides has been a lot less stressful knowing I can remount the tire on the wheel without calling for help.
This tool is especially handy for senior riders that struggle with trying to mount the tire by hand. Also the EZ-CLINCHER will not pinch the tube when installing as is the case with tire levers.
You know what is alot less stressfull? Using stans fluid normally reserved for tubeless tires, but for inside regular old tubes, as well tire liners, and regular old department store tires. You will get twice as much miles per dollar on $20 tires than you will on $60 tubeless tires, and you will spend less time fixing flats than it will take to work to earn the extra cash to pay for the expensive tires, commuting to the bike shop, as well paying and waiting for them to do the install. They will probably have your wheel in the shop for four or five days while you wait. Screw that!
Excellent advice. Spent hours trying to get tight tyre back on rim. The diagram about positioning the beads in the centre of the well as you go around really helped. Also ending at the valve helped me too.
Thank you, worked for me. First time fixing tubeless-ready tires. getting the beads into the well is the key