Tips for Buying Used Road Bikes part 2: How to Inspect a Used Bike Before You Buy
 Jim’s Tech Talk
If you read part 1 of this series, you now know how to assess your used road bike needs and how to find previously owned pavement pounders. This week, we’ll cover inspecting used bikes to make sure you don’t get a lemon.
I’m assuming, here, that you’re shopping for a nice used road bike that’s reasonably ready to ride. You might not mind having it tuned up or replacing a worn part, but you don’t want to have to deal with expensive repairs such as new wheels or drivetrain components or a full bearing overhaul.
Take This Guide With You
You don’t need to be a bicycle expert or a mechanic to do this inspection. Simply print the step-by-step instructions here. Then, bring them with you and a pencil. As you perform each step of the inspection, jot down anything you notice.
That way you’ll keep track and if it ends up you want to buy that used bike, you’ll have a list of things that might be bargaining chips for getting an even better price. For example, if you find a nice used bike and notice that the tires are worn out.
Since nice road tires are expensive, you could point out that you’re going to have to buy new rubber before you feel safe riding the bike. And, the seller might drop their price.
Tips for Making a Good Inspection
It takes at least 15 minutes to inspect a used bike and even longer if you like it – because you’ll want to test ride it, too. So, communicate with the seller that you need enough time to do these things. You don’t want to try to inspect and test ride in a rush. You could miss something major.
Pick a location that’s well lit and has room for you to move all around the bike, spin the wheels, try out the gears and brakes. Outside usually works best. I bring a flashlight just in case the bike is in a dark garage or basement, etc. and the owner wants to show it to me there.
Tell the owner of the bike that you insist on test riding the bike and make sure they agree to let you.
Deal Breakers: Avoid Used Bikes With These Problems
Here are a few things that make me walk away from used road bikes and I recommend you do, too. In the steps we explain what to look for to spot these deal-breakers. Thinking a used bike might be stolen is not on the list below because we covered that last week.
- If the bicycle has been repainted, walk away
- If you see serious rust or corrosion on the frame or parts, walk away
- If the bicycle appears to have been dropped or crashed, walk away
- If the components are worn out, walk away
- If the frame or fork are bent, walk away
Step By Step Used Bike Inspection Checklist
Step 1) Judge the overall condition
Here’s where you will spot the deal-breakers, so look closely. The bicycle should have a nice finish on the frame and fork and the frame decals should look good, too. Look down all the frame tubes on both sides and the fork also. There should be no dents or cracks or corrosion or big chips. If you can’t tell looking down the tubes, try touching the frame feeling for dents, imperfections and signs of damage.
Look carefully at the touch-down points – the places a bike will hit the ground when dropped or crashed. Look at the side of the seat, handlebars, pedals and rear derailleur. If you see scratches or gouges in these places, the bike was probably crashed or dropped and that can be all it takes to damage a bike seriously in some cases. You can ask about it to learn more, but it’s a sign to proceed carefully.
Any steel bicycle should be checked for bends in the frame and fork. To see a bent fork takes practice, but it’s not that hard. If you stand the bike up against a wall and back up, you can then look at the front end of the bike from a distance. On a good bike, an imaginary line that bisects the head tube will also bisect the fork. When the front end has been bent, the fork blades won’t be on the line anymore.
Carbon bicycles can get damaged from impacts but this type of damage can be hard to detect. The best approach is to ask the owner if they know of any damage or crashes. And then, inspect the surface of the entire frame and fork. Usually an impact will leave a mark. If you find a mark, you can try the tap test which involves tapping on the frame with a quarter. If it sounds different at the sight of the damage than it does away from it, it’s a sign that the frame was damaged by the impact.
Step 2) Check the wheels
After the frameset, the wheels are the most expensive part of most road bikes. To check them, start by feeling for bearing play. Don’t worry, you don’t need to know about bearings to do this check. All you do is hold the wheel at 12 o’clock and push and pull sideways.
Don’t yank on it, just push and pull with gentle but firm pressure. You’re feeling for play in the bearings. There shouldn’t be any. If you feel the wheel move sideways and especially if it moves a lot, it’s a sign that the bearings need work. Check both wheels.
If the wheels pass the bearing check, the next thing to do is to inspect them to make sure they’re straight (not wobbly). To do this, lifts one wheel at a time and give it a spin. As it spins, look carefully at the rim where it passes the frame so that you have a reference point. You want to see wheels that don’t wobble side to side or hop up and down. If the wheels wobble, it’s a sign of needed wheel maintenance.
On rim brake road bikes, check the sides of the rims, which are the braking surfaces and things that wear whenever you brake. What you don’t want are deeply grooved rim sides, a sign that you’ll need to replace a rim(s) sometime soon. To spot this, look closely at the sides of the front and rear rims for a smooth surface.
If the brake pads have worn into the rim, instead of an even smooth surface, there will be a wear track around the rim. It can fool you, so look closely. You can also use a fingernail to feel the rims for signs of braking wear, such as deep grooves cut into them from a brake pad that had dirt or rocks become embedded in it.
Also, look closely at the tires for signs of worn out tread (“bald tires”), cracked sidewalls or cuts, holes. As stated earlier, tires are expensive so ideally you’ll get tires on any used bike you purchase that still have some miles left in them.
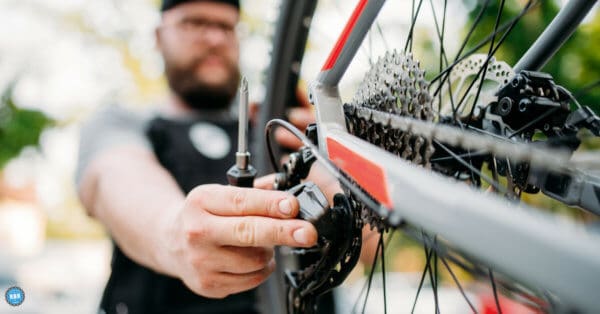
Step 3) Check the drivetrain
The drivetrain consists of the mechanism that the pedals are screwed into, which is called the crankset, plus the chain and the derailleurs. Because all these parts get worn with each revolution of the pedals and because they wear together, you want to find a used bike with a drivetrain that’s still in good shape.
The telltale sign of a heavily worn drivetrain is a build up of grime and gunk caked on the chain, the sprockets and the derailleur pulleys (the small toothed wheels the chain runs over on the rear derailleur).
If the chain and sprockets are nice and clean, it might be because they were recently cleaned. In that case, you may need to ask the owner how many miles are on it to assess its condition. If you’re used to looking at drivetrain components, you can look for smaller pointed chainring teeth and too much daylight between the chain and the sprocket when the chain is on the large sprocket. Those are signs of worn out drivetrain parts.
Step 4) Check the bearings
You already checked the wheel bearings. The other components with bearings include the headset (steering mechanism), the bottom bracket (what the crankset spins in) and the pedals (usually pedal bearings won’t tell you much so there’s no need to check them).
Just like the wheel bearing check, you check the other bearings for play, too. Play means at the very least that the component needs adjustment. If all the bearings are loose and have play it usually means that the bike was ridden so long without servicing that all the grease in the bearing components is worn out or dried up. It can be an expensive repair to have the bearings all replaced with fresh ones and new grease. Usually, it’s best not to buy a used bike that needs that much work.
Besides the wheel bearings, check the bottom bracket bearings. Those are inside the frame and are what the crankset turns on. To check these, stand next to the bike and turn the crankset so one pedal is at 6 o’clock and the other is at 12. Now hold the pedal closest to you with one hand and reach through the frame and hold the other pedal with your free hand.
Holding the crank like this, you push and pull to feel for play in the bearings. There shouldn’t be any.
Lastly, you can also check the headset with an easy test. Stand next to the bike and hold onto the handlebars. Now apply the front brake so the bike cannot go forward if you push on the bars. With the brake held on like this, try rocking the bike forward and backward. What you’re trying to find is a loose or worn headset.
If you feel or hear a knock or clunk when performing the rocking test, something’s not right with the headset (once in a while a bad brake can cause the same feeling, but it’s usually the headset). Sometimes it’s an easy adjustment. But, it’s definitely something to put on your list as it could be a sign to walk away.
Step 5) Check the brakes and gears
To do this one, start with the cables and housing sections. They should be in good shape showing no cracking, bends or fraying in the cables. Also, there shouldn’t be any corrosion.
Inspect the general condition of the parts, too. Things should look new and in good shape. The rubber hoods on the brake levers shouldn’t have any tears or serious wear. The brake calipers (the part straddling the wheel or disc rotor) should look almost like new, no bends or scratches.
You already looked at the derailleurs when checking the drivetrain, but it won’t hurt to look again. Does everything look almost new? There shouldn’t be any signs of abuse or rust or corrosion. The front derailleur cage should not have wear grooves inside and the pulleys on the rear derailleur should have all their teeth and none of them should look worn out.
This is a lot to read, but the actual used bike inspection shouldn’t take too long. Here’s hoping it helps you find a winner. One last tip is to be sure to test ride the bike even if it passed your inspection with flying colors. Only on a test ride can you make certain the bicycle rides and shifts and brakes the way it should. Have fun and good luck finding an awesome used road bike.
One Way to Unload Your Used Road Bike
Got a used bike you’d like to get rid of, but don’t want to deal with trying to list it for sale and then show it to potential buyers? Turns out there is a way, if you are willing to take less money for the bike. In some cases where you wouldn’t bother to sell it at all otherwise, or where you really don’t want to deal with the hassle, it can be worth it. I haven’t ever used the service, but Lars has used it once at a bike shop in Austin and says he found it be easy, even if he was a little disappointed with how much he got for the trade.
Bicycle Blue Book has over 1,600 Authorized Trade-In Partners ready to help you turn your old bicycle into store credit you can use immediately towards the purchase of a new one. The process is simple—just like trading in a car. It works in a similar way, where you get the wholesale value of the bike and not the full retail value. So don’t go in dreaming of getting big bucks. Take your old bicycle to your local Bicycle Blue Book Authorized Trade-In Partner and they will help you quickly and easily find the trade-in value you can apply to any new bicycle or gear in the shop.
Ride total: 8,926

For a bent steel or aluminum frame or fork you can check to make sure the wheels are centered between the stays and the fork blades, so then you have to open the skewers and see if you can align the wheel within the stays or fork, if you can’t or you can but the gap in the dropout on one side is greater than the other there is an issue with something bent; also you can ride the bike with no hands and see if it pulls to one side, this could be a result of a slant in the road which you can eliminate by riding on the other side of the road (the wrong way so make sure there isn’t any oncoming traffic) and see if the pull continues to the same side or it switches sides, if it continues then there is probably an issue with the frame or fork. Some pulling can be as a result of a bad headset which the test of that is given in write up.
If the wheel in the back cannot be aligned with equal spacing on both sides of the dropout it could be something as simple as replacing the replaceable dropout IF it has one, at this point if you’re still highly interested in the bike you may want to check with a straight edge ruler to see if the dropout is straight inline with their prospective stay. Problem with a bent replaceable dropouts is that the bike manufacture may no longer make that dropout so then you may end up searching the internet like crazy trying to find one. There is an option with bent aluminium dropouts, you can bent it back but then you have to add what’s called a torque plate to reinforce the dropout.so it won’t bend again. Do not with AL dropouts keep bending it back and forth because it will break on you, so you only get one shot at rebending AL after that it’s toast.
IF you really want to be accurate on a frame check use this string check shown on this video, it’s easy to do: https://www.youtube.com/watch?v=dUPAKqS3dt8 You don’t have to remove the wheels to do this test either. With a steel frame it can be bent back, but if it’s aluminum bike and it’s out only a very small bit you can also bend it back but if it’s out more than just a small bit the frame is probably toast.
On carbon bikes some come with replaceable dropouts, but most use a derailleur hanger made of aluminium that bends quite easily, in fact so easy that a lot of them come brand new from the factory bent from shipping which causes a lot of issues with shifting problems that the bike shop can have a bear of time figuring out. If the hanger was bent say in a very minor accident that didn’t leave any signs of a crash on the bike but now the shifting is bad, that hanger has to be replaced because more than likely the hanger is pushed inward which could allow the derailleur cage plate when shifted to the upper most gear (the biggest gear) to catch the spokes breaking them and cause you to crash as a result. The most common problem with a bent hanger is shifting accuracy is not as good at one end or the other. This is so much a common problem that pro riders replace their hangers with a stronger 7000 series AL hanger or a stainless steel hanger, some may use titanium too depending on the weight of the bike to meet UCI requirements, some pro frames don’t use a hanger at all to eliminate that potential weak area but in turn a minor crash could destroy the frame much faster then one with a replaceable hanger. Replaceable hangers are easy to find but there are hundreds of different ones so you have to get the right one of course. There is more to this but space may be limited.
I’m one of the volunteers at a large bicycle non-profit where we rebuild literally hundreds of donated bikes every year. Your ‘walk away’ bullet list is useful for someone that just wants to get a bike without investing anything into parts or maintenance. But they could be missing out on many bargains. I certainly agree with crash damage and significant frame rust as walk away points, but the other bullets are worthy of some qualification, although probably beyond the scope of this article.
As an example, I recently rebuilt a donated bike that had a very rusty freewheel and chain, and appeared to be pretty crusty everywhere. I replaced the chain and freewheel (relatively easy jobs), and trued the rear wheel (more difficult, but not expensive at a good shop). When I started to deal with the rest of the crustiness, it turned out to be just a layer of sawdust that was easily wiped off, revealing a beautiful finish. That bike, in excellent condition, went to a very lucky buyer within days.
On the subject of frame repaints, there are many, many fabulous classic road bikes out there whose ‘patina’ went too far for an owner in their past and have been wonderfully repainted or powder-coated.
Replaced components are not necessarily evidence of a problem, either. Both my classic lugged steel bikes have gone through several series of upgrades to enhance (IMHO) their functionality.
I agree with David Frost about maintenance parts may need to be replaced, but you can get a very good deal on a great bike if that’s the case and spend minimal dollars extra to get it back to running condition. But you also have to be careful about certain worn out parts, if a part like ring gears are worn that’s indicative that the bike has at least 15,000 miles on it, and if those gears are not original then who knows how many miles are on the bike! And aluminum frames can go soft over miles, and now evidence is appearing that carbon fiber bikes go soft over miles of use, could indicate the frame is tired. Of course a classic steel bike is idea to purchase used since the frame going soft thing won’t happen for a very very long time vs Aluminum and perhaps carbon fiber if that turns out to be true.
I found a complete 1984 Schwinn Voyager in a dumpster about 4 years ago completely covered in some sort of black goo which I have no idea what it was, but after 5 cleanings to get that goo off I had a really good condition bike on my hands with minimal scratches, and all the mechanicals work just fine. Not the first time I found a dumpster gem, I found a 97 Kona Lava Dome that needed new cables, seat, pedals, and rubber grips, cost me $80 total; even after some metal scrap was thrown on top of the bike it had very acceptable scratching on it that wasn’t even noticeable once I cleaned, touched up a few scratches that went down to bare metal to prevent rusting and then polished the bike; I gave that one to my daughter.
You would also be surprised at what you may find at a recycle yard, people throw away decent bikes just because they, either the owner or the bike, got old and they wanted that “piece of junk” out of the house.
Good article.
One thing: When checking the bottom bracket for bearing play, hold the cranks (not the pedals) and try to move them side-to-side. Pedals can have their own play, which makes holding them unreliable for checking BB bearings.
Oops! Thanks for catching my stupid mistake, NJgreyhead! I meant to write grab the crankarms and apparently had pedals on the brain. You are 100% correct that grabbing the crankarms is the only way to feel the bottom bracket for bearing play. Thank you for spotting the mistake and explaining. Much appreciated.
Jim
I would have carbon anything and press fit bottom bracket on my walk away list. But then I’ve yet to buy either new (I do have a carbon bike on my N+1 list, but I’m not there yet). I really can’t see buying used carbon components: how can you know the stem and seat post clamp have always been torqued correctly for example? And a press fit BB can be quieted for a while with loctite, yet may act up later. But then I’m rather old school, my 1986 Cannondale frame is showing no signs of softening, which is well known to happen in fiberglass sailboats, so I’d believe it happens in composite bike frames and rims too. Internal delamination will be impossible to spot.
Some people also seem to think it’s reasonable to run such low pressures in their tires that they get rim strikes, so I would add checking the rim bead edges (for clintchers of course) for dings. And double check that if they are carbon rims.
Another way to get rid of your used bike is to donate it to your local non-profit bike collective. You can then deduct the fair market value off your taxes (check with a tax professional to be sure).