Chain Cleaning, Wheel Truing, Outsmarting Ill-Fitting Parts
Pro mechanic Steve Gravenites of Gravy Pro Wheels has a funny saying. It goes something like this, “Bicycle drivetrains are like bathrooms – keep them clean and cleaning is easy; let them go, and the job becomes miserable.”
Gravy’s tip is the key to keeping your chain from ever becoming a grimy mess. All you need is a rag, like that T-shirt you got at the [insert long-ago concert here] in 19xx. Simply grab it, drape it on the lower run of chain beneath the chainstay, squeeze and hold it. Then hold the right crankarm with your other hand so it can’t move, and pull the rag backwards to clean that section of the chain.
Rotate the crank to bring the next section of chain into the rag and pull again. Move the rag around each time so that you’re wiping with clean cloth. Then repeat the process until you’ve removed all grit and grime from the chain. Depending on how dirty your chain was, you may be able to use your rag again. If not, toss it.
This only takes a few minutes. It cleans the gunk on the outside of the chain off, leaving the important lube in-between the moving parts and a finer film of lube on the rollers and sideplates. If you’re worried there isn’t enough lube, rub the links with your fingers and see if any lube comes off. It probably will, meaning you’ve got lube for riding. If it feels bone dry, you should apply more lube, wait several hours for it to penetrate and dry, and then wipe off any excess.
If you get in the habit of cleaning your chain like this, I think you’ll find that that it will never get too gunked up. Plus, your chainrings and derailleur pulleys and cogs won’t become filthy, either. Clean chains wear the rings, cogs and pulleys the least, which is another good reason to keep your chain clean.
Tip: A drivetrain that seems to be grimy all the time is a sign of using too much lube.
Wheel truing for dummies
A lot of even experienced roadies think they’re dummies when it comes to wheel truing. They’re afraid to try because they’ve seen the fancy truing jigs pro mechanics use, or they’ve heard of how important it is to tension wheels correctly, or they’ve seen a wheel being trued and it looked like black magic — like that guy that finds water for you with a forked stick.
Wheel truing can require skill in some cases. Assuming you didn’t crash and actually bend it, most of the time a road wheel goes out of truebecause a spoke loosened. And usually it’s just one spoke.
Truing a wheel like this is as easy as finding the loose spoke and tightening it back to as tight as it was before.
Tip: You’ll need the right spoke wrench for your wheel to tighten spokes. Most bike shops carry them, but they’ll need to know what type of wheel you have or they’ll need to see it. Even if you decide never to use it, by carrying the right spoke wrench, a good cycling Samaritan will be able to help you out.
You can find the loose spoke by spinning the wheel and watching for the wobble. The loose one will be in the area of the warp. Just wiggle each spoke until you find the one that moves way more than the others.
To finish the job, use your spoke wrench by placing it on the spoke nipple and turning the nipple clockwise. To not get confused about which direction to turn the nipple, bring it to the 12 o’clock position on the wheel. When it’s there, clockwise turns tighten it.
Here’s the fun part: your wheel is trued and straight once your loose spoke makes the same pitch “ping” that the spokes right next to it on the same side of the wheel make. So gradually tighten the nipple and keep plucking the spoke like a guitar string, comparing the tone it makes to its neighbors. When it sounds the same, the wheel will be true and ready to ride again.
Tip: Front wheels have equal tension left and right. Rear wheels are tensioned differently left and right. So comparing the sound the spoke makes with the spokes on the same side of the wheel is best.
Outsmarting ill-fitting parts
This trick is a cool way to outsmart something that can be highly frustrating, like a seatpost binder on a frame that’s so tight you’re afraid you’re going to scratch your pristine seatpost inserting or adjusting it, or a modern 2-bolt Shimano crankarm that’s stuck on the bottom bracket axle, tempting you to break out the big hammer and teach it some respect.
Don’t do it. There’s an elegant solution I call the penny trick. It works on single-bolt stems that are so tight you can barely get the handlebars in, too.
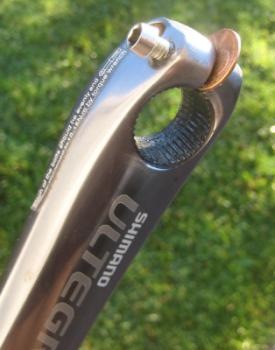 The photo shows the basic setup you want to achieve. It’s not possible with every component, but often you can remove the bolt(s), reverse one of them and thread it into the other side of the part. Just thread it in part way. Then take a penny (or a dime if a penny is too thick — washers will work, too) and place it beneath the bolt to give the bolt something to push against. Make sure the penny doesn’t protrude to the inside or it will get in the way when you install/remove the component.
Now, by tightening the bolt little by little, it pushes on the penny and that opens the crankarm, stem or seat binder wider making a formerly impossibly tight part into an easy slip-on.
Tip: This is a little difficult to explain and with different components you’ll have to look at them and figure out whether it will work. Please look at the photo to understand the principle.