 by Stan Purdum
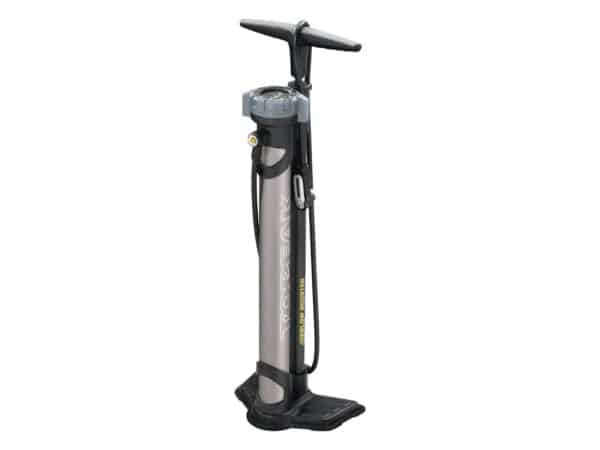
If you ride a recent model mountain bike or gravel bike, you’ve probably already dealt with tubeless tires. Road tubeless wheels and tires are also making inroads. Once you make the switch to tubeless tires on any of your bikes, you’ll discover that mounting them using just the floor pump you used for regular tires with tubes is not easy and often impossible. Seating tubeless tires correctly is best accomplished with an instant high-volume shot of air, something regular floor pumps can’t deliver. An air compressor can, of course, but that’s not something you always have available, especially when away from home.
The good news is that there are now options for standalone floor pumps that are designed to deliver that needed air shot for seating tubeless tires, so that you don’t have to buy or use a compressor.
Below are some tubeless friendly floor pumps we’ve found that accommodate both Presta and Schrader valves. Note: These also work perfectly well as regular floor pumps. They just have the additional feature of shooting a quick blast of air to help seat your tubeless tire if you need to put on a new one. So if you only wanted to own a single pump for all your bikes, one of these would still work for you.
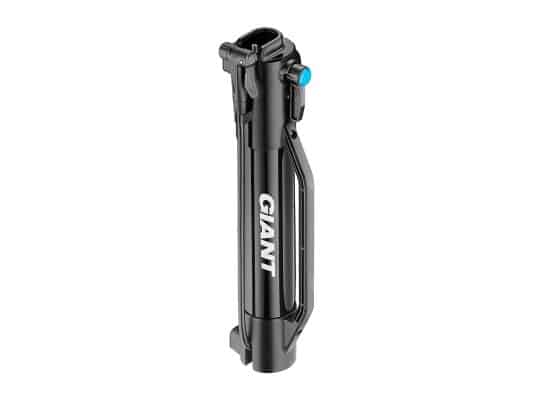
Giant Control Tanks Tubeless Inflator, $63
https://www.giant-bicycles.com/us/control-tank-tubeless-inflator
The Control Tank from Giant is made to be pumped up using a standard floor pump. It has a pressure release valve to prevent over filling it, but once filled, it delivers 1450cc of air instantly to seat a tubeless tire on the rim. Once that is accomplished, you switch back to your standard pump to inflate the tire to the desired pressure. Two feet provide a stable base and the steel tank construction offers long-lasting service.
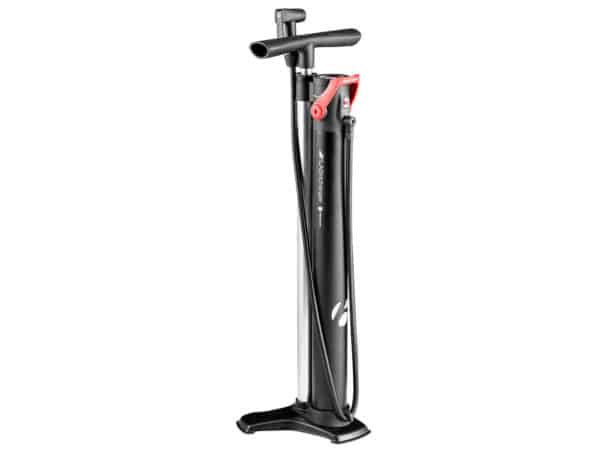
Bontrager TLR Flash Charger Floor Pump, $119.99
Trek’s Bontrager Flash Charger TLR is an all-in-one unit: a pressurized chamber to provide the instant air shot for tire-seating purposes combined with a conventional floor pump for filling the chamber and inflating the tire to the desired pressure after the air from the chamber has seated it in your rim. Both the pump and chamber are mounted on a stable base with a top-mounted 160-psi gauge.
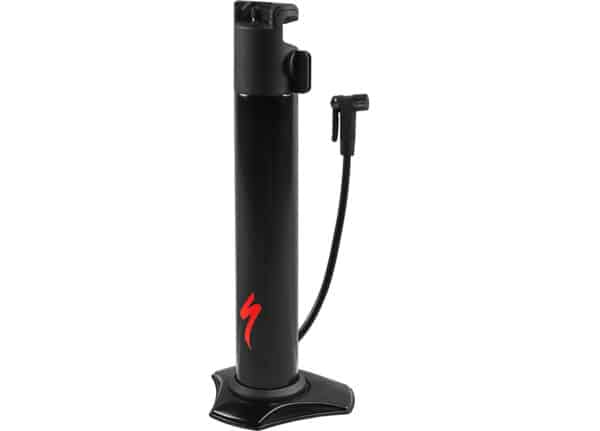
Specialized Air Tool Blast Tubeless Tire Setter, $55
https://www.specialized.com/us/en/air-tool-blast-tubeless-tire-setter/p/156624?color=232984-156624
Fill the Air Tool Blast Tubeless Tire Setter using your existing floor pump (as long as it has an operating range of 100–140 psi). The tank’s safety valve will keep you from overfilling it. Specialized says the “updated head design has 40% higher airflow, making it easy to seal the most stubborn wheel and tire combinations.” Presumably, Specialized mean it’s 40% higher than head designs on its standard pumps.
Blackburn Chamber Tubeless Floor Pump, $149.99 MSRP
https://www.blackburndesign.com/pumps/floor-pumps/chamber-tubeless-floor-pump.html
Also available on Amazon. https://amzn.to/2EsZVAn
A combo unit with a pressurized chamber you fill using the attached floor pump. Then flip the switch and all the air from the chamber floods the tire, seating it immediately. And because it’s always a good idea not to stand near the wheel in case of tire failure during the instant inflation, the Chamber Tubeless Floor Pump has a four-foot hose, letting you send the instant shot from a distance. Once the tire’s seated, flip the switch back to bypass the chamber and you can top the tire pressure up accurately with the 2.75-inch top-mounted analog gauge. The Anyvalve pump head works not only with Presta and Schrader valves but also with Dunlop valves, which are more common in Europe and Japan.
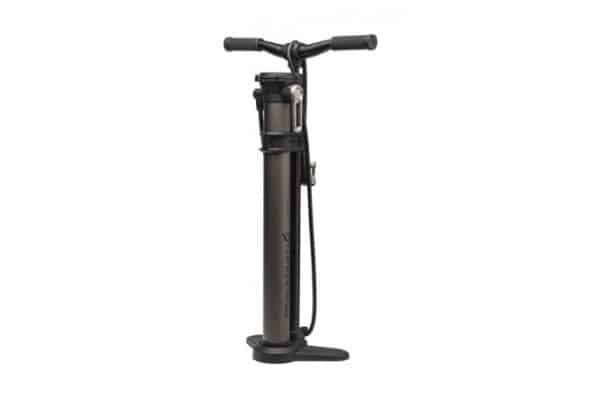
Topeak Joeblow Booster, MSRP $127
https://www.topeak.com/global/de/products/floor-pumps/822-joeblow–booster
Also available on Amazon. https://amzn.to/2U4kh8x
Topeak’s Joeblow Booster is half air compressor and half pump. Fill the air compressor chamber using the attached pump and then deliver a tire-seating shot — up to 160 psi — to the tire. When you flip the selector from “charge” to “inflate” mode, air bypasses the chamber and flows directly into your tire like a standard pump. Includes a top-mounted analog gauge, an air release button, an extra-long hose and a stable base.
Crankbrothers Klic Floor Pump Analog (or Digital) + Burst Tank
$200 MSRP on Crankbrothers’ site, but both analog and digital versions available for less elsewhere
https://www.crankbrothers.com/products/klic-floor-analog-canister
Also available on Amazon. https://amzn.to/2EqRW6O
Although Crankbrothers’ Klic Floor Pump Analog (or Digital) + Burst Tank is similar in function to other combo units in that it combines a high-pressure chamber with a standard floor pump, it has some unique features. For one, whether you choose the analog or digital gauge model, the gauge is stored in the middle of the handle and is attached to the hose which extends down the inside of the handle shaft. When you want to use the unit, you pull out the gauge and hose and attach it either to top of the burst tank — if filling that is your intent — or directly near the top of the pump if you’re using it as a conventional pump. The burst tank is removable for easy transport. Because the hose fits into the handle shaft, it is quite short, meaning you cannot be far from the wheel when you release the tire-seating burst of air.

Serfas AF-1 Air Force One Air Canister, MSRP $70
https://www.serfas.com/shop/products/pumps/af-1-air-force-one-air-canister/
Also available on Amazon. https://amzn.to/2U30SEN
Fill the Serfas AF-1 Air Force One Air Canister to 140-160 psi using your existing floor pump. Then, with the short hose connected to your tire valve, release the accumulated pressure all at once to seat your tire instantly. You can fine-tune the pressure using your floor pump still connected to the Serfas AF-1 or directly from you pump.
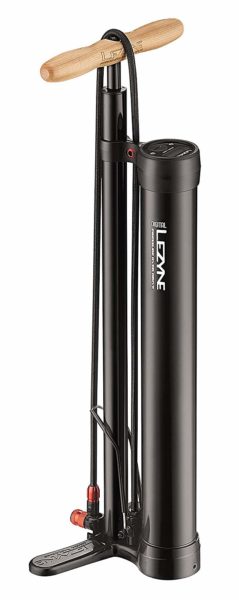
Lezyne Digital Pressure Overdrive, $164.99 MSRP
https://www.lezyne.com/product-dpumps-hv-digipressovrdrive.php
Also available on Amazon. https://amzn.to/2GYXvLs
This integrated system is designed to seat tubeless tires. The secondary chamber is manually pressurized with the attached pump. A foot-lever discharges a strong, continued blast of air through an extra-long nylon-reinforced braided hose that quickly seats tubeless tires. Available with your choice of an analog or digital gauge. The chuck not only fits Schrader and Presta valves, but also functions as wrench to unscrew removable stems from Presta valves, allowing you to inject slime through that portal.
While the Pressure Overdrive can be used as a standard floor pump, Lezyne states this caveat: “When using the Pressure Over Drive as a regular pump, air has to fill the chamber before it will start to fill an empty tire/tube. This may take numerous strokes before the tire/tube begins to inflate. When topping off a tube/tire that already has pressure in it, the chamber will have to reach the same pressure the tire/tube is at first before it will begin to inflate it further.”
Thanks for the product descriptions but the article is categorized as a “Review”, do you have any experience with how they actually work in real life? It would be helpful to know how well they did or did not work.
We are working on obtaining some of these for detailed reviews and hope to have some individual reviews of them on the site pretty soon.
Having converted to tubeless tires 5+ years ago on two different road bikes, I’ve had a fair amount of trial and error experience in attempting to seat the tire beads. My experience thus far supports the notion that no ordinary pump can do the job. Unfortunately, I’ve also found that pumps such as those reviewed above are not up to the task either. There is little substitute for the air volume and delivery rate that an electric storage tank compressor allows…..and even then it can be a challenge depending on the brand of tire you are trying to mount. I have achieved the most success with the least amount of frustration by changing out my valves to ones that allow both the valve core to be removed (allows greater air flow into the tire) and seals without the core in place With the beads set and tire pressure below 15 lbs, these valves allow me to then add the sealant, install the valve core, and bring the tire up to pressure.
John, thanks for your thoughts. Please tell us what valves allow for a seal without the core in place. I too use road tubeless and would find these invaluable. Thanks
The valves that I mentioned are to be found at http://www.milkit.bike.
I know that no manufacturer would ever endorse this idea, nor would any bike mechanic likely endorse it, but the old car mechanic technique of starter fluid and a flame to seat tires has worked for decades. Can see fluid doing damage to the resin in carbon fiber, but that’s just an assumption. Anybody tried this on tubeless bike tires?
There are reasons some tubeless tires don’t seat and seal easily during installation. The floor pump is often blamed. But in reality with any floor pump that actually works, you can usually seat and seal tubeless tires. BUT here’s the thing: you must make 100% sure the sealing system is actually working correctly. That’s the tire, rim strip or tape and sealant if it’s used in the system. If any of these aren’t working correctly, the floor pump’s individual bursts of air won’t work because they leak out right away. But it’s not the floor pump’s fault, it’s the leak in the system – the tubeless setup not sealing. When you make sure the system will seal itself, the floor pump will work.
One trick that can work is to first mount new tubeless tires with a regular inner tube and let them sit and set to the rim overnight. Then you only remove one side of the tire to get the inner tube out and install the tubeless valve and sealant (if used in the system). Pop the tire back on and with luck that side will go back where it was too and be seated. Now, since the tire is seated, it should seal when you use your floor pump.
Good luck. If all you have is a floor pump, this trick can save the day on stubborn tubeless tires. But keep in mind that if the rim strip is moving out of place exposing the rim holes, or if the tubeless valve stem is loose in the rim, or if the tire is not seated somewhere, or if there isn’t enough sealant, or if you didn’t shake up the sealant before installation to get the particles free – you won’t succeed until you fix it.
Jim
Thanks Jim. I’m wondering if you could field my question two posts above yours. I know of no valve that can be sealed with the core removed which the reader in the post above mine says exists. I’m doubting it.
BTW, the summer sun in Tucson does wonders for softening a virgin tubeless making its installation much easier.
Thanks.
Seth
Thanks for the tip about the hot sun making tubeless installation easier, Seth. Good one. Did you see that John gave you a link to the Milkit valves above? Those are valves that work without cores for tire installation. Pretty interesting design/concept.
I have used the Bontranger Flash Charger pump for several years, since it was first offered. I think it was the first pump that combined an air resevior with a floor pump to inflate tubeless tires. Unlike John’s experience, I have found it very effective for mounting road, gravel and MTB tubeless tires, all of which I use on my bikes. I also have an air compressor but I have not used it on my bikes tires since I got the Bontranger pump.
Thanks, Matt. That’s great to know. Appreciate you sharing your experience.
I agree with John above of taking the core out of the valve stem to inflate and seat the tire then you just install the valve core and pump up the tire. There are numerous places to get the removable core stems in different colors and lengths. I’ve used them on my mtn. bike for many years and work great. Link to amazon.
https://www.amazon.com/dp/B07H8BXW7P/ref=sspa_dk_detail_4?psc=1&pd_rd_i=B07H8BXW7P&pd_rd_w=CXTwx&pf_rd_p=80559f3c-f83b-49c1-8a72-40f936e9df7a&pd_rd_wg=vNCNV&pf_rd_r=N949CYPNTBQNPK90V029&pd_rd_r=410b0ca5-3eb0-11e9-aaa6-cf0e18ac2bd6
I used to use the Milkit stems for my gravel bike. The concept is great, you can test and add/remove sealant without deflating the tire (tire has to be <22psi). That part of the systems is great.
The part that didnt work well for me and led me to remove them entirely is that I had two stem failures. The stem actually started to push out of the rim due to air pressure and a failure of the seal inside the rim. That's a pretty catastrophic failure that should never happen – so they got replaced and I went back to more traditional tubeless stems.
The other issue with Milkit stems is that they stem core is proprietary to their stems. The core has a tube that holds open a rubber flapper seal at the base of the stem so it works like a normal stem. In an emergency, you could replace it with a standard presta valve core but you wouldn't be able to deflate the tire or relieve pressure unless you either had their stem or some small enough rod to push into the stem and open the flapper at the base.
I do have these on my fatbike where tire pressures are much lower and they have been fine there. Where I had problems with them was on rims set up with 30c Schwalbe G-1 speeds at about 50-70 psi. That's on the low side for road tubeless pressure. The problem for me was in the rubber slug/seal at the base of the stem not being firm enough to prevent being extruded through the valve hole in the rim at those pressures.
While I really like road tubeless in those tire sizes, checking sealant is kind of a hassle. In my climate in the summer, the sealant seems to go about 3 months or so before it needs a refresh. I saw the Milkit stems as a convenient way to solve that problem – I could top off the sealant and replace it without having to break the bead seal. But, given the reliability of the stems, I had to pass on that. What I did find was a sealant that lasts a LOT longer and, essentially, for the life of the tire given the frequency of my riding. I now use the Finishline sealant that I put it in once and that's it for the life of the tire. I've had great luck with it over the last season and a half.
Thanks for your feedback about Milkit stems.
I personally had terrible luck with Finish Line sealant and had trouble getting any of my tires to remain sealed. Then I tried Muc-Off and had similarly bad luck. Orange Guard has been the best sealant for me for road tubeless where the pressure gets higher than 50 psi, and Caffe Latex is the other sealant that has been very good for me with road tubeless. Both of those two sealants have also worked well for me on mountain bike tubeless setups too.
I agree with you that it sucks that sealant dries out so fast and I had high hopes that Finish Line would solve that for me, but I couldn’t get it to stay sealed for very long, even with massive amounts of sealant in there. I thought maybe it was just my poor mechanical technique, but as soon as I went back to Orange Guard, problem solved.
Does it require significantly more effort to “prime” one of these blast inflator pumps?. I am currently inflating to 100 psi with my standard pump on conventional clinchers with tubes.