 Jim’s Tech Talk
By Jim Langley
Some of the worst damage to your roadster can come from something that seems harmless: the bike falling over when it’s parked against a pole. I learned this lesson the hard way. It was a long time ago, but I still remember the pain.
It happened in 1971, to my first dream ride, an almost full-Campagnolo Raleigh International, with a feathery Reynolds 531 double-butted steel frame. After a ride, I parked the bike against a pole next to the little market I stopped at to get some snacks.
Not wanting to risk scratching or chipping the Raleigh’s gorgeous Chartreuse paintjob, I carefully rested the side of the Brooks Pro leather saddle against the pole. I made sure the bike was balanced, standing up straight, and perfectly safe – or so I thought.
When I came out of the store with my Coke and Snickers, I found my bike lying on its side next to the pole. There were more bikes parked around now. I was annoyed that one of these riders had apparently bumped into and knocked my baby over. But, I didn’t yet realize how much there was to be mad about.
Oh, No!
It was later at home when I saw the damage. When my International toppled, the frame must have struck the pole. Because not only was the paint on the top tube scratched, there was also a bad dent in the tubing!
I knew about the risk of scratching the paint when I parked my bike against the pole. But, I had no idea that bikes frames were so fragile that simply falling into a pole could damage them like that.
Pole Parking is Just as Risky Today
That incident happened back when almost all bicycles were made of steel. Today we have many more frame materials, such as aluminum, titanium and carbon. All can still be badly damaged from a bike falling over like mine did.
What happens is, something causes the bike to move. And because bikes rest on wheels, once they start moving they keep moving until something stops them. When parked by the seat against a pole, the most likely object the bike frame slams into is the pole.
And, it doesn’t take something or someone bumping into your bike to cause this accident. Even a gust of wind or a passing truck vibrating the pavement can make a bike move enough.
Tip:
Besides scratches and dents, you don’t want your road bike to topple because if it falls to the right, the rear derailleur usually strikes the ground the hardest. This can bend the derailleur and/or the “derailleur hanger,” the little piece of metal on the frame the derailleur is attached to. This damage is almost always fixable, but it can be expensive. So it’s best to avoid it.
The Safe Way to Pole Park
From what I see on group rides every week, many even experienced riders don’t park their bikes safely against poles. So, to help you avoid what happened to me, here are the simple steps for parking against poles safely. Please share this with friends to save them, too.
Basics:
You can lean the left or right side of your bike against the pole – your choice. You need to lean it at enough of an angle that gravity makes it want to stay against the pole. If it’s too upright, it will fall to the outside. You don’t want that (see tip #1 above).
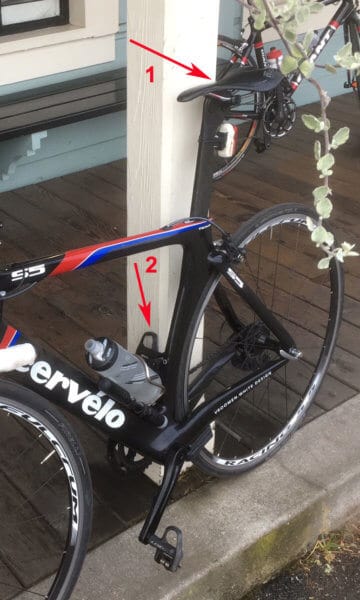
In the photo, the key points for Steps 1 and 2 are shown.
Step 1:
Find the deepest point in the curve on the side of the saddle and place that point against the pole. The shape of the saddle will keep the bike from being able to move forward because the seat is wider in back.
Step 2:
Now, “lock” the bike in place by turning the inside crankarm backwards until the inside pedal comes up and touches the pole’s front side (the pedal will probably be at around 10 o’clock). Make sure the pedal is flat against the pole, rather than having just the edge of the pedal against it.
That’s all there is to it. What makes this pole parking technique safe is that the saddle keeps the bike from shifting forward while the pedal and crank stops it from moving backward – so the bike is essentially locked in place.
The first time you try this, you will need to experiment to make sure the lean angle is right in order for your pedal to come up and rest against the pole. Keep in mind that the pedal can only lock the bike in place if it’s resting on the front side of the pole (the front side is the same side your handlebars will be on). Because in that position, the bike’s drive mechanism keeps the crank from changing position.
Bonus tip:
Former RBR chief, John Marsh reviewed a nifty $2.99 item called the Bike Brake that acts as an emergency brake preventing your bike rolling, which will help stop a bike from falling over, too. https://bikebrake.com/
As an important final note, this safe pole parking technique is NOT a guarantee that your bicycle cannot fall over when parked against a pole. Someone could still hit it hard enough to move it. An earthquake could do it, etc.
If you want to be 100% sure your bike can’t fall over no matter what, park it by laying it gently on the ground, preferably on its non-drive side (so no drivetrain parts are close to calamity). Just don’t put it where it can get run over.
Ride total: 8,996
I learned that trick for leaning the bike against a pole many years ago myself, glad you shared it.
My touring bike came with a different type of brake lock, it’s small wedge shaped plastic thing that goes between the gap that the brake lever makes between the lever and the body of the brake lever which then locks the lever so that the front brake is applied. The piece is connected to the brake lever by a short length of cord. There’s no name on this thing so not sure what’s it’s called, plus it’s probably old since it was already attached to a 85 Schwinn Le Tour Luxe when I bought it very slightly used a few years ago. Of course all one really needs is one of those short thick round hairbands and it’ll do the same thing.
Thanks, Frank. That plastic gizmo you had that goes into the brake lever and locks on the brake was an accessory made by Blackburn if my memory serves me right. I used to use those back when they were available. They worked nicely. I tried to find a picture of one online but couldn’t turn anything up. I might actually still have one at home. If so, I’ll share it.
There was also the Rhode Gear Flickstand, a little device that attached to the down tube and performed another bike stability trick. The Flikstand had a little wire loop that you’d rotate out so that it jammed into the front tire. It would keep the wheel from moving left/right and also prevent the wheel from turning. It looks like you can still buy these on ebay and if you google on Rhode Gear Flickstand a lot of photos will come right up. Cool little device that put Rhode Gear on the map.
You are right that a stout hairband (and other wraparounds) will also hold the brake on.
Thanks!
Jim
There is a far better tool than a BikeBrake, y’all. Not that the BikeBrake is a bad product, but it only solves one problem…preventing the front wheel from rolling forward or backward…the handlebars can still turn and allow the bike to fall over. This is especially true on a loaded touring bike. Instead, buy a cheap snap closure dog collar and fasten it around the wheel and down tube to act as a front brake lock and prevent the handle bars from turning. Clip the collar to the handlebars when not in use and viola! the front wheel cannot roll forward or back and the handlebars cannot turn left or right. A strip of double sided velcro will do the same thing even cheaper; keep the fuzzy side to the wheel and downtube to prevent scratches!
I find the cheapest and best way to protect my bicycle when leaning against something is to use a piece of Velcro long enough to wrap around the down tube and the rim of the front wheel. It not only keeps the bicycle from moving back and forth, it also keeps the front wheel from turning. Cheap and easy. You can wrap it around the rails of your saddle when not in use.
A short Velcro strap, or the locking straps from my old cheapo roof rack are perfect for holding the brake levers in the in position – and easy to carry. A single strap will keep the front brake engaged which is 90% of the problem when parking a bike upright
More than seven years down the road from reviewing Bike Brake, I still swear by it. It is just so super simple and effective. It’s a $6 solution that will last for years and, yes, it’s better than a rubber band. Buy a color that matches your bar tape, put it on your bar right behind the front lever, and it totally blends in and is exactly where you need it when you want to lean your bike against anything.
That’s the key. You don’t need a post to hold the bike in place by the seat. Just lean the opposite side of the handlebar against anything (a wall, post, car, railing, whatever), and the bike will not move — nor will the bar turn and let the bike fall over (which dj mentioned as a possible issue; it’s not). By using the front of the bike to lean against something, it makes it perfectly stable.
Anytime I stop, I use it. I guarantee it’s faster than trying to use the seat and pedal to “lock in” the bike against a post. Jim’s method is great if you don’t have something to lock the front brake. But if you do, so much the better.
Be careful where you park also. In Dallas, due to overcrowding by rental bikes your bike could end up confiscated or in the city dump
there is yet ANOTHER way to do it, which usually works
if your bike has no fenders, lean the back tire against the pole [works on car tires, walls, trees too]
the rubber will have enough friction to keep the bike from rolling-usually
fenders may be too slick, and it may bend the fender.
wle
OMG, why not use a kickstand? So useful. There are stands that temporarily attach to the bike and weigh very little. I use an Upstand ( https://upstandingbicycle.com/ ) for my road bike and a Click-Stand (http://www.click-stand.com/ ) for my touring bike. No problems. No more leaning against poles. Oh, and the commute bike has an actual kick stand, which the local bike shop cut for me to the exact right height for my bike, given the frame size, the size of the wheels and the bottom bracket height.
I tried the Upstand and it is not up to the job for a loaded touring bike…or even for my unloaded steel frame touring bike. I donated it to the Boy Scouts.
Another great tip, thanks. When there’s no pole, an idea is to remove the front wheel and set up a v-shape self-supporting “stand” by leaning the top tube of the bike against the angled wheel.
One recent advance has made this problem even worse: electronic shifting. Without the two additional shift cables to help hold the handlebars straight, the front wheel is much more likely to flop to the side and cause the bike to roll and fall. If your bike has Di2, EPS or Etap, be extra careful when leaning it against a pole or anything else.
On my nice road “commuter bike”, I use your seat and pedal method of leaning the bike against a pole. I carry a 36″, 3/8″ vinyl-covered cable and lock around my waist that I use to secure the bike to the pole so that it doesn’t fall over and to prevent theft. I thread the cable through the rear wheel and frame and around the pole so that the bike is snug against the pole. I, also, use the cable to lock the bike to a 3/8″ eye-bolt in my garage wall to prevent theft at home. Many of our new downtown bike-racks are upside down U’s that do not reach up to the seat. To prevent leaning the bare top tube against the bike rack, I have secured 6″ of foam water-pipe insulation around the top tube, just in front of the seat tube, to prevent scratches.
Sorry for the multiple posts, folks. The site is very slow to post comments and it often appears that the attempt has failed…apologies.
A useful option for holding the brake lever to the handle bar is your glove’s strap!
Here’s an even easier option: Just turn handlebars slightly so front wheel is on one side of the pole, down tube is on the other. Lock all three with U-lock–bike won’t fall down.
An added bonus tip, take your helmet off and loop its straps between the front wheel and the frame’s down tube so the wheel stays straight and in position. Also if someone tries to quickly grab and ride off they get surprised.
One other possibly useful tip. I cut a couple of strips from an old inner tube (1/2-3/4″ wide) and use them to “tie” my bike to some object and to secure the front wheel. They are inexpensive, light, easy to carry and work on most any size bike frame.
Parking tip I learned years ago. Good to know.
Sad story! My first groovy bike was a ’70’s Carlton-built Raleigh International. Met its demise from a Cadillac which didn’t signal a turn.
Hmm, I always lean my back wheel against a vertical structure without ever a problem.